When in Bario, you can opt to do a lot, or you can do nothing at all. It’s one place you can forget that ime exists, or you can go out and explore the Kelabit Highland life.
Young and old, depending on what you’re coming to Bario for, there are a lot things to have a go at. If you are willing to roll up your sleeves, get your hands dirty, and experience Bario life like the locals, there’s a unique Bario experience to take home with you.
Bario Things To Do is a list of things that you can do in Bario. Some things you can do without a guide, while others will need some local assistance. Enjoy.
Bario – The Kelabits Highlands is where the Baram River starts. Its rivers and tributaries feed into many rivers downstream and ends up in the Baram Delta – or Kuala Baram, (north of Miri City).
The Kelabit Highlands’ biggest river is the Debpur River. It’s a major source of food and means of transportation. In Kelabit, it’s called the ‘Paq Debpur’. In some parts, it’s rocky whitewater, and in some parts it goes deep and slow, but for Bario, it’s big.
If you’re up in Bario, you can kayak down the Debpur river and tell the folks back home that you’ve paddled the source of the great Baram River.
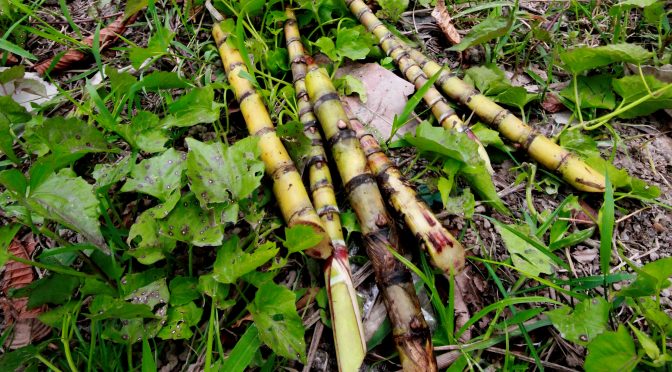
If you’re a city dweller reading this post from your mobile device in a café somewhere, here’s a question for you. As you sip your caramel coffee and nibble on your sweet cake, do you know how sugar cane is planted?
Our Sweet Life
Most of us know what sugar looks like, and what sugar cane (the largest source of processed sugar) looks like, but have you thought about how sugar cane is planted and grown?
Considering that sugar is a big part of our modern lives – it’s everywhere from the most obvious things like cakes and soda drinks, to the least direct like in food preservatives and bottled sauces – it’s interesting how little we actually know about sugar cane.
Trivia: Did you know – Malaysia’s richest man is a Sugar King?
So, it might pay to know a thing or two about planting sugar cane.
Hold your sugar craving, because this sugar cane is going to the ground.
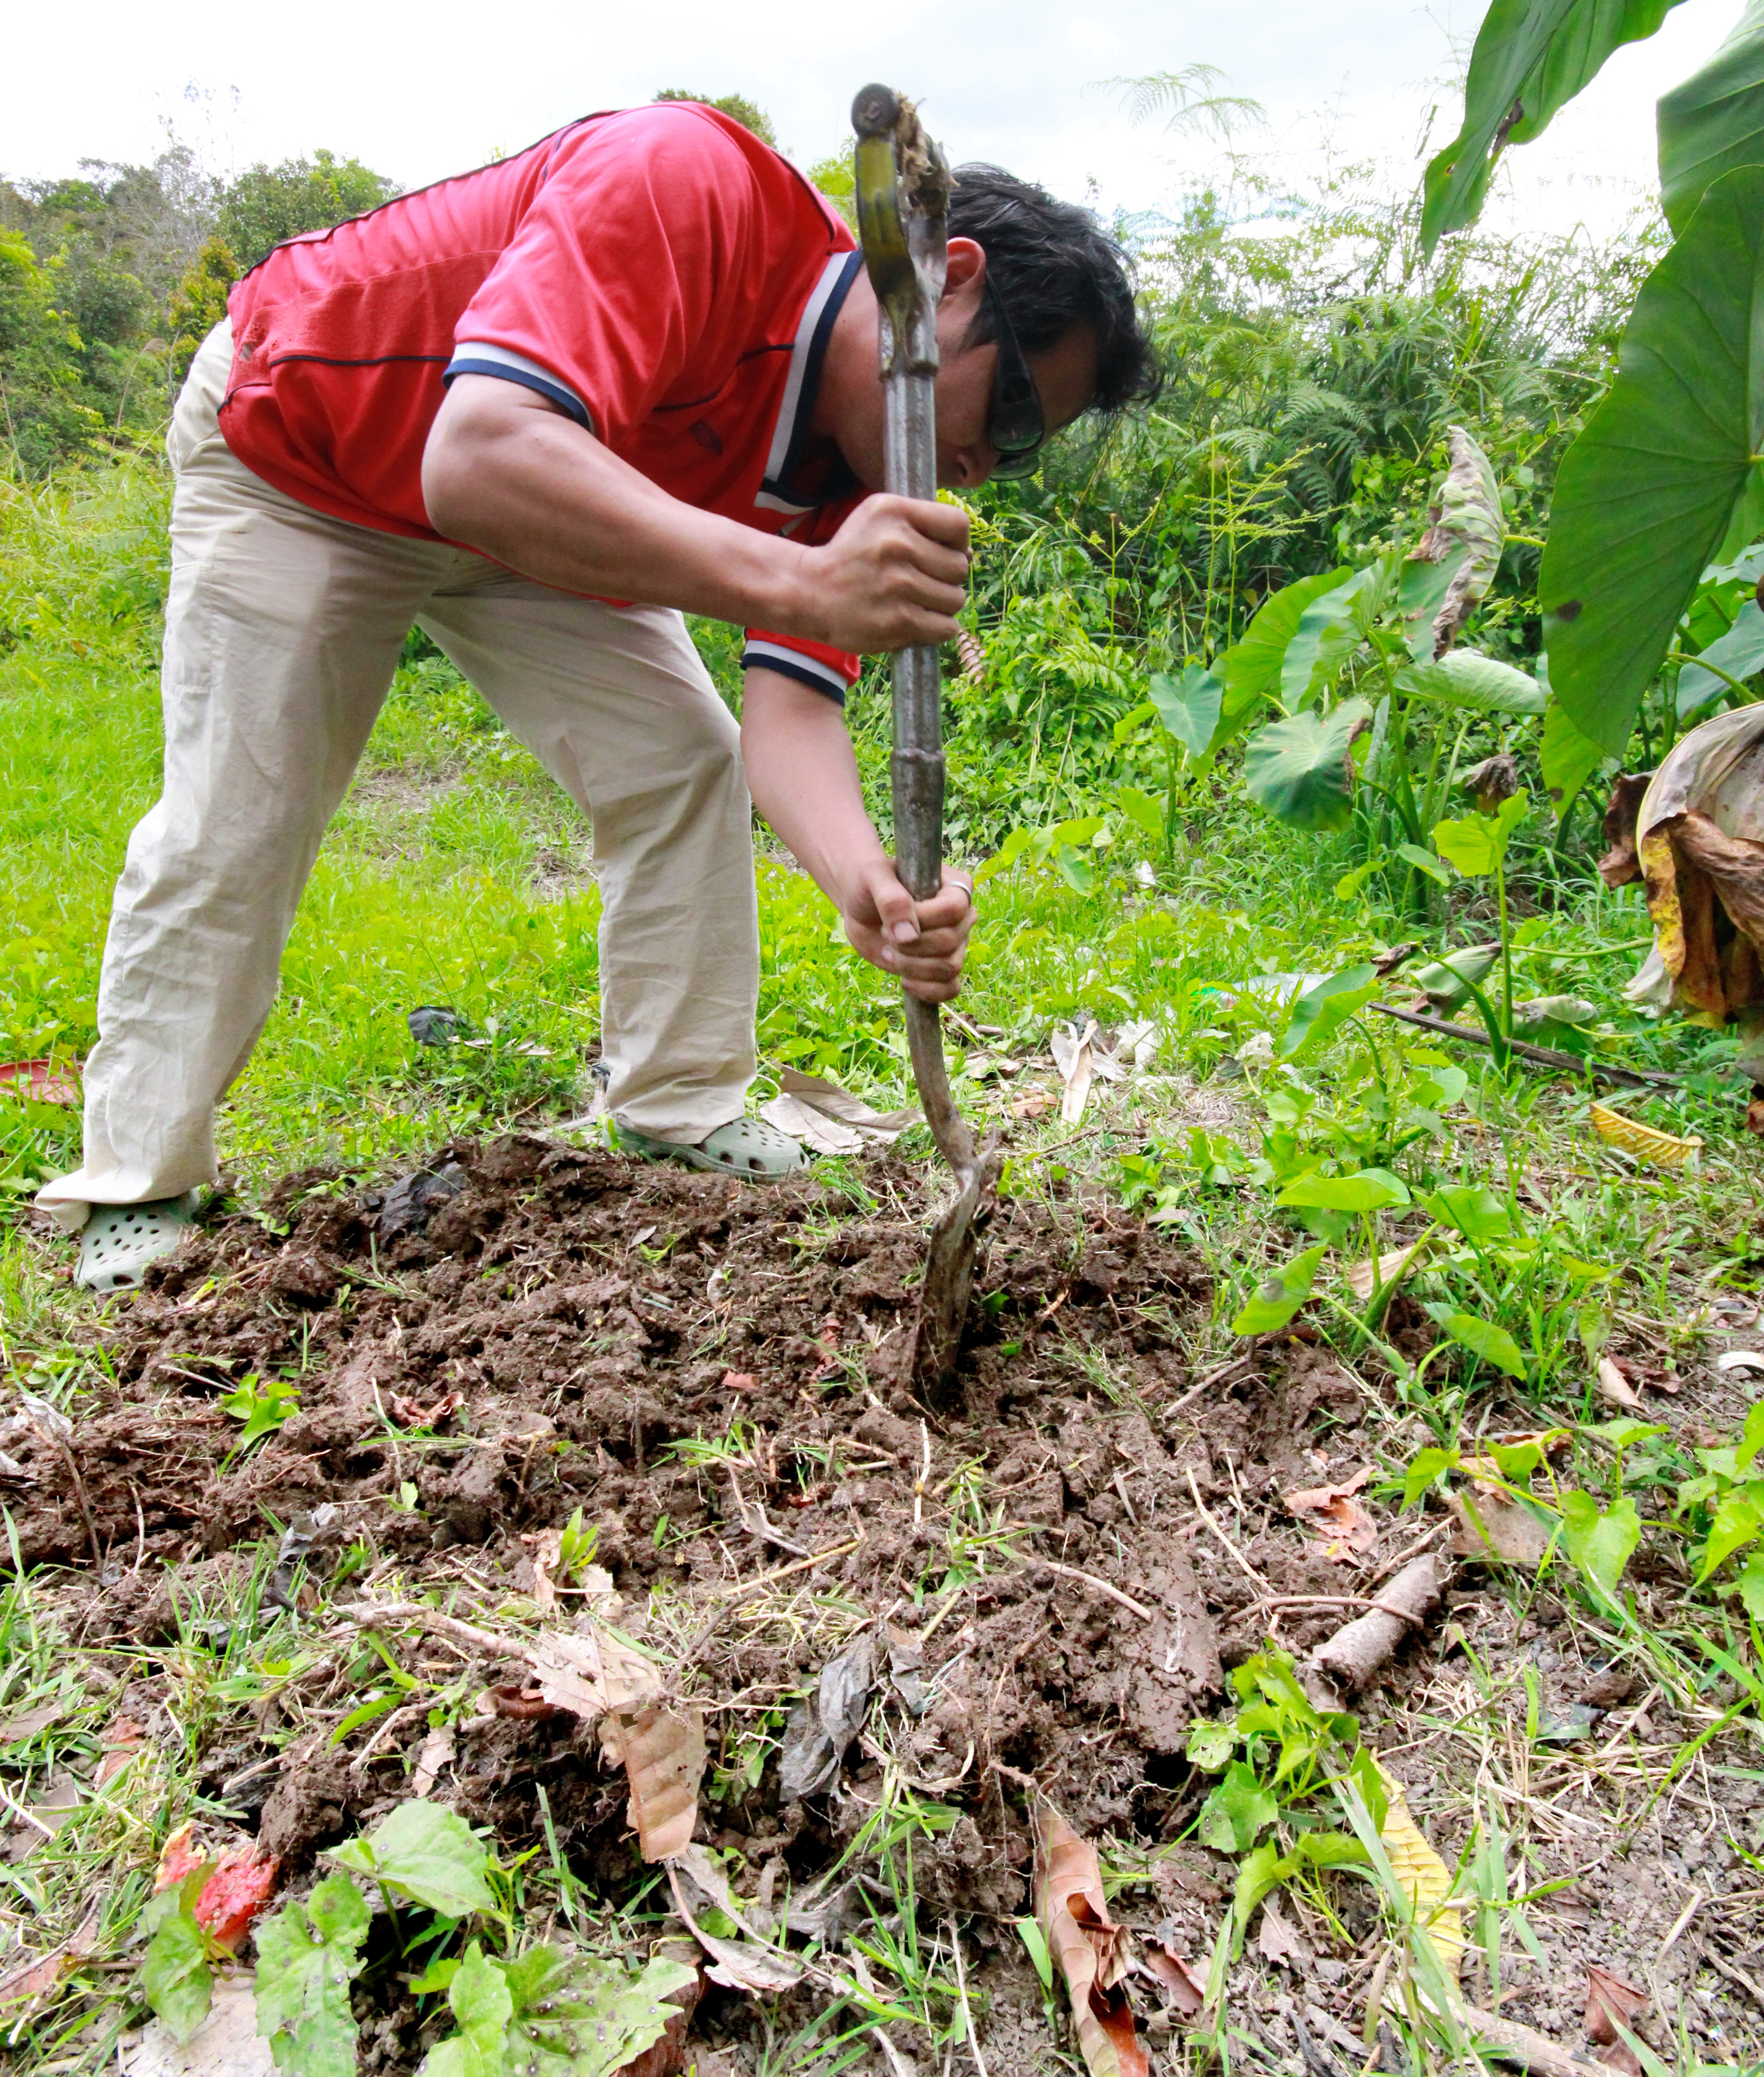
In theory, it seems elementary – put something into the soil, and it grows. Well, not really. Read the graphic instruction manual below.
Prepare your sugar bed. Just lightly plough the soil to loosen the dirt.Set them down flat on the ground. No poking needed.Lay them flat down, as many rows as you can.…and that’s how it’s done. Cover it up with a bit of soil, water it, and… now we wait.
Well, there’s actually a little more to it than four pictures, but at at least we get the general idea.
If you’d like to experience it yourself, and listen to the extra tips on how to plant and grow sugar cane, go on a Bario Farm Experience Tour. There are heaps of farming activities around, and a farming tour can be tailored to your interest.
Plant your sugar cane well enough, and who knows, you could be the next richest man in Malaysia. But if you don’t make it to Sugar Baron level, at least you’ll have a nice glass of sugar cane juice at the end of this.
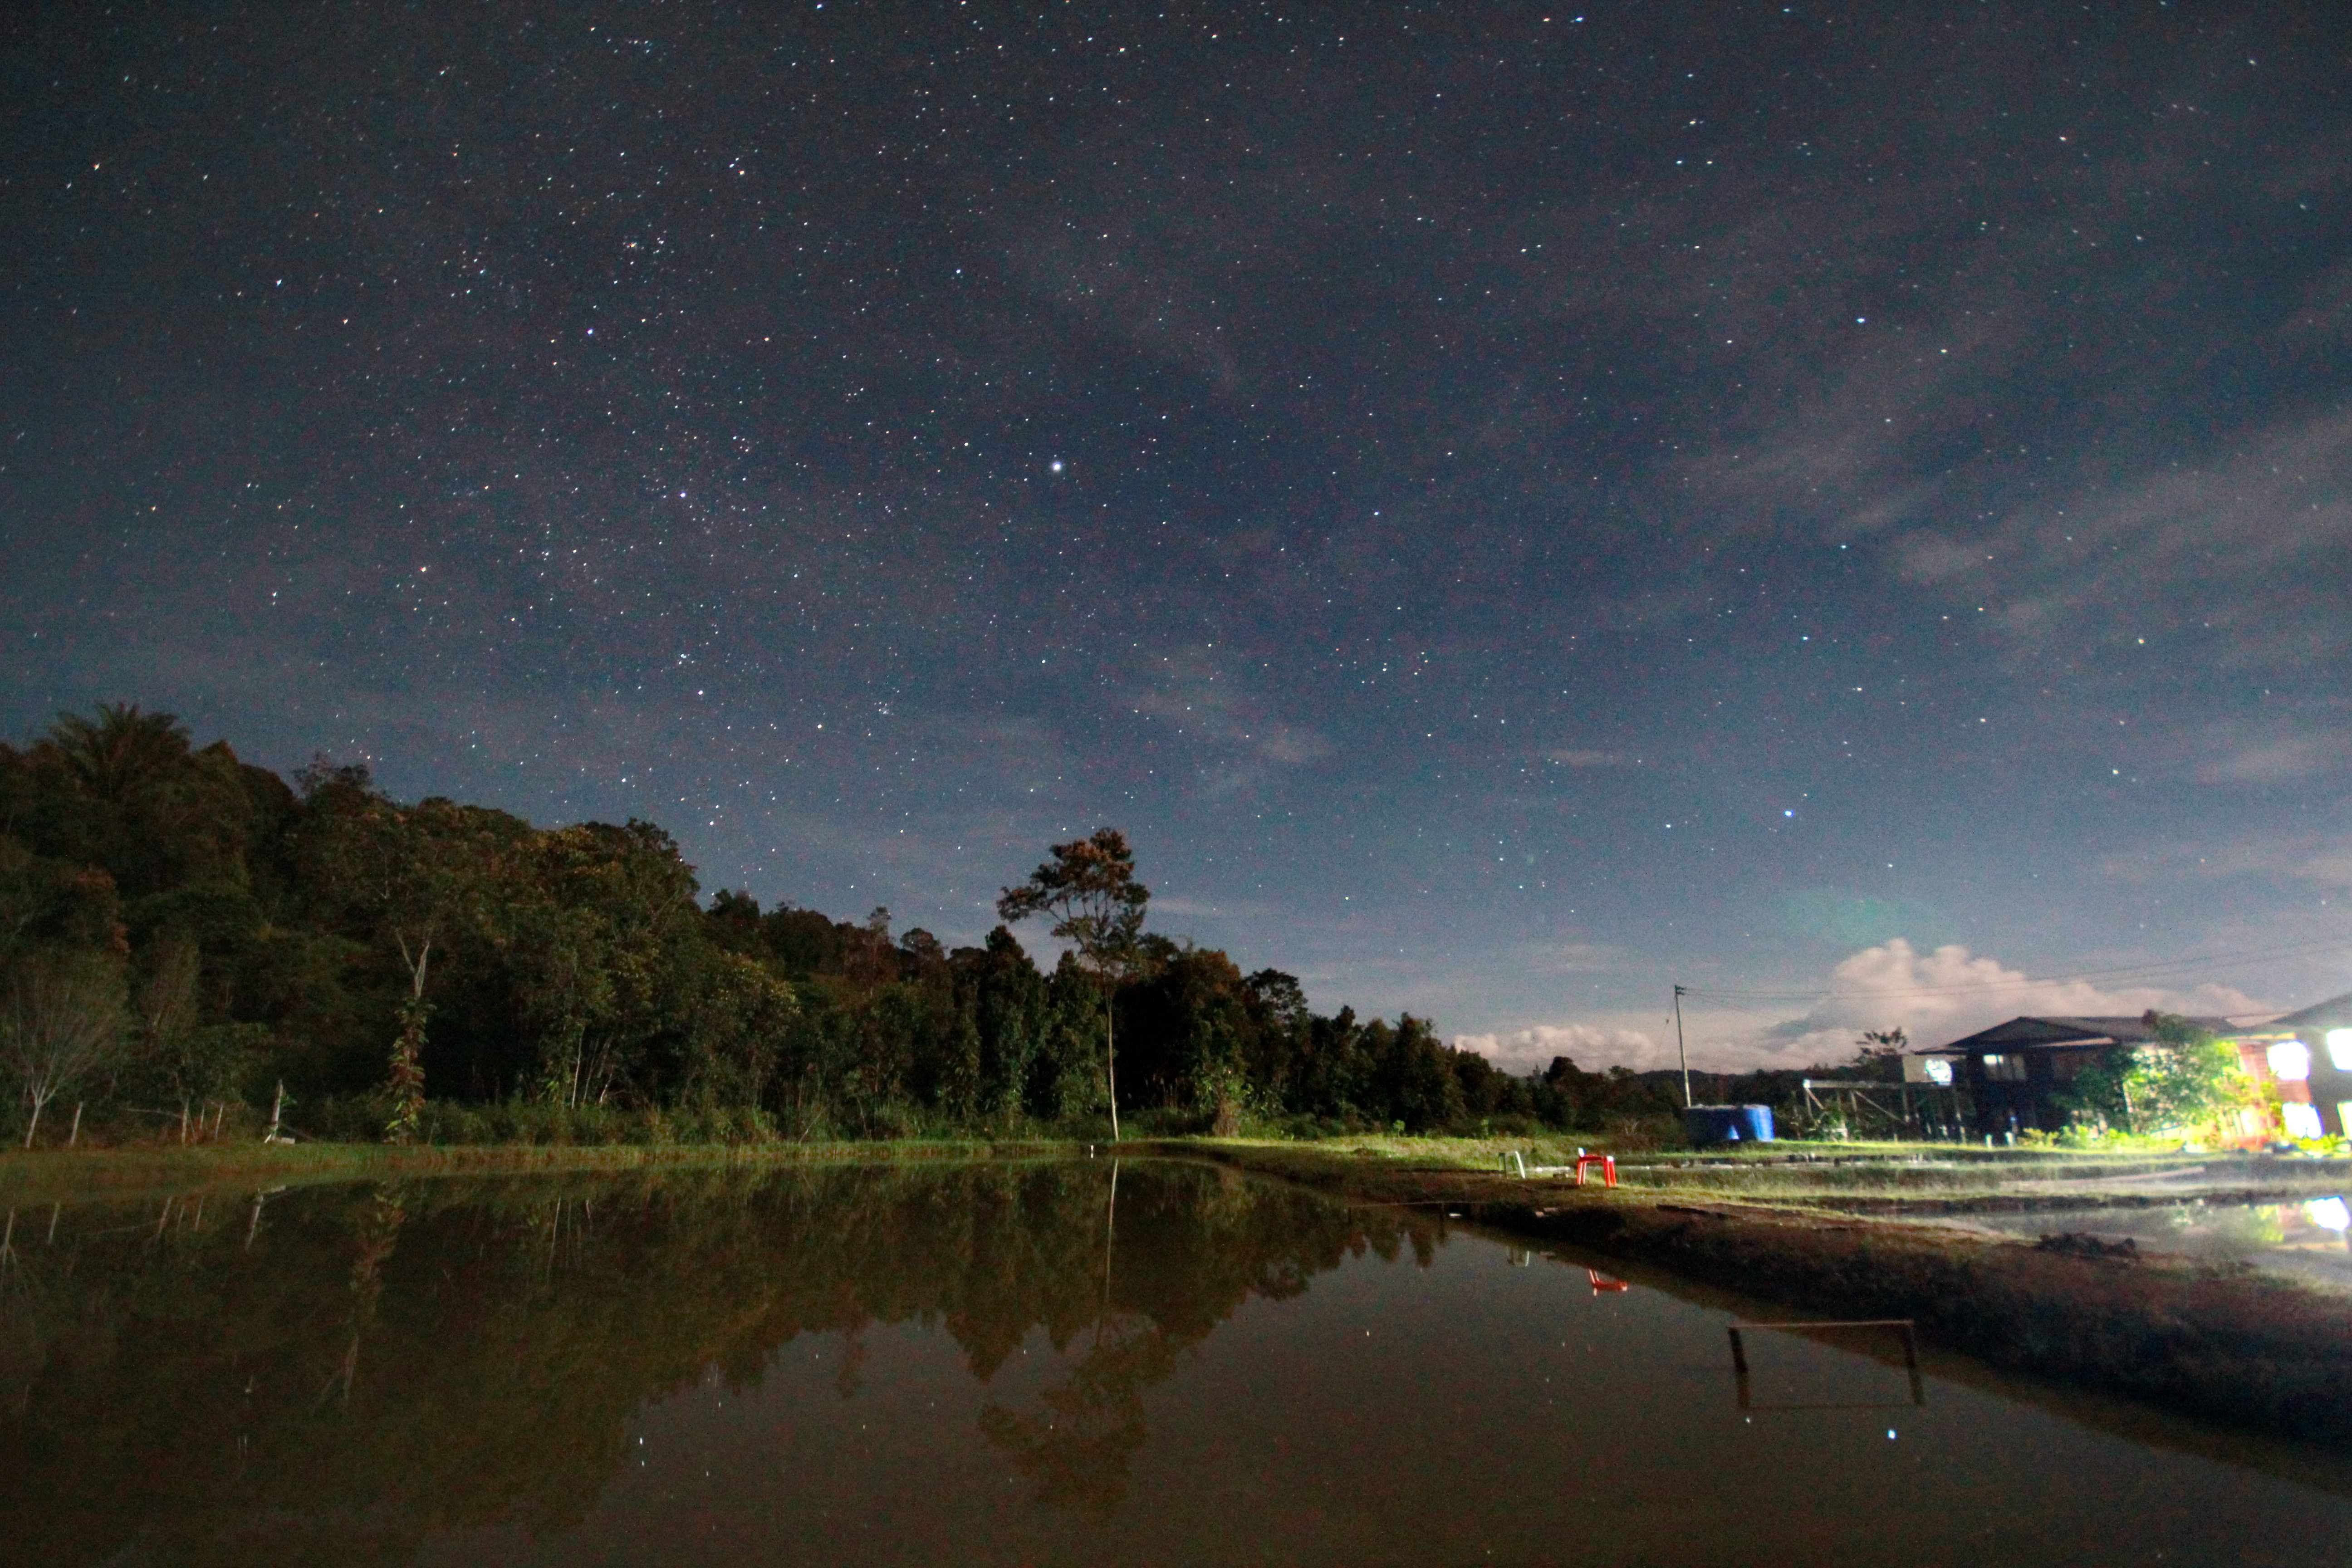
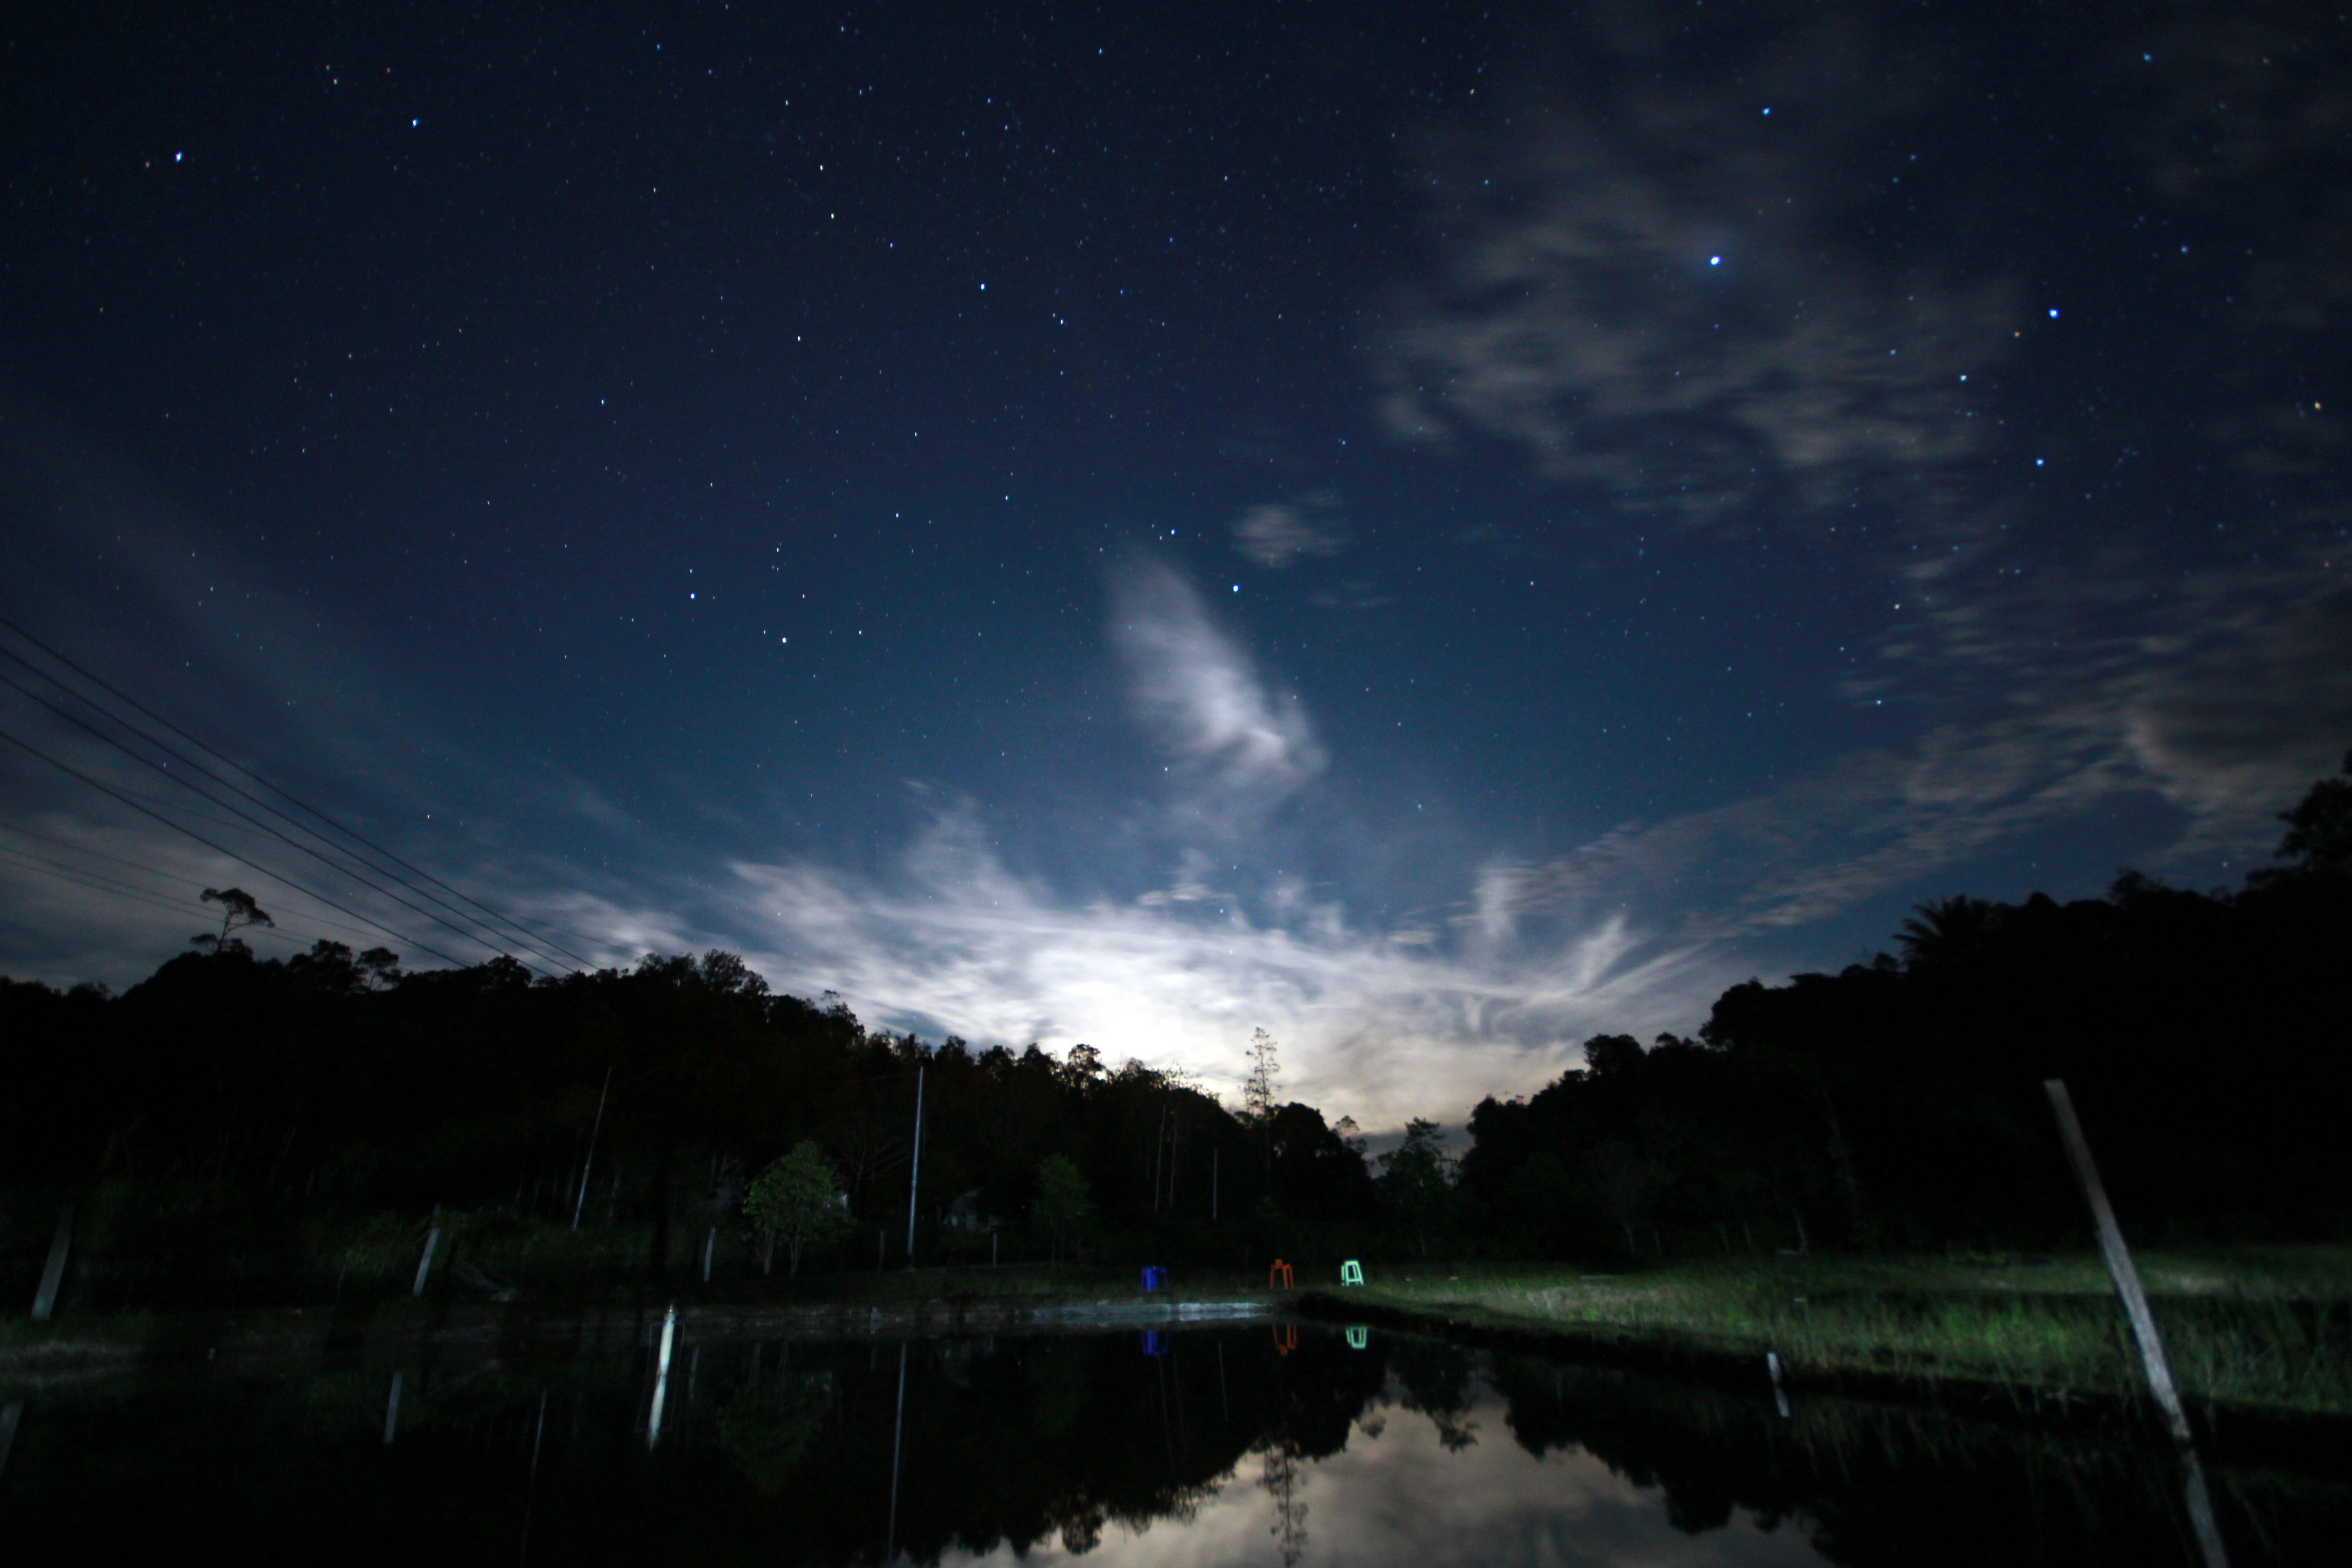
In Bario, when the sun goes down, the stars come out to play.
One would think that only professionals photographers could take night shots like these. In some ways, that’s true… a long time ago. But with the new technology found in many amateur ‘entry-level’ cameras today, it’s not that hard for a beginner to take beautiful starry-night photos like these. Of course, there are many levels of camera technology, and a high-end camera can do wonders with more ease than the low-end camera, but with the right skills, you can take great starry-night shots (official term is astrophotography) with an entry-level camera that would make your friends on FB go WOW!
THE STATISTICS SAY: 🙂
If you’ve come to Bario, chances are you’ll be carrying a camera of some sort. There’s also a good half chance of you knowing how to use only half your camera’s full set of features and potential (mostly the Full-Auto mode green box and Auto-Scene mode – sports/low light/landscape functions). And if that’s the case, you’d have missed a great opportunity to shoot Bario’s beautiful starlit nightscape (and when the street lights are fully installed in the future, you may never have the chance again).
START EASY
So, here’s a quick easy instruction on how to ‘start’ with night photogaphy and astro-photography when you are in Bario.
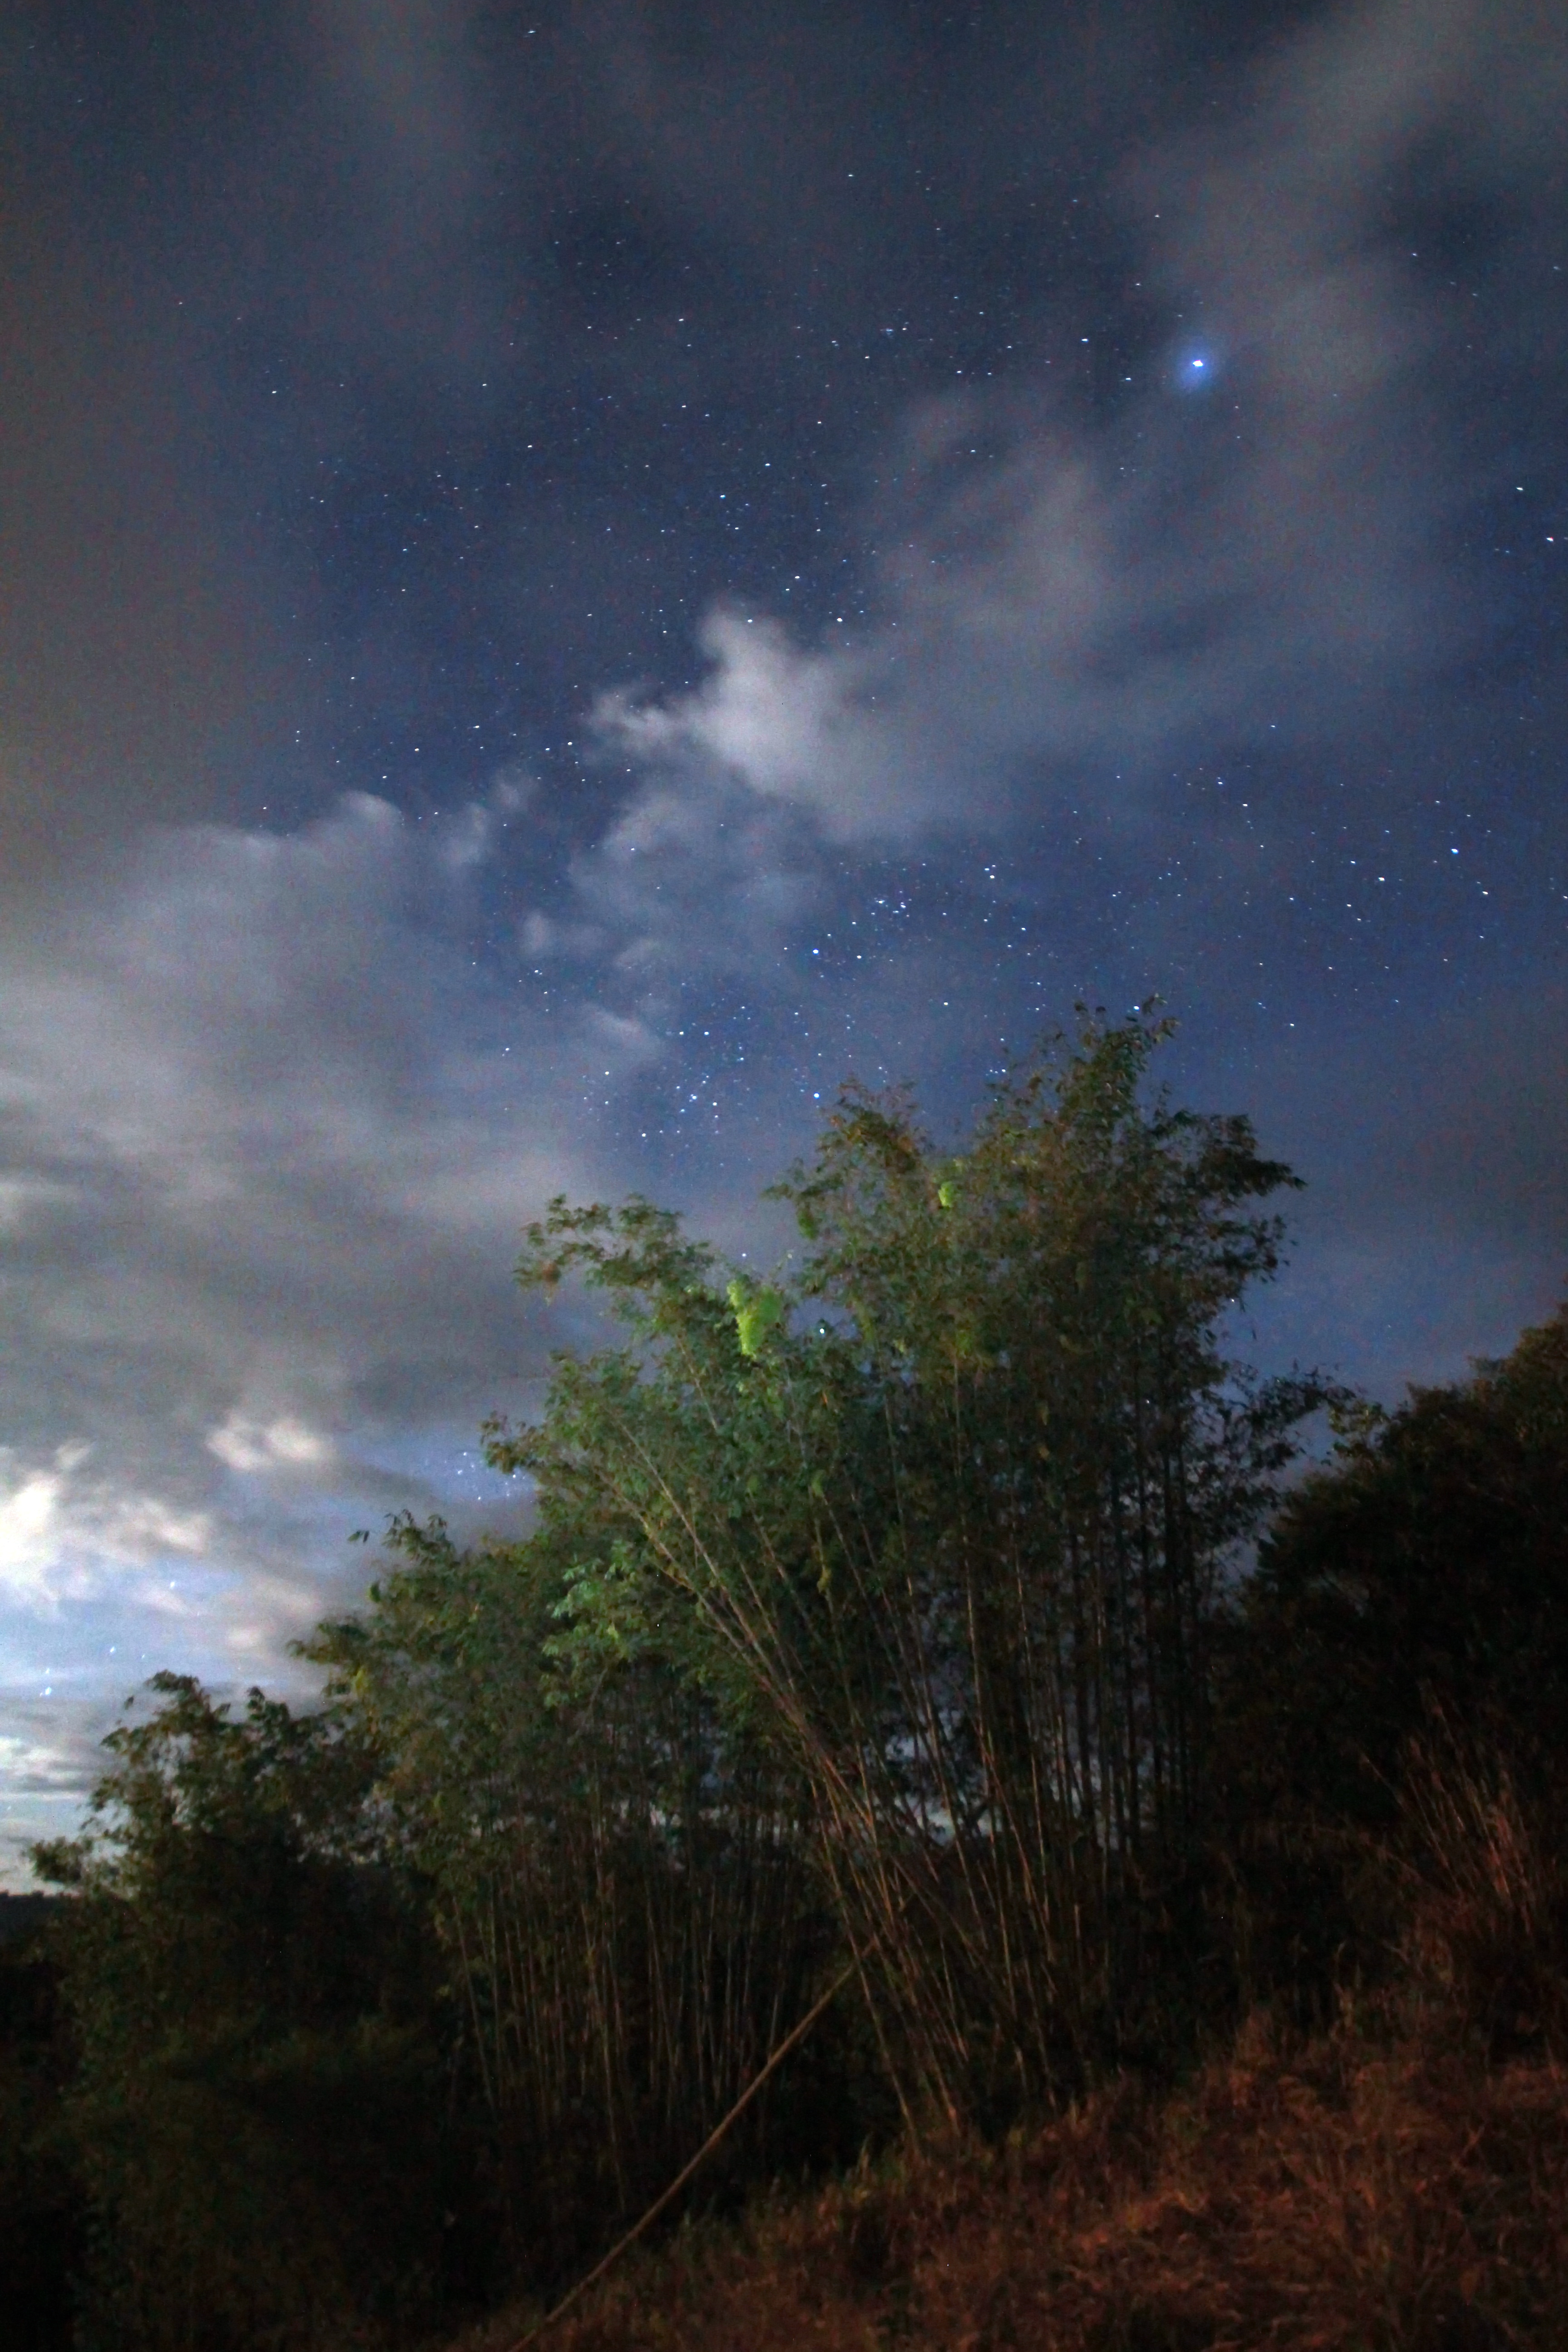
The Moon Grass
Now, entry-level digital cameras today are heaps more advanced in terms of features, control and sensitivity than they were 10 years ago, so what’s more important to a great night shot these days is not so much the quality of the camera but the quality of the eye that composes the shot, and the weather conditions of the night itself.
CHECK YOUR EQUIPMENT:
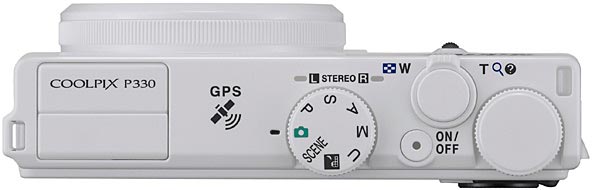
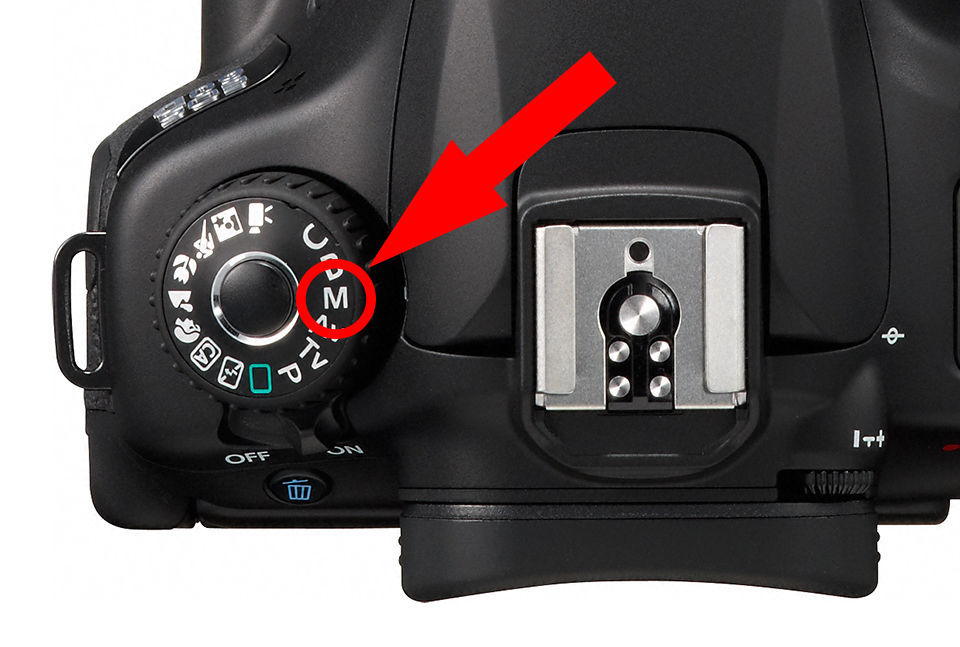
So long as your digital camera has a ‘Manual’ (M) mode (and you can also find them even in some point-and-shoot compact cameras), you already have the basic tool you need to start taking these photos. However, if your compact camera doesn’t have the (M) function on it, then you’re out of luck.
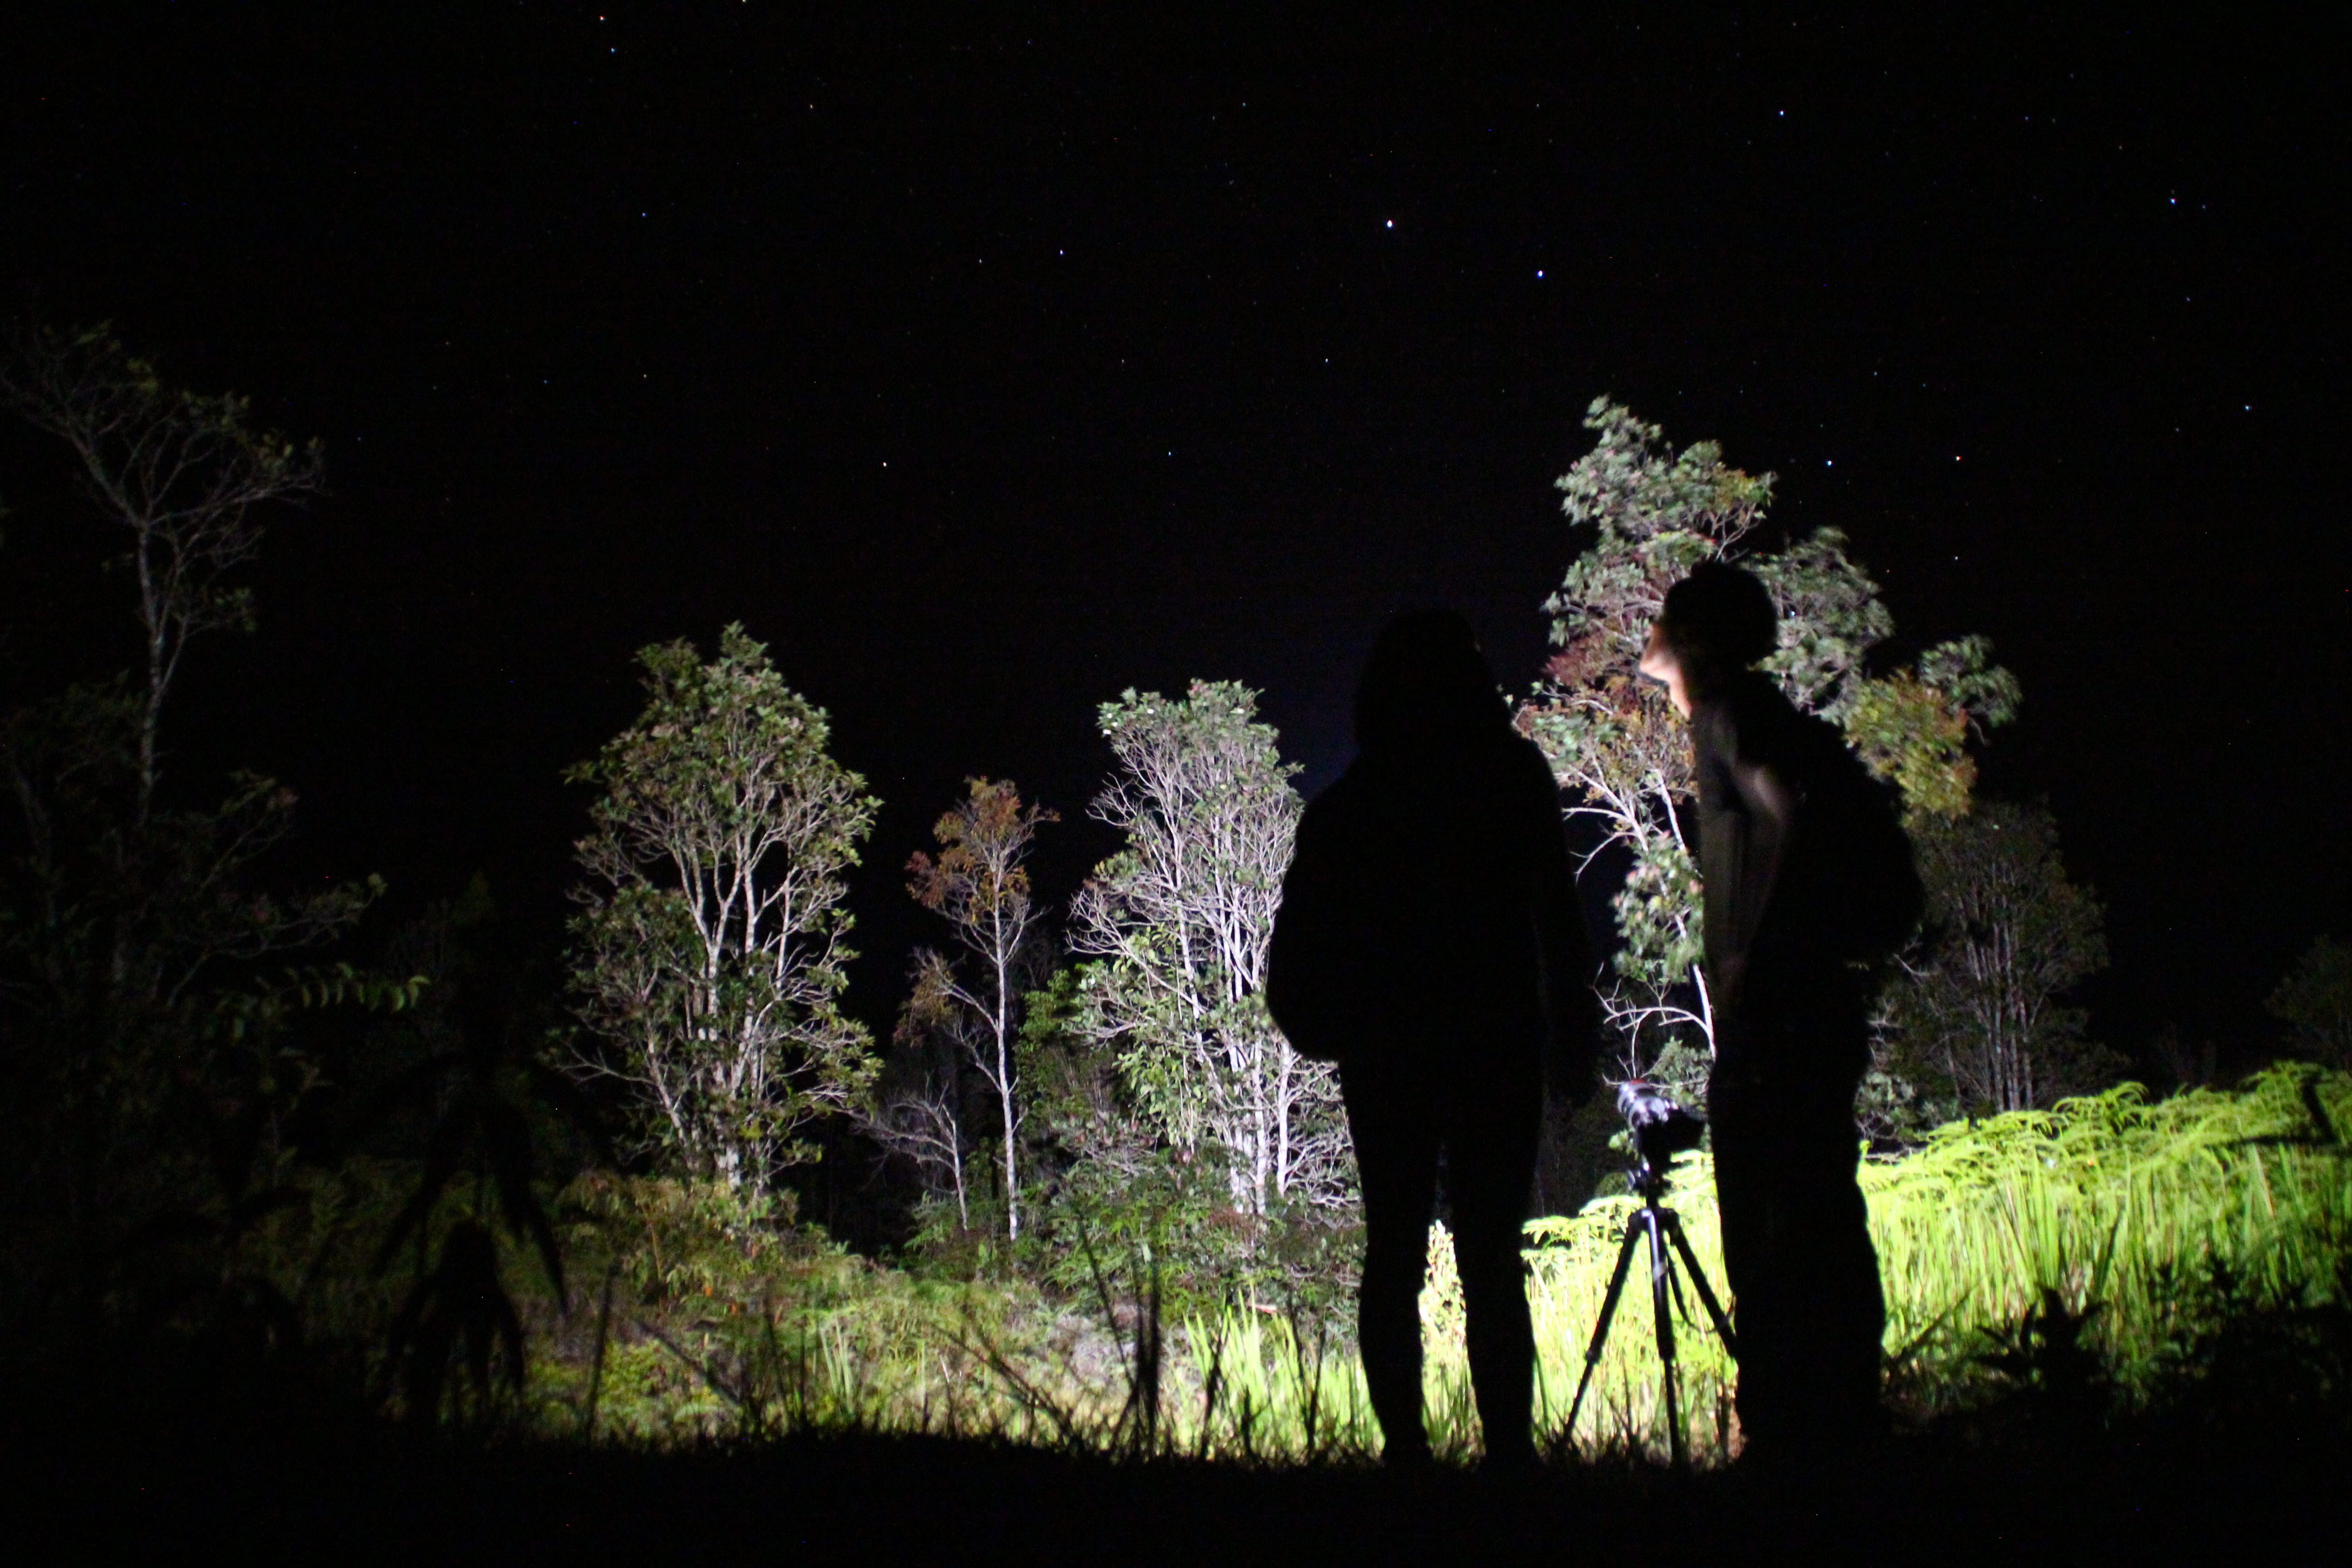
The other very important thing to have is a tripod.
Below: DSLR cameras and any Compact Camera with a ‘Manual’ (M) mode can get the job done.
Nikon compact camera with (M) mode.Canon DSLR CameraCanon Compact Camera with (M) mode.
Once you get into the (M) mode, you can control the shutter speed and aperture size.
The-4-Step-How-To on the Camera:
So, to not make this article very technical, (and just using your regular settings), let’s just start with setting your digital camera to the ‘Manual Mode’ (M).
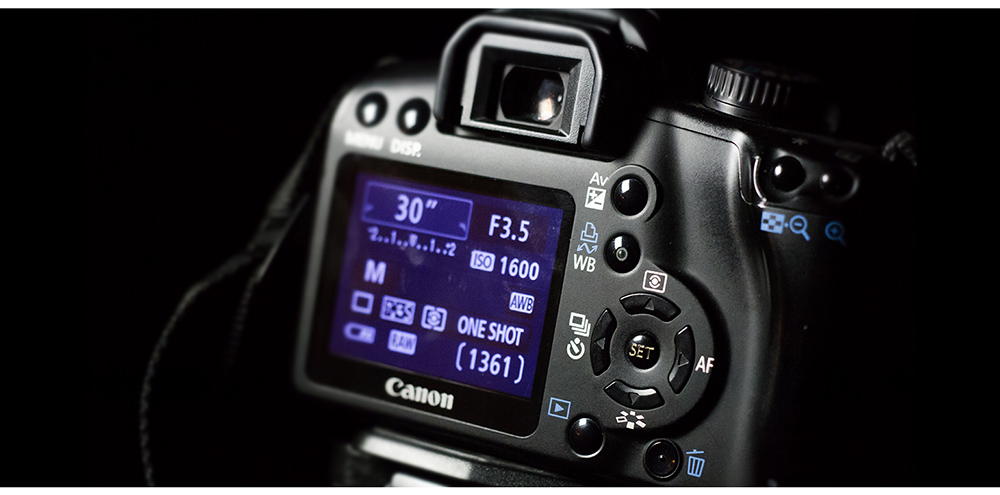
From there, there’s only 4 things you need to set properly first.* 1) Your ISO (set it to between 800 and 1600, or sometimes 3200). 2) Your Shutter Speed – Tv (set it to 30″ – it means 30 seconds exposure). 3) and your aperture size – Av (set it to the biggest – it was f3.5 on my lens). 4) Set your lens focus ring to infinity ( ∞ ).
*Note – This is a starting point. From here onwards, you can toy around with the settings (Shutter Speed + ISO + aperture) after every shot, to get best results.
(M) mode – at 30 second exposure, f3.5 aperture, and ISO1600
Once you’ve adjusted the camera’s settings, it’s time to shoot the scene. Start with something, anything, with the sky as the background. Compose your scene, or just point the camera in a direction you like (because it’s dark, and you can’t really see anything way in the distance).
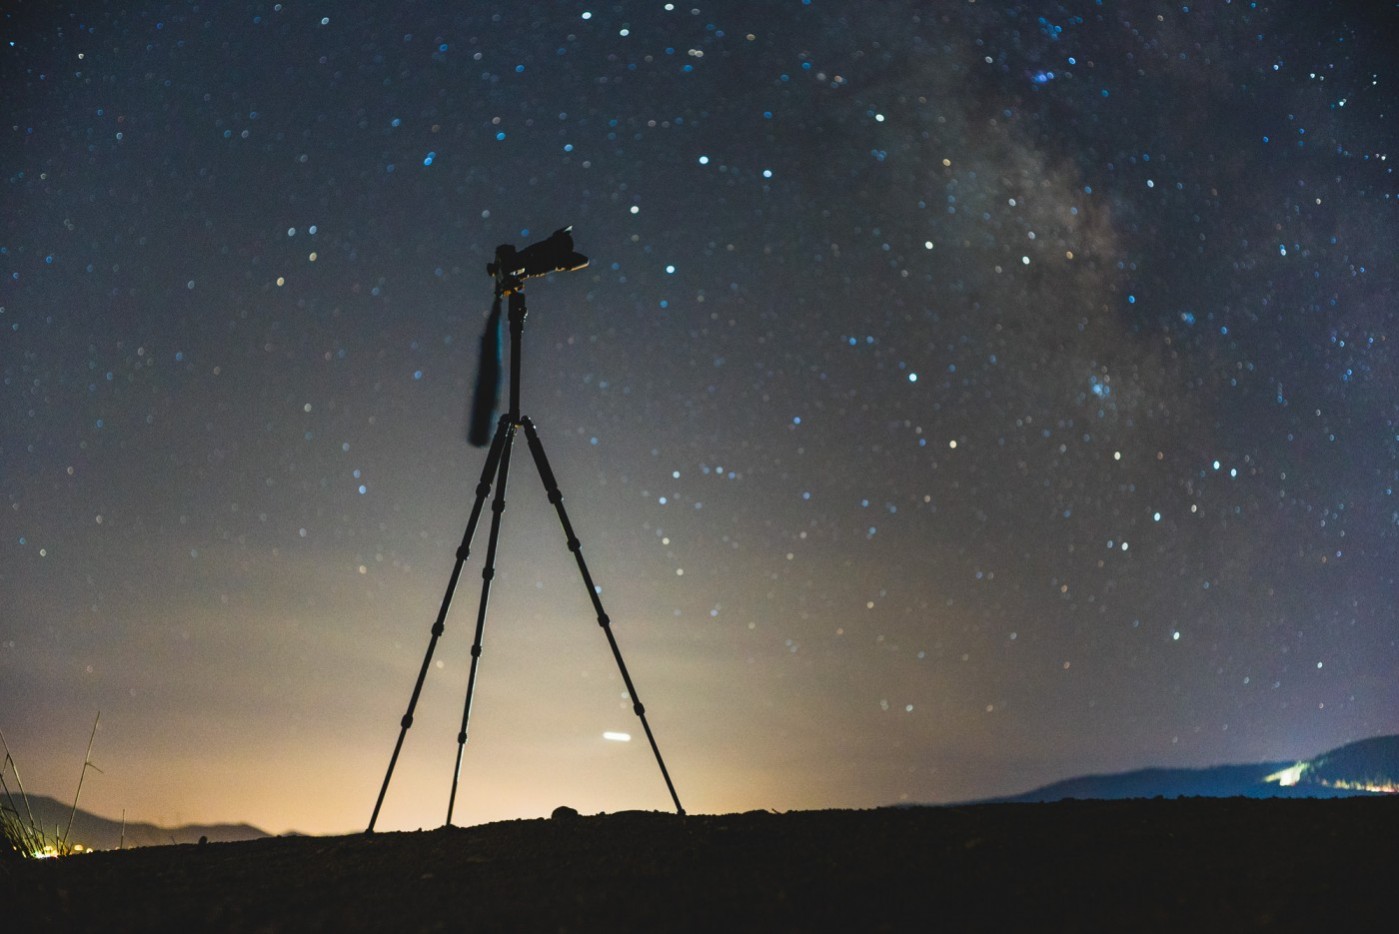
Note:The camera has to be really still for the 30 seconds. So, having a very sturdy tripod is important.
A tripod is an essential component of astrophotography. Don’t forget to bring one up.
The first shot: The Finger Trigger
Start with using your finger to press and release the shutter. (you don’t have to leave your finger on the shutter button). Wait 30 seconds and have a look at the result.
If you’re not so steady with the hands, you’ll notice that there will be some motion blur in the picture from the movement of your finger on the shutter. Some people can do it well, others not so well. If you’re one of those who can’t keep a slow and steady shutter finger, then here’s a trick.
The second shot: The Timer Shutter A very simple solution – Turn on your timer shutter release (all cameras have a timer shutter release setting – the one we use for group photos). Press the shutter button, let the timer start the countdown, and wait 40 seconds. (10 seconds for timer release, and 30 seconds for shutter exposure). Check the shot.
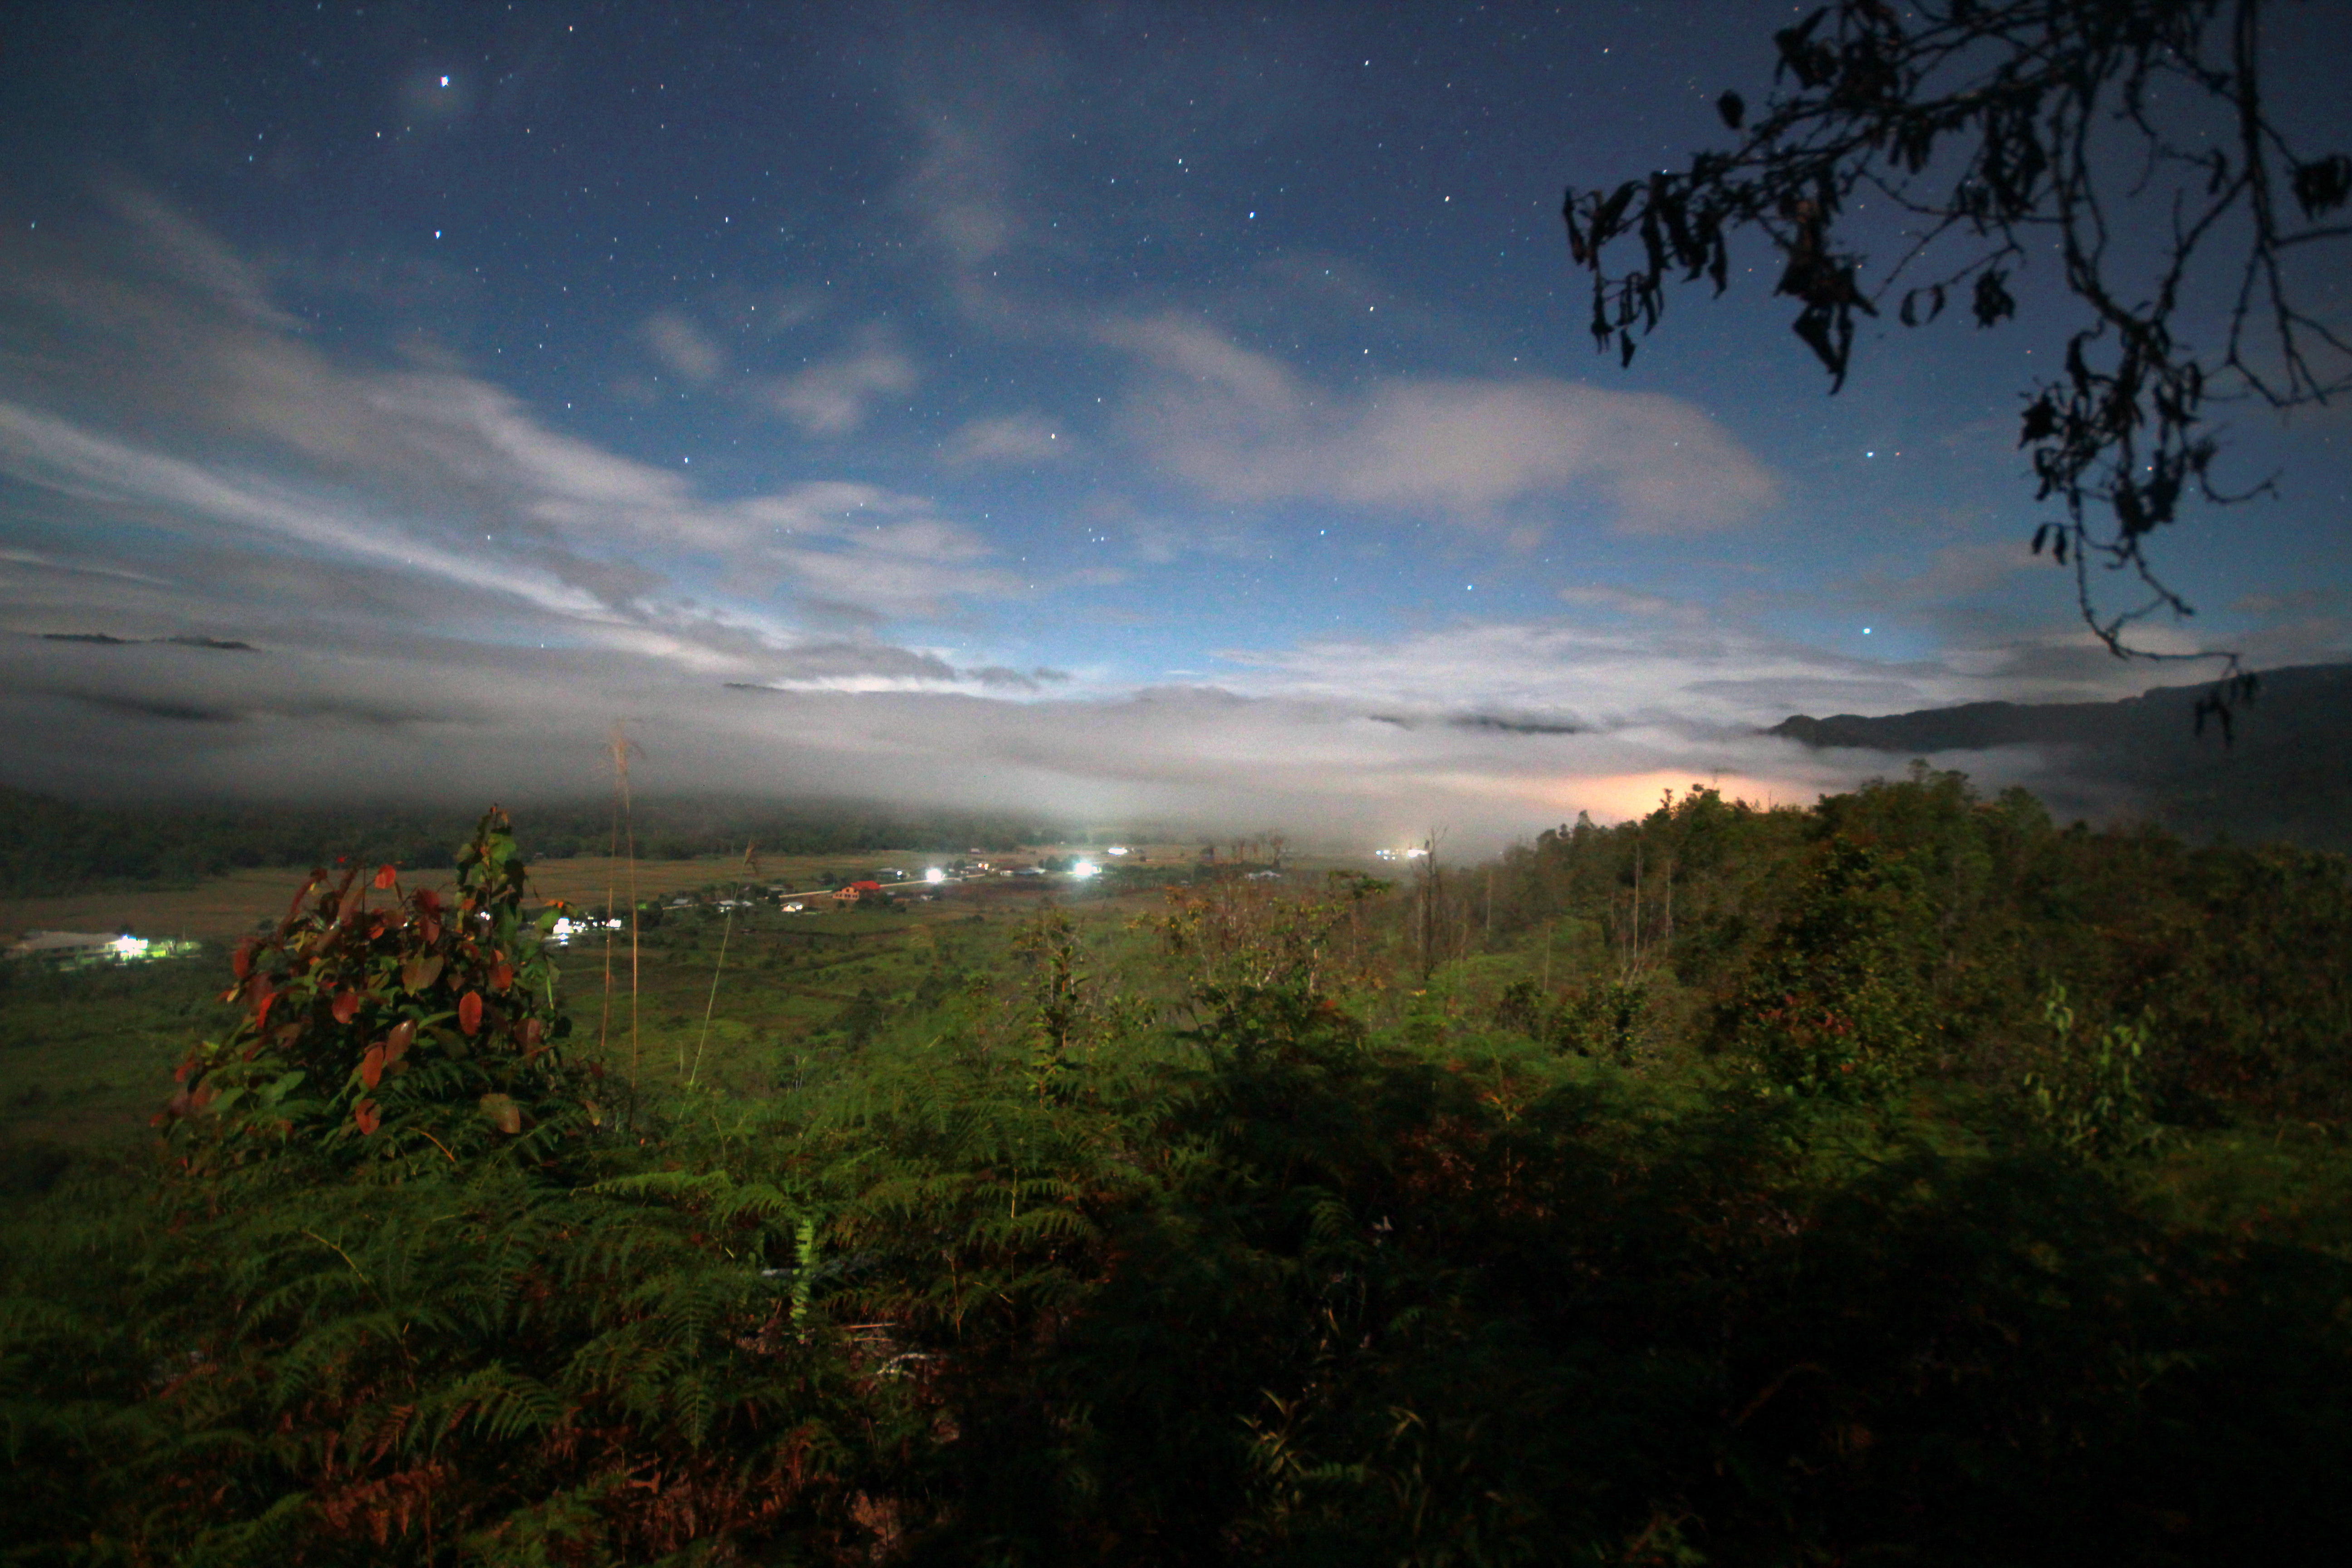
Horizon Rising
After you’ve taken a picture, repeat the process. With digital cameras, we are no longer limited to the 24 or 36 frames on a Kodak/Fuji celluloid film roll. You also get instant result on the photo you took through the LCD panel. So, if you aren’t happy with your picture, retake the shot – with a different aperture size, and shutter speed or ISO speed setting. So you can keep snapping until you get the shot you like.
Different cameras will respond differently to the settings mentioned, so try the different settings and see the results. If you still don’t like it, use another setting and see what comes out. The more photos you take, the better your odds are of getting better shots.
The Bario night scene on a full moon night.
Photography is more of an art than science, so feel free to experiment and come to your own picture perfect sense. Soon you’ll develop your own preference for a style to your astrophotography. For example, I have developed a preference for shooting the night sky when there’s a bright full moon up in the sky (mid month).
So, start with these simple steps first. Don’t expect to get it right on the first go, and you’re bound to take lots of bad shots along the way. But hopefully, there’s enough information here to help you bravely get started on it. If you find that you enjoy taking night photographs with the stars, you can then consider acquiring one more important piece for the perfect shot – a wireless remote shutter button. 🙂
I use something like this. Was RM100 in 2011, but you can get cheaper ones now.
VERY IMPORTANT TO HAVE:
Now, there’s one very crucial tool to have with you at all times, and without it, you’d be absolutely unable to do all those things above. Headlamps. You’ll need the light, and you’ll need to leave your hands free, because they’ll be doing a lot of work. Headlamps will also help you ‘paint the foreground with light’ (but that’ll be topic for another post).
Experiment and play around with your composition. Here, a hand held light source was used to ‘paint the foreground’. This was also shot ‘Trigger Finger’.
BARIO CONDITIONS: LOCAL KNOWLEDGE.
In Bario, depending on what kind of night shot you want to take, here are a few key things to take note of. On a good day, early evening (8mp after dinner) is a good time to be out shooting if you want clear skies. If you go out too late, the mists starts blowing in at about 12am-1am, and you might not be able to get a good shot as the mist blocks your view of the stars and your lens gets misted. So, go out early, and you’ll give yourself plenty of time experiment with your camera.
However, the mist can spectacularly add to a photo if you know how to shoot it. Late in the night, go up the higher hills for a spectacular shot. As the mist fills up the valley below, you’ll see a layer of cloud below, and stars above it. Suggestions are Prayer Mountain, Proposal Hill (aka Panorama Hill), and Korea Hill. These spots have good views over the valley.
Good luck!
*If you’re going up to Bario with a camera, look us up at the Lodge. We’re not quite the pro, but we’ll gladly help you make more use out of your camera on your evenings in Bario.
The viewing point on Proposal Hill (as seen from Labang Longhouse Lodge).