Are all noodle’s the same? Now, imagine this – ‘Bario Rice Noodles’.
Bario rice purists would definitely squeal “but why?”. “Bario rice is great as it is”, so they’d say. Read on to see what happens when a group of researchers try to process the very expensive Bario rice into Kway Teow noodles.
Definitely a good read if you love kway teow noodles, or if you love Bario rice, and better still, if you love both.
“The Bario rice (White) used in this study is considered
as an exotic local variety of rice with a distinctive taste,
soft texture and exhibiting a mild and delicate aroma on
cooking. This rice is as an organic produce and are grown
at high altitudes (1100 m above sea level) without any use
of artificialfertilizers.”
Curator's Note:
This post is part of a collection of academic research and publications done in the Kelabit Highlands. We'd like to sincerely thank the many academicians and institutions from all over the world that have come to Bario to experiment, document, and expand our understanding of the things around us.
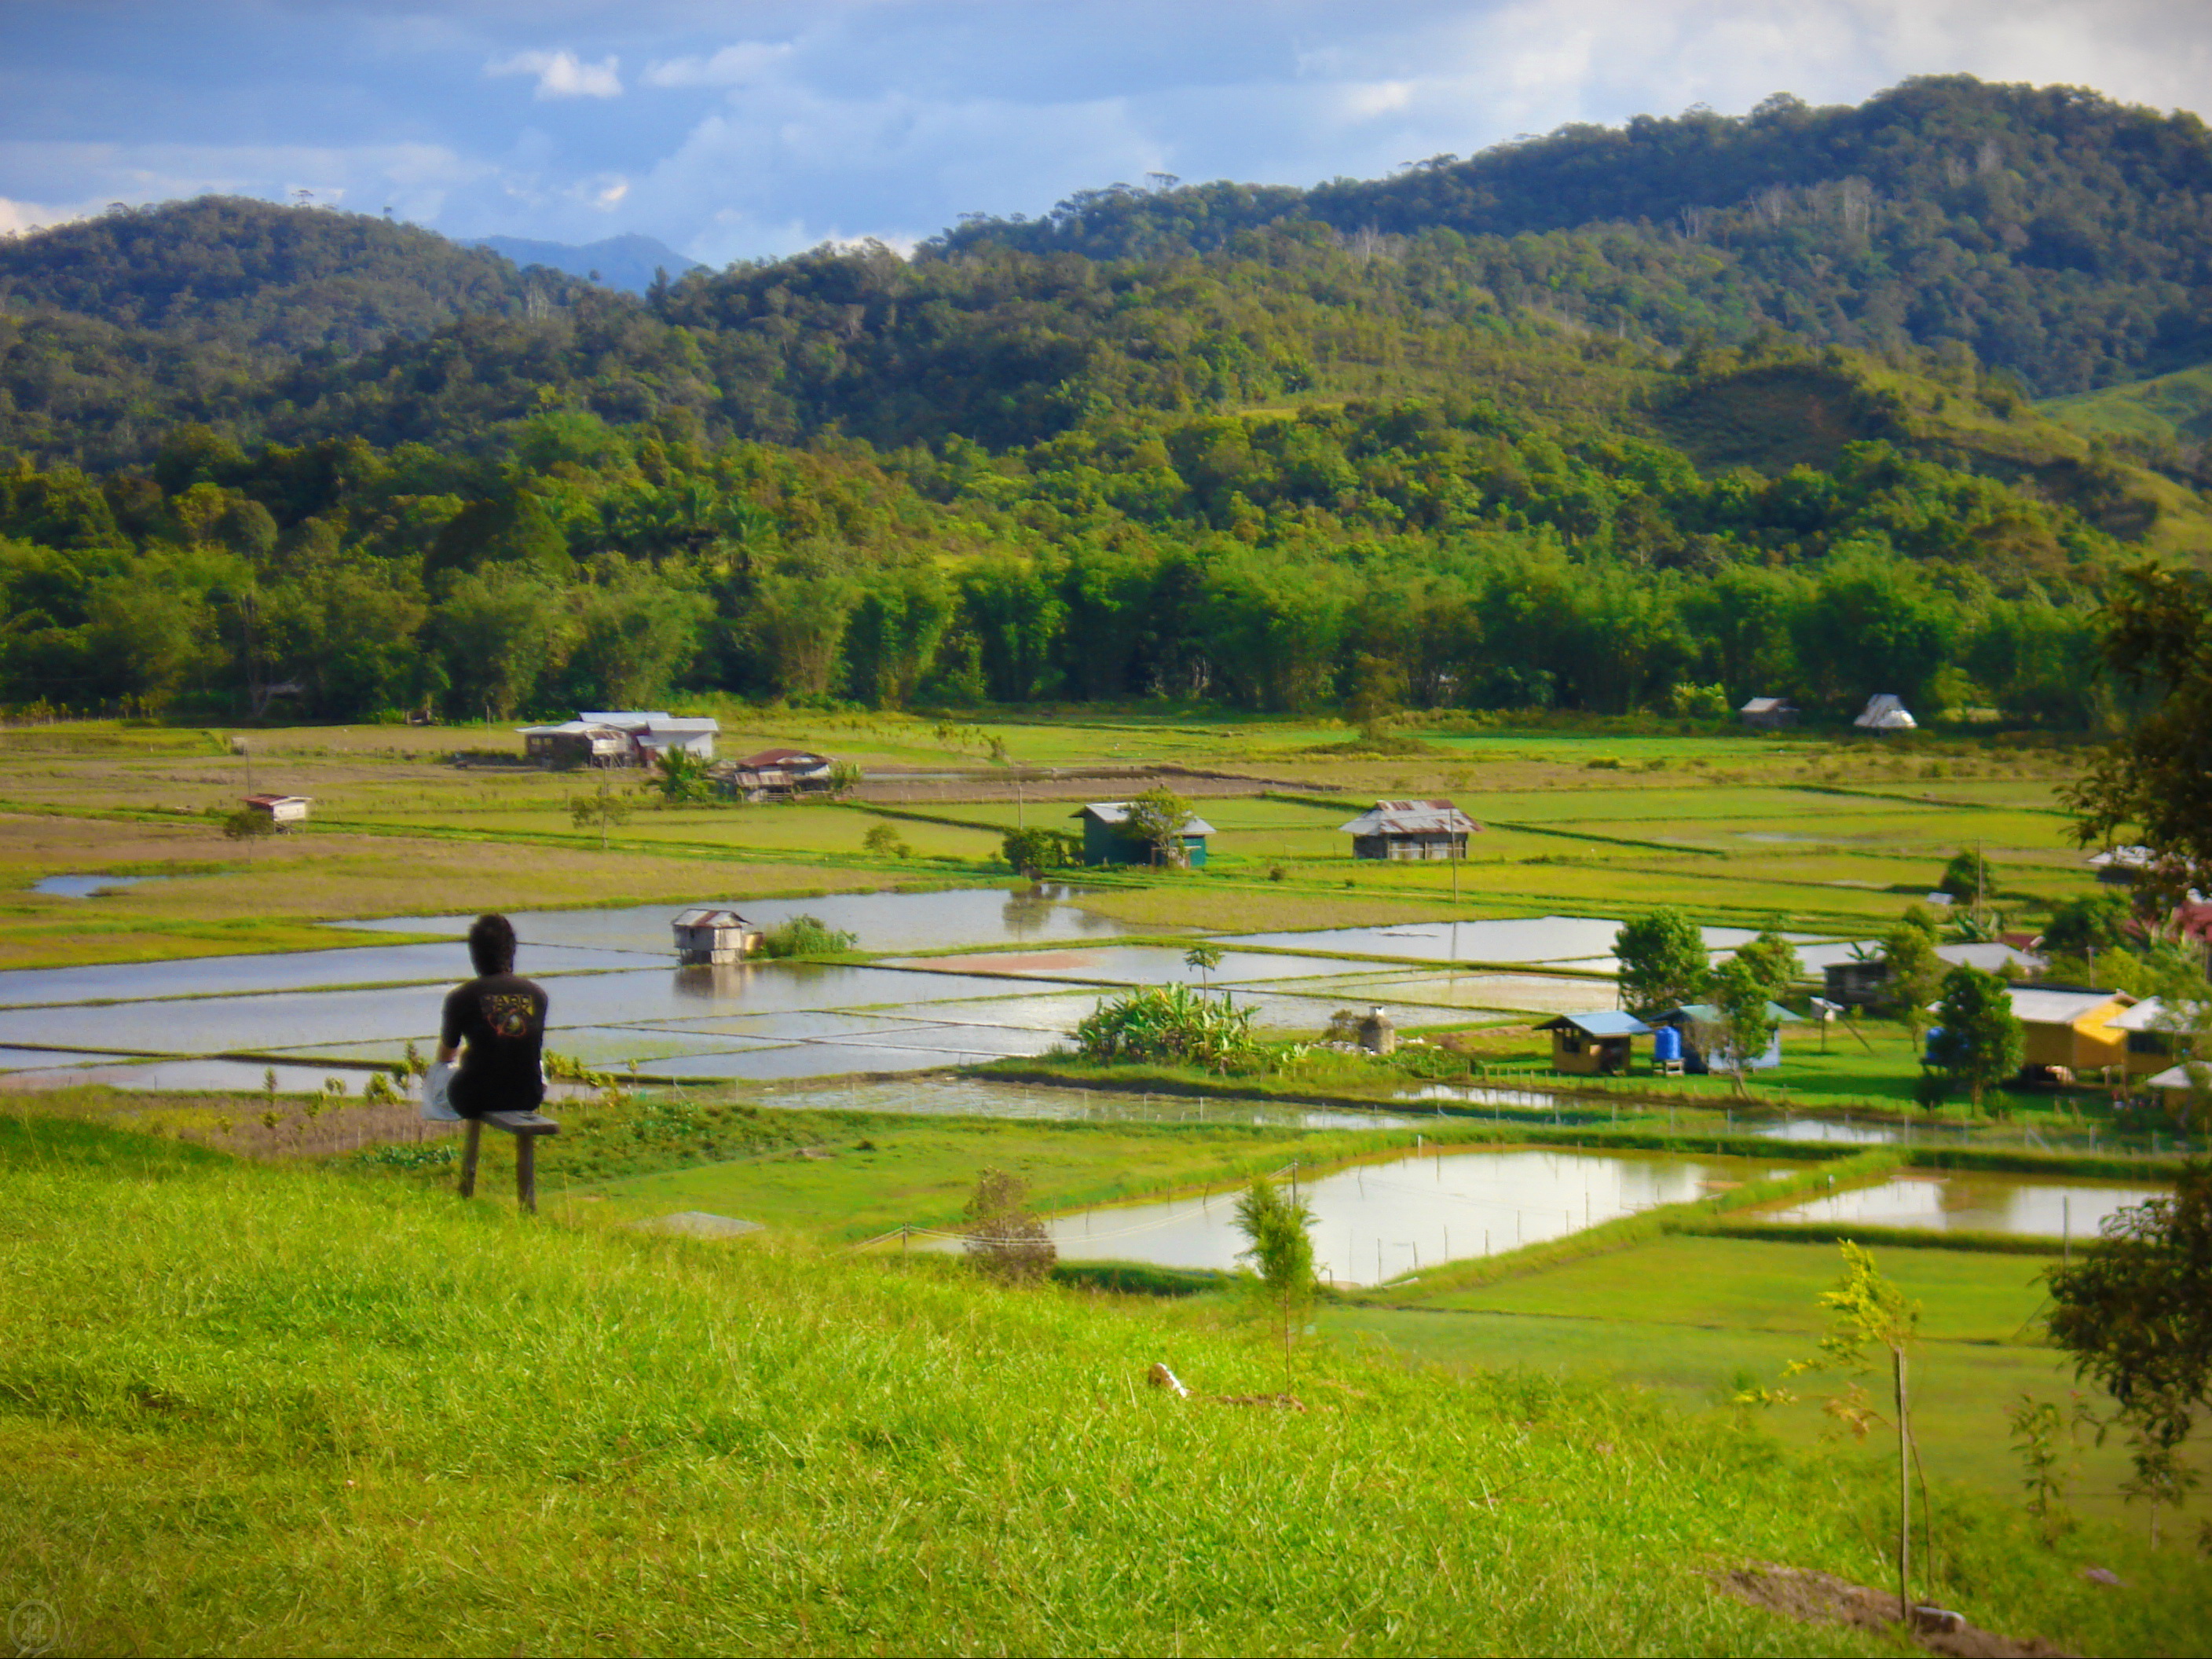
The Kelabit Higland’s Bario Scenery – Just taking a stroll around during the day, the scenery in Bario is always welcoming, and uniquely magical. It’s a beautiful place up in the mountains, with many little treats for the eyes.
Touring Bario – a walk back in time.
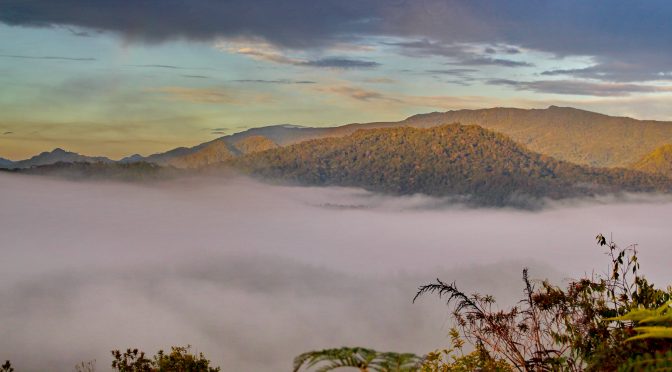
The Spectacular Morning Gems In Bario
However, if you took a little effort (well, it can be a lot for some) to get up before daybreak and walk up Bario’s many hills and mountains, the scenery that awaits you can be utterly breathtaking.
The morning views from the mountain top.
There are a few well maintained and well visited elevated spots in Bario to catch this scene, and some require more commitment than others.
The Bario Prayer Mountain
The best spot of the lot is undisputedly, the top of the Bario Prayer Mountain. This is a one or two hour ascent (depending on your fitness level). It’s hilly at the bottom half, and almost vertical on the top half. But once you get up there very early in the morning, you’ll thank God for it. Some visitors have even spent the night before at the top, so they won’t miss the morning view. Now, that’s dedication.
The View From Prayer mountain at Dawn.
How to get to Bario Prayer Mountain.
The foot of the prayer mountain starts behind the Arur Dalan Longhouse (on the eastern edge of the Bario plateau). It is well marked, so you won’t miss it.
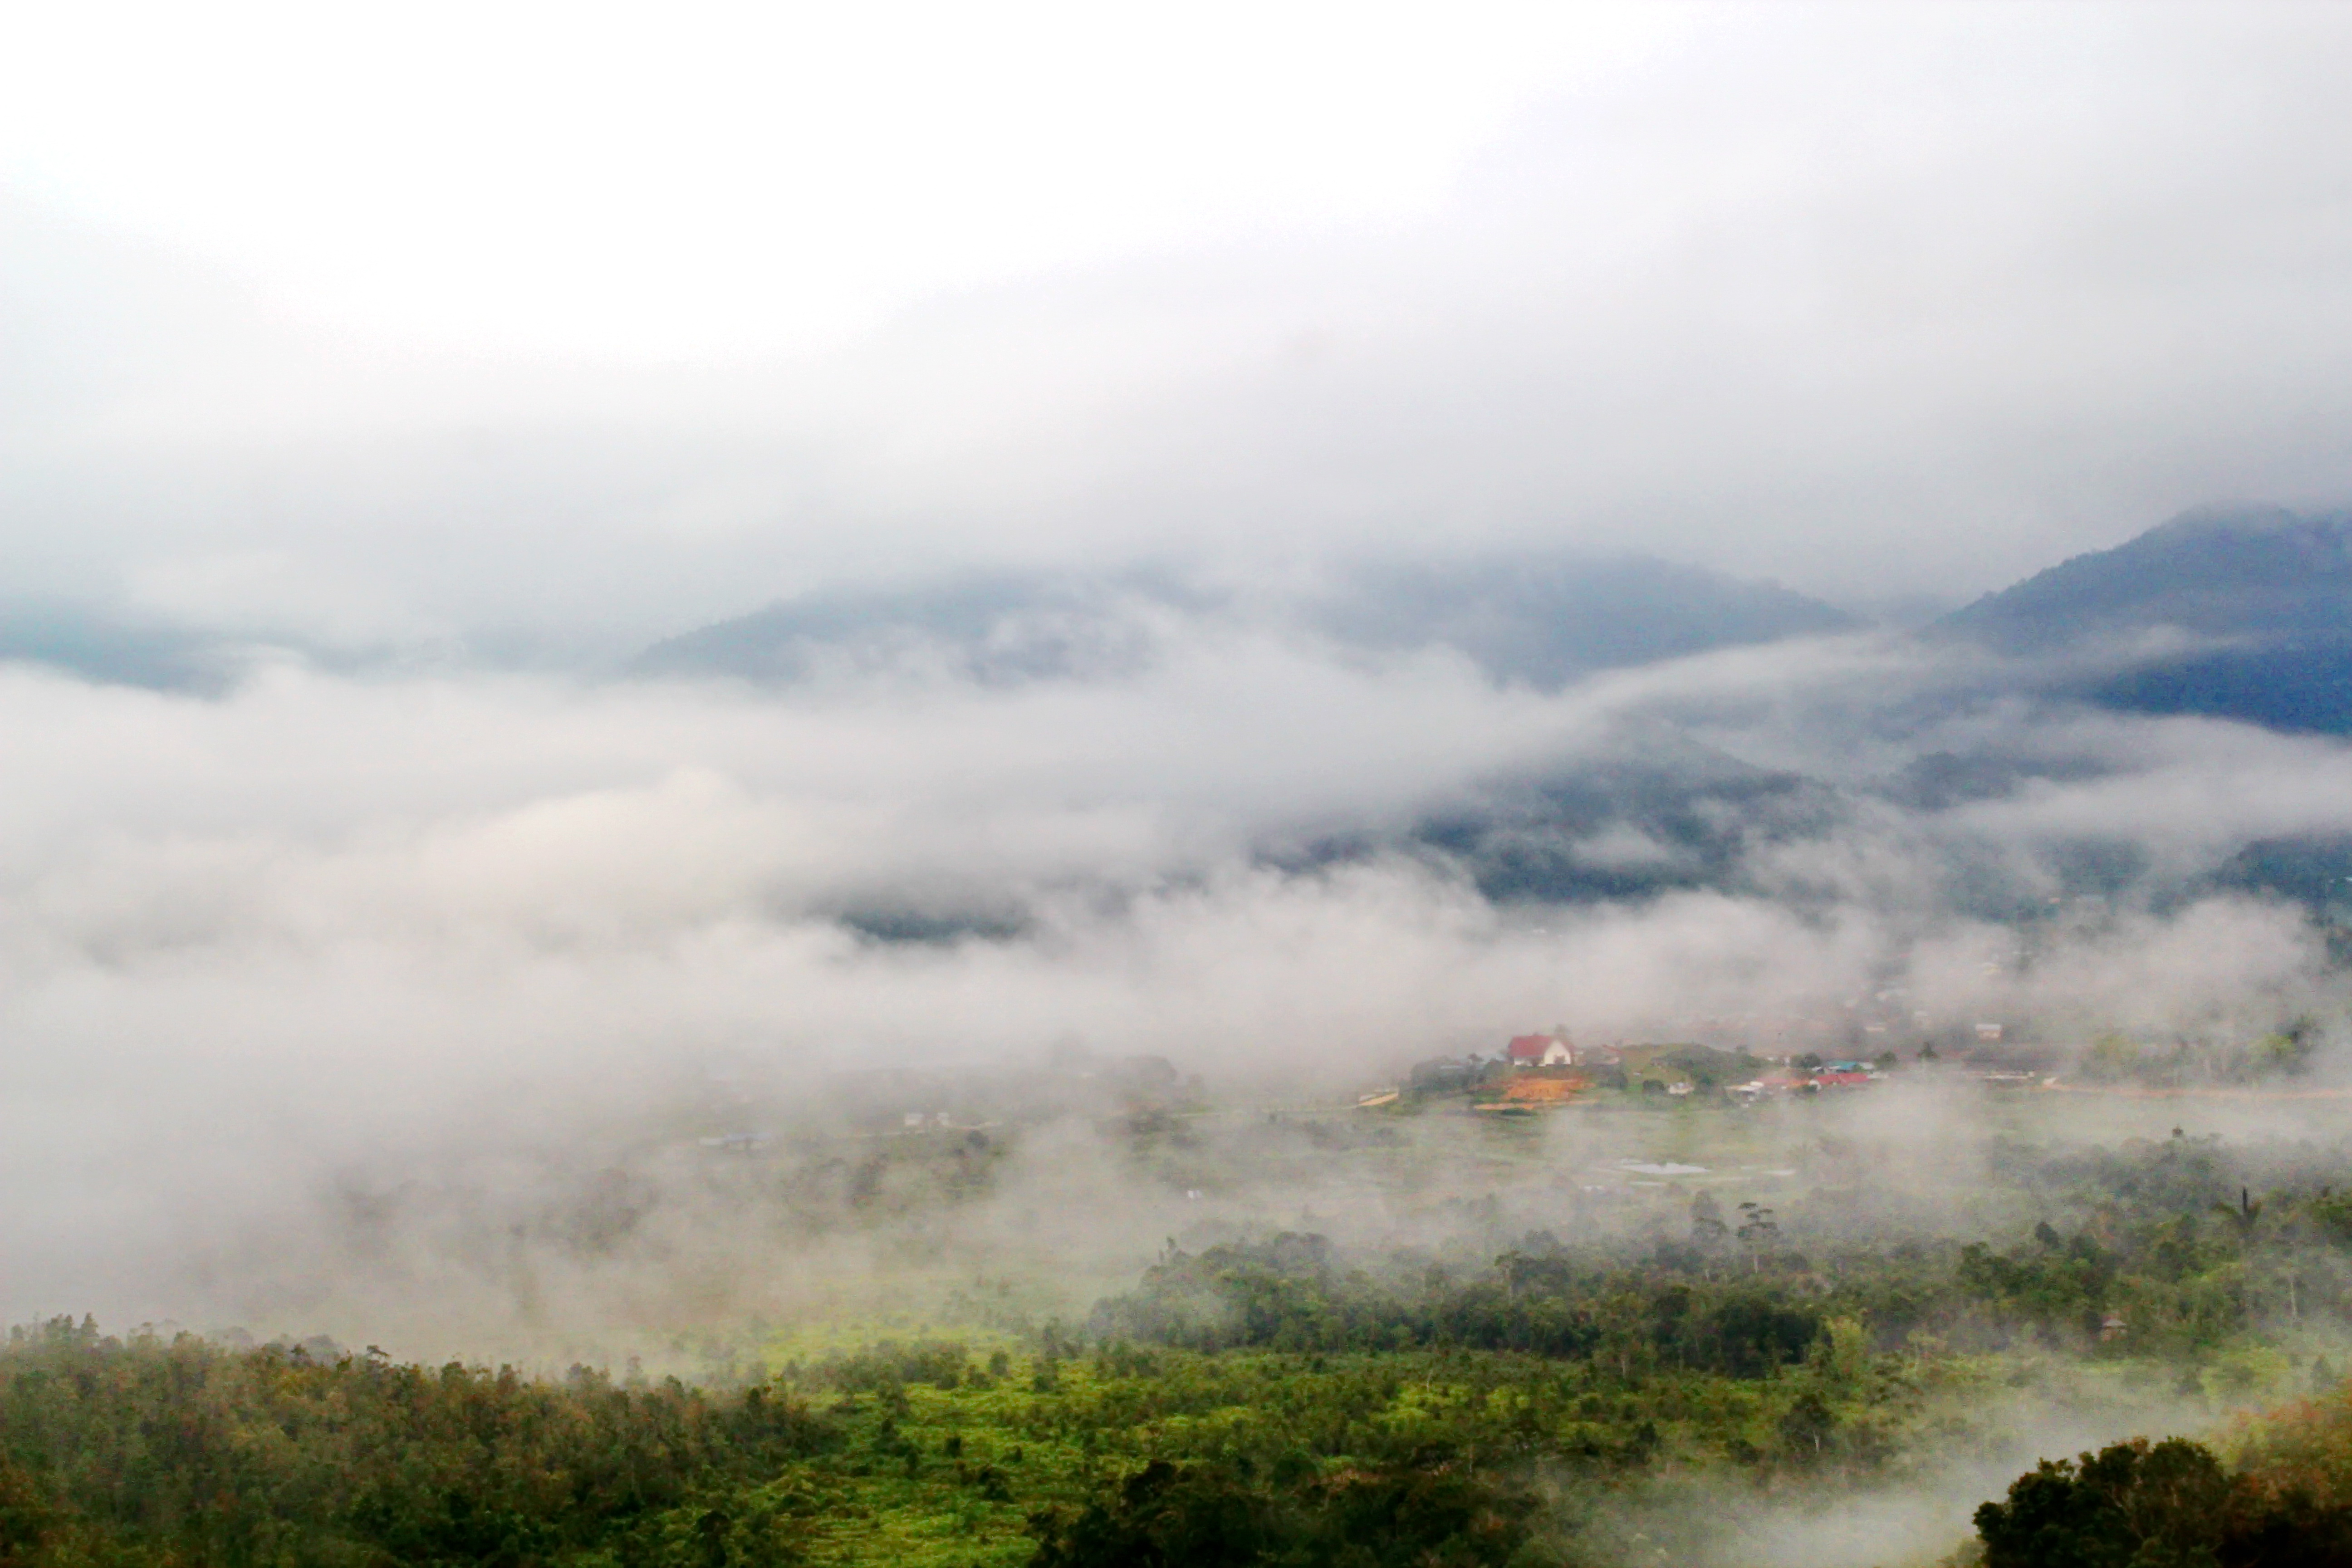
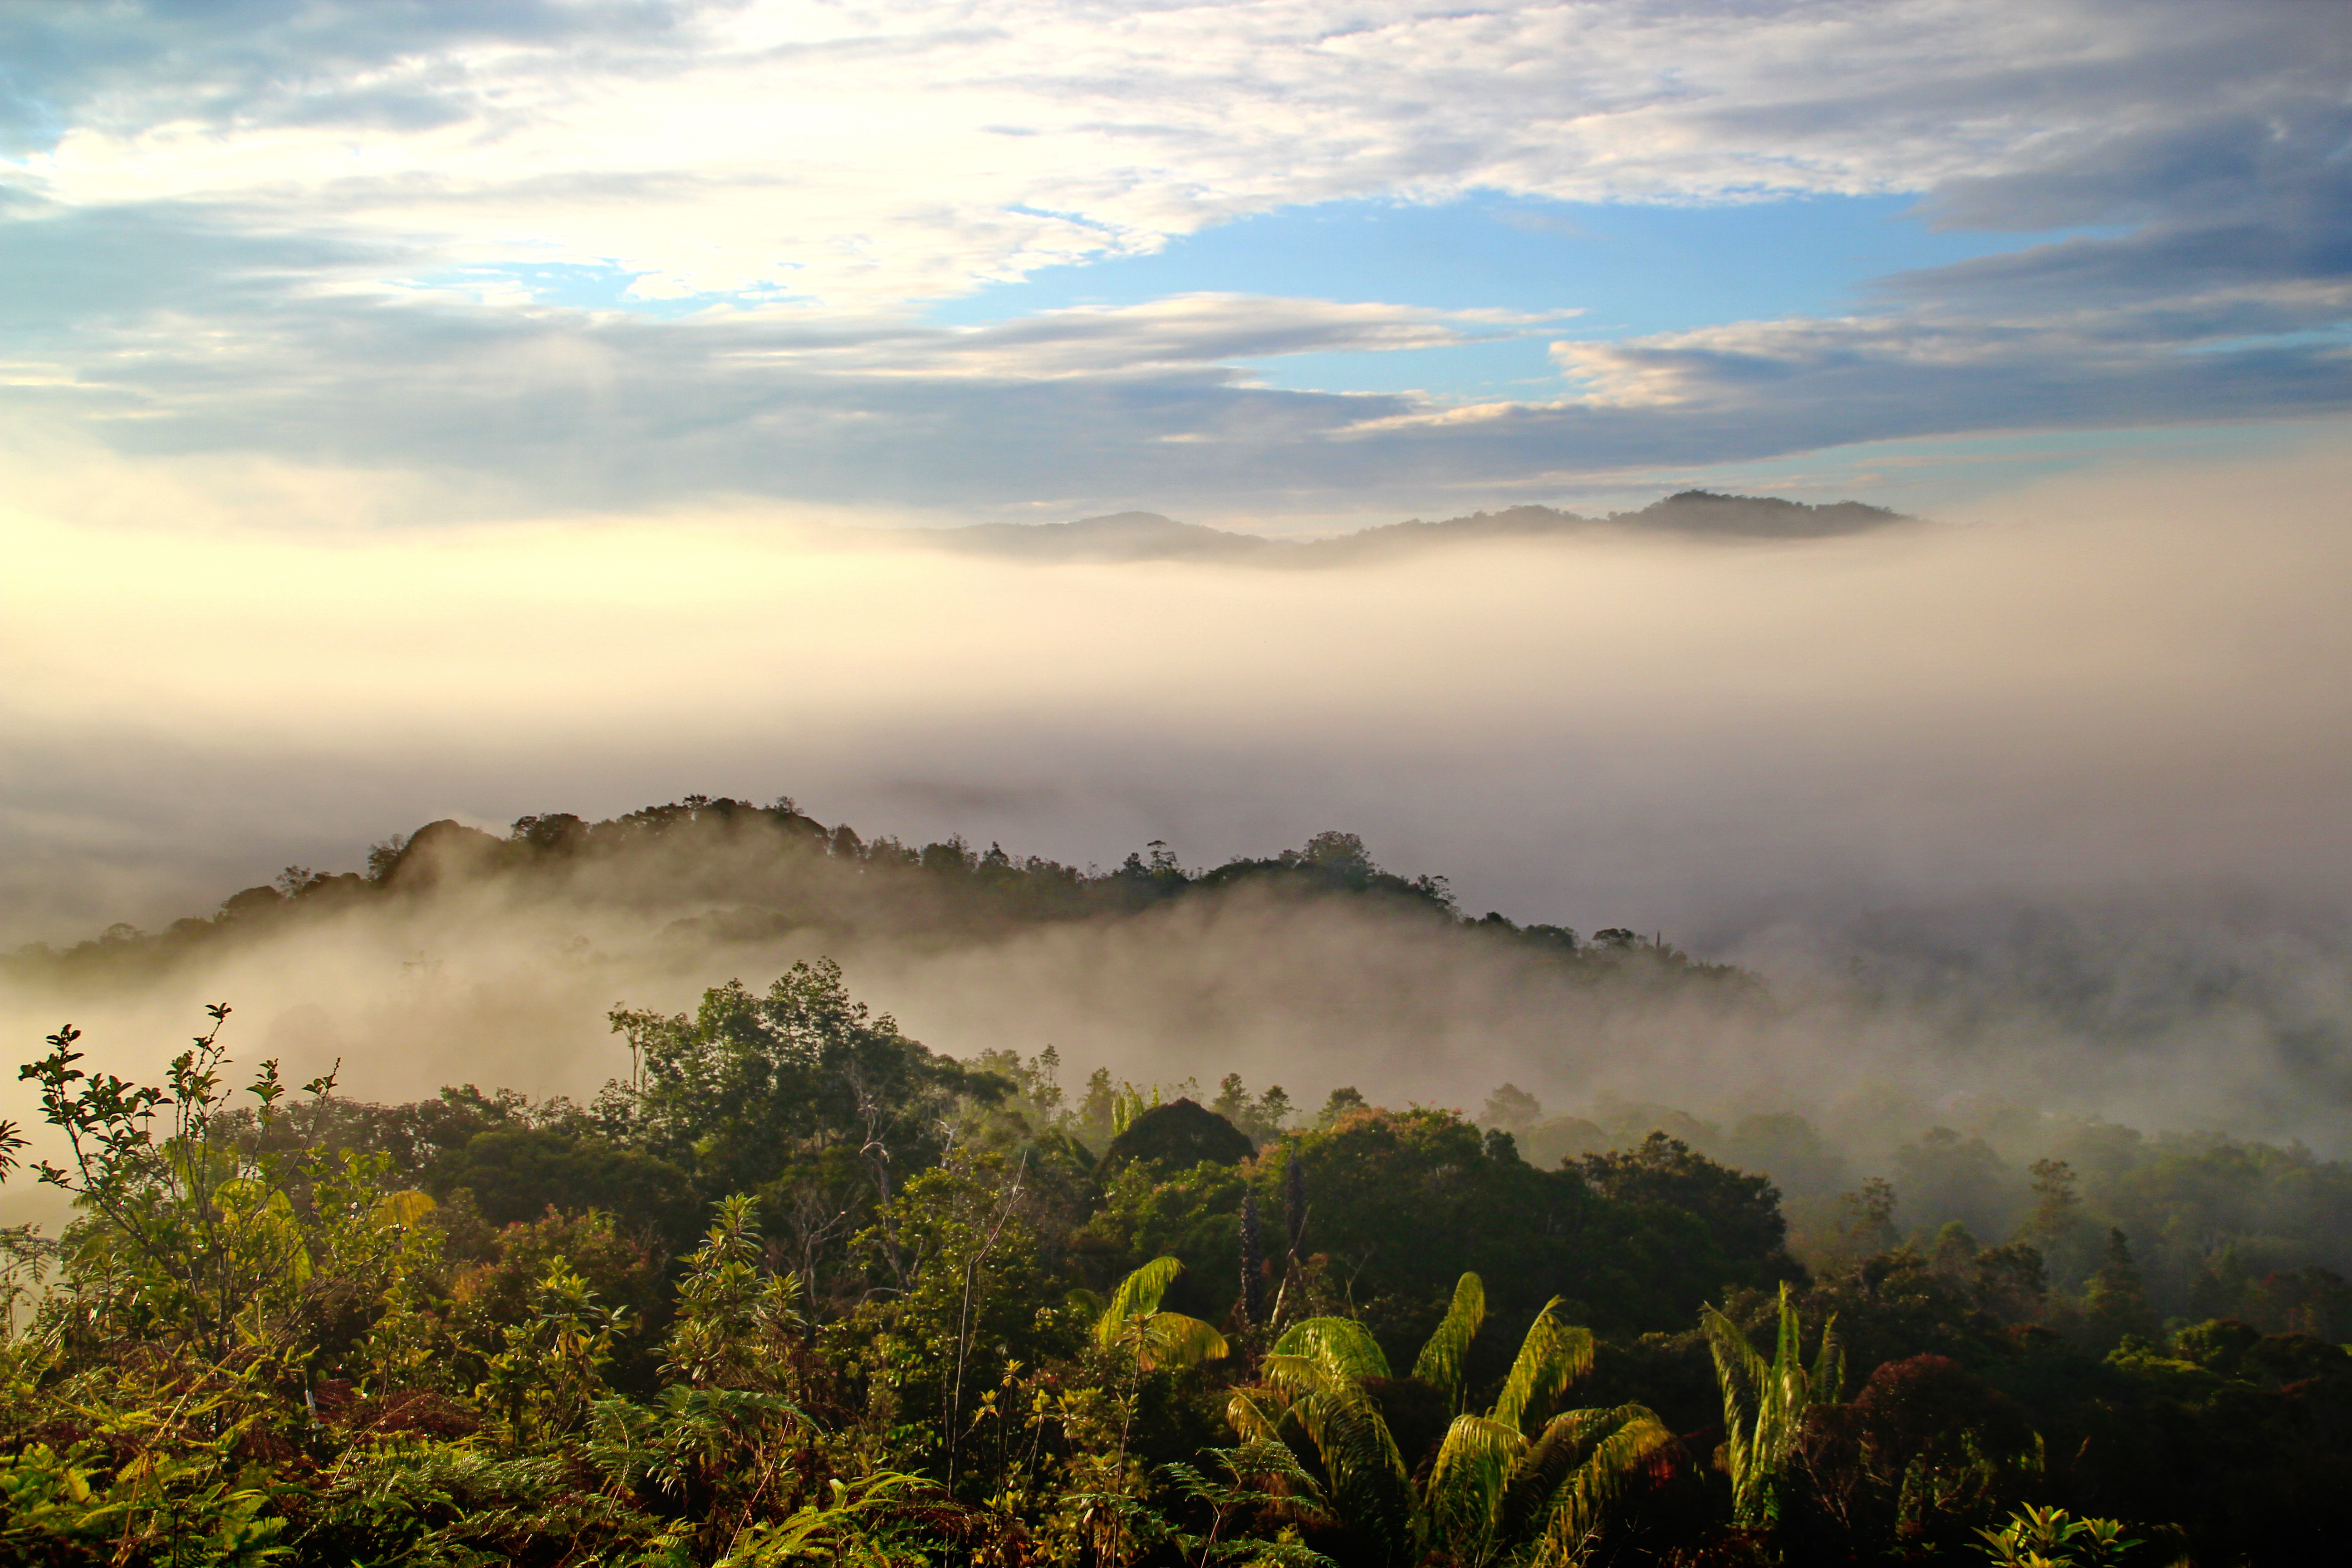
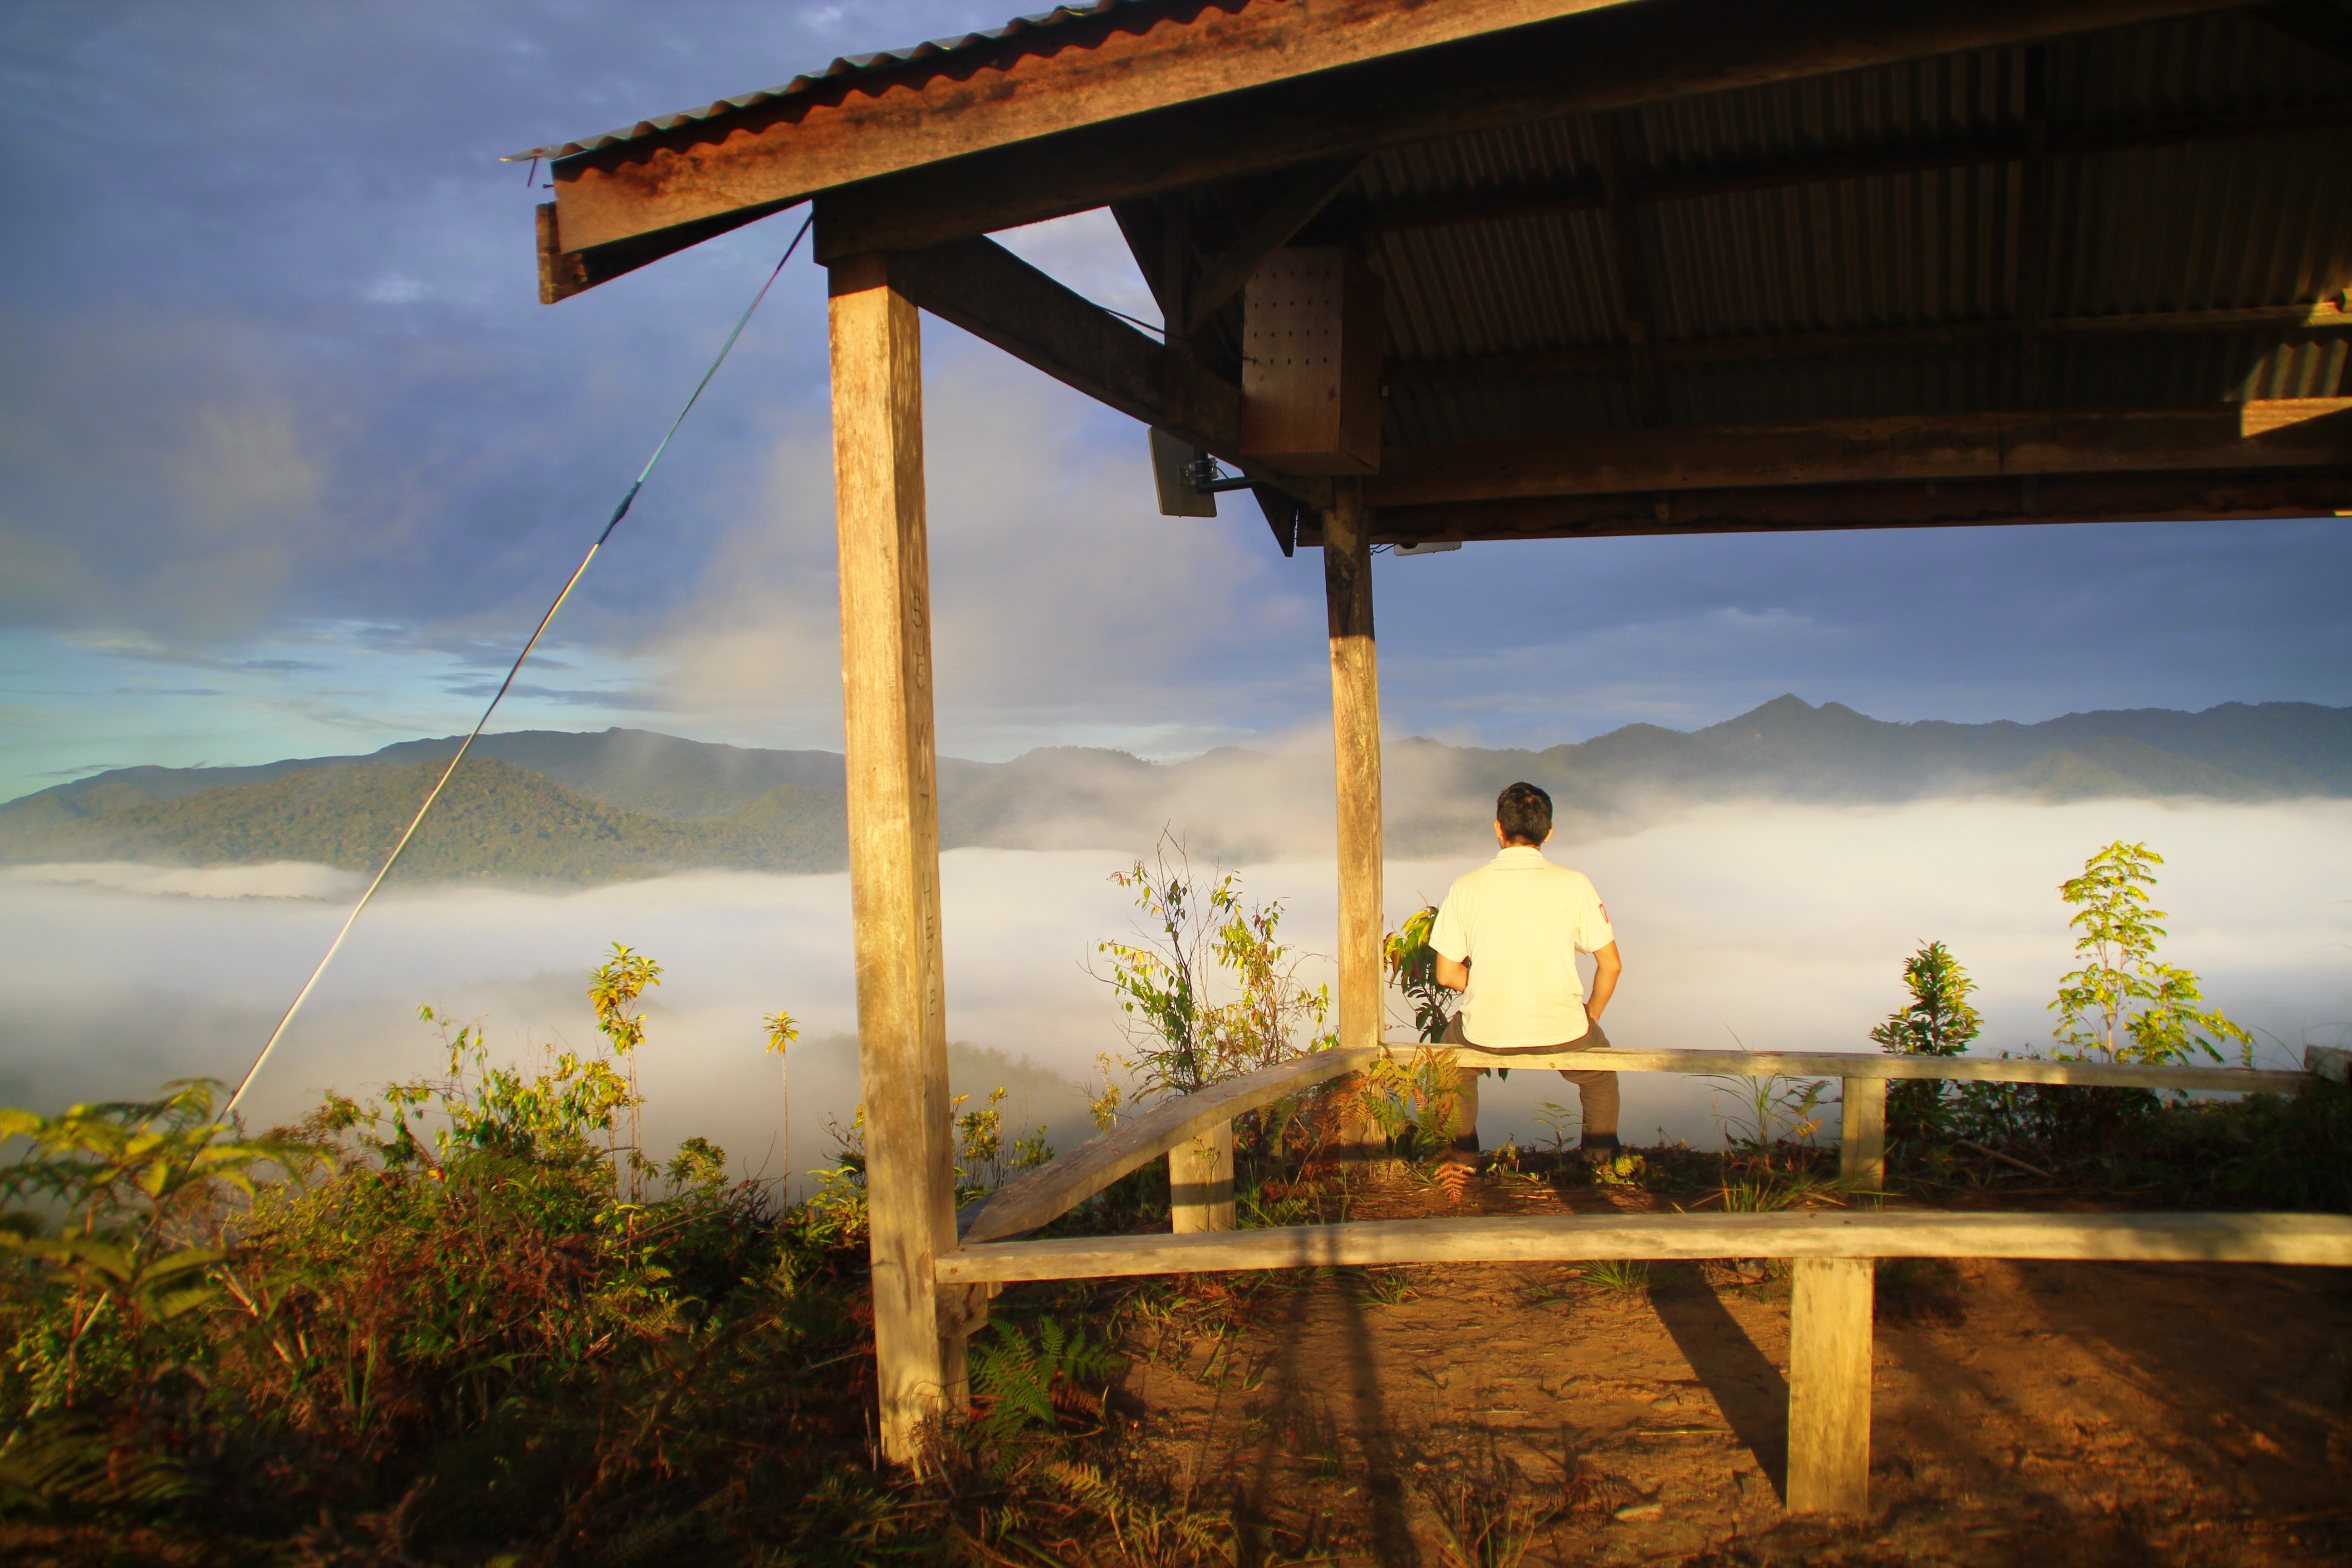
The Bario Proposal Hill
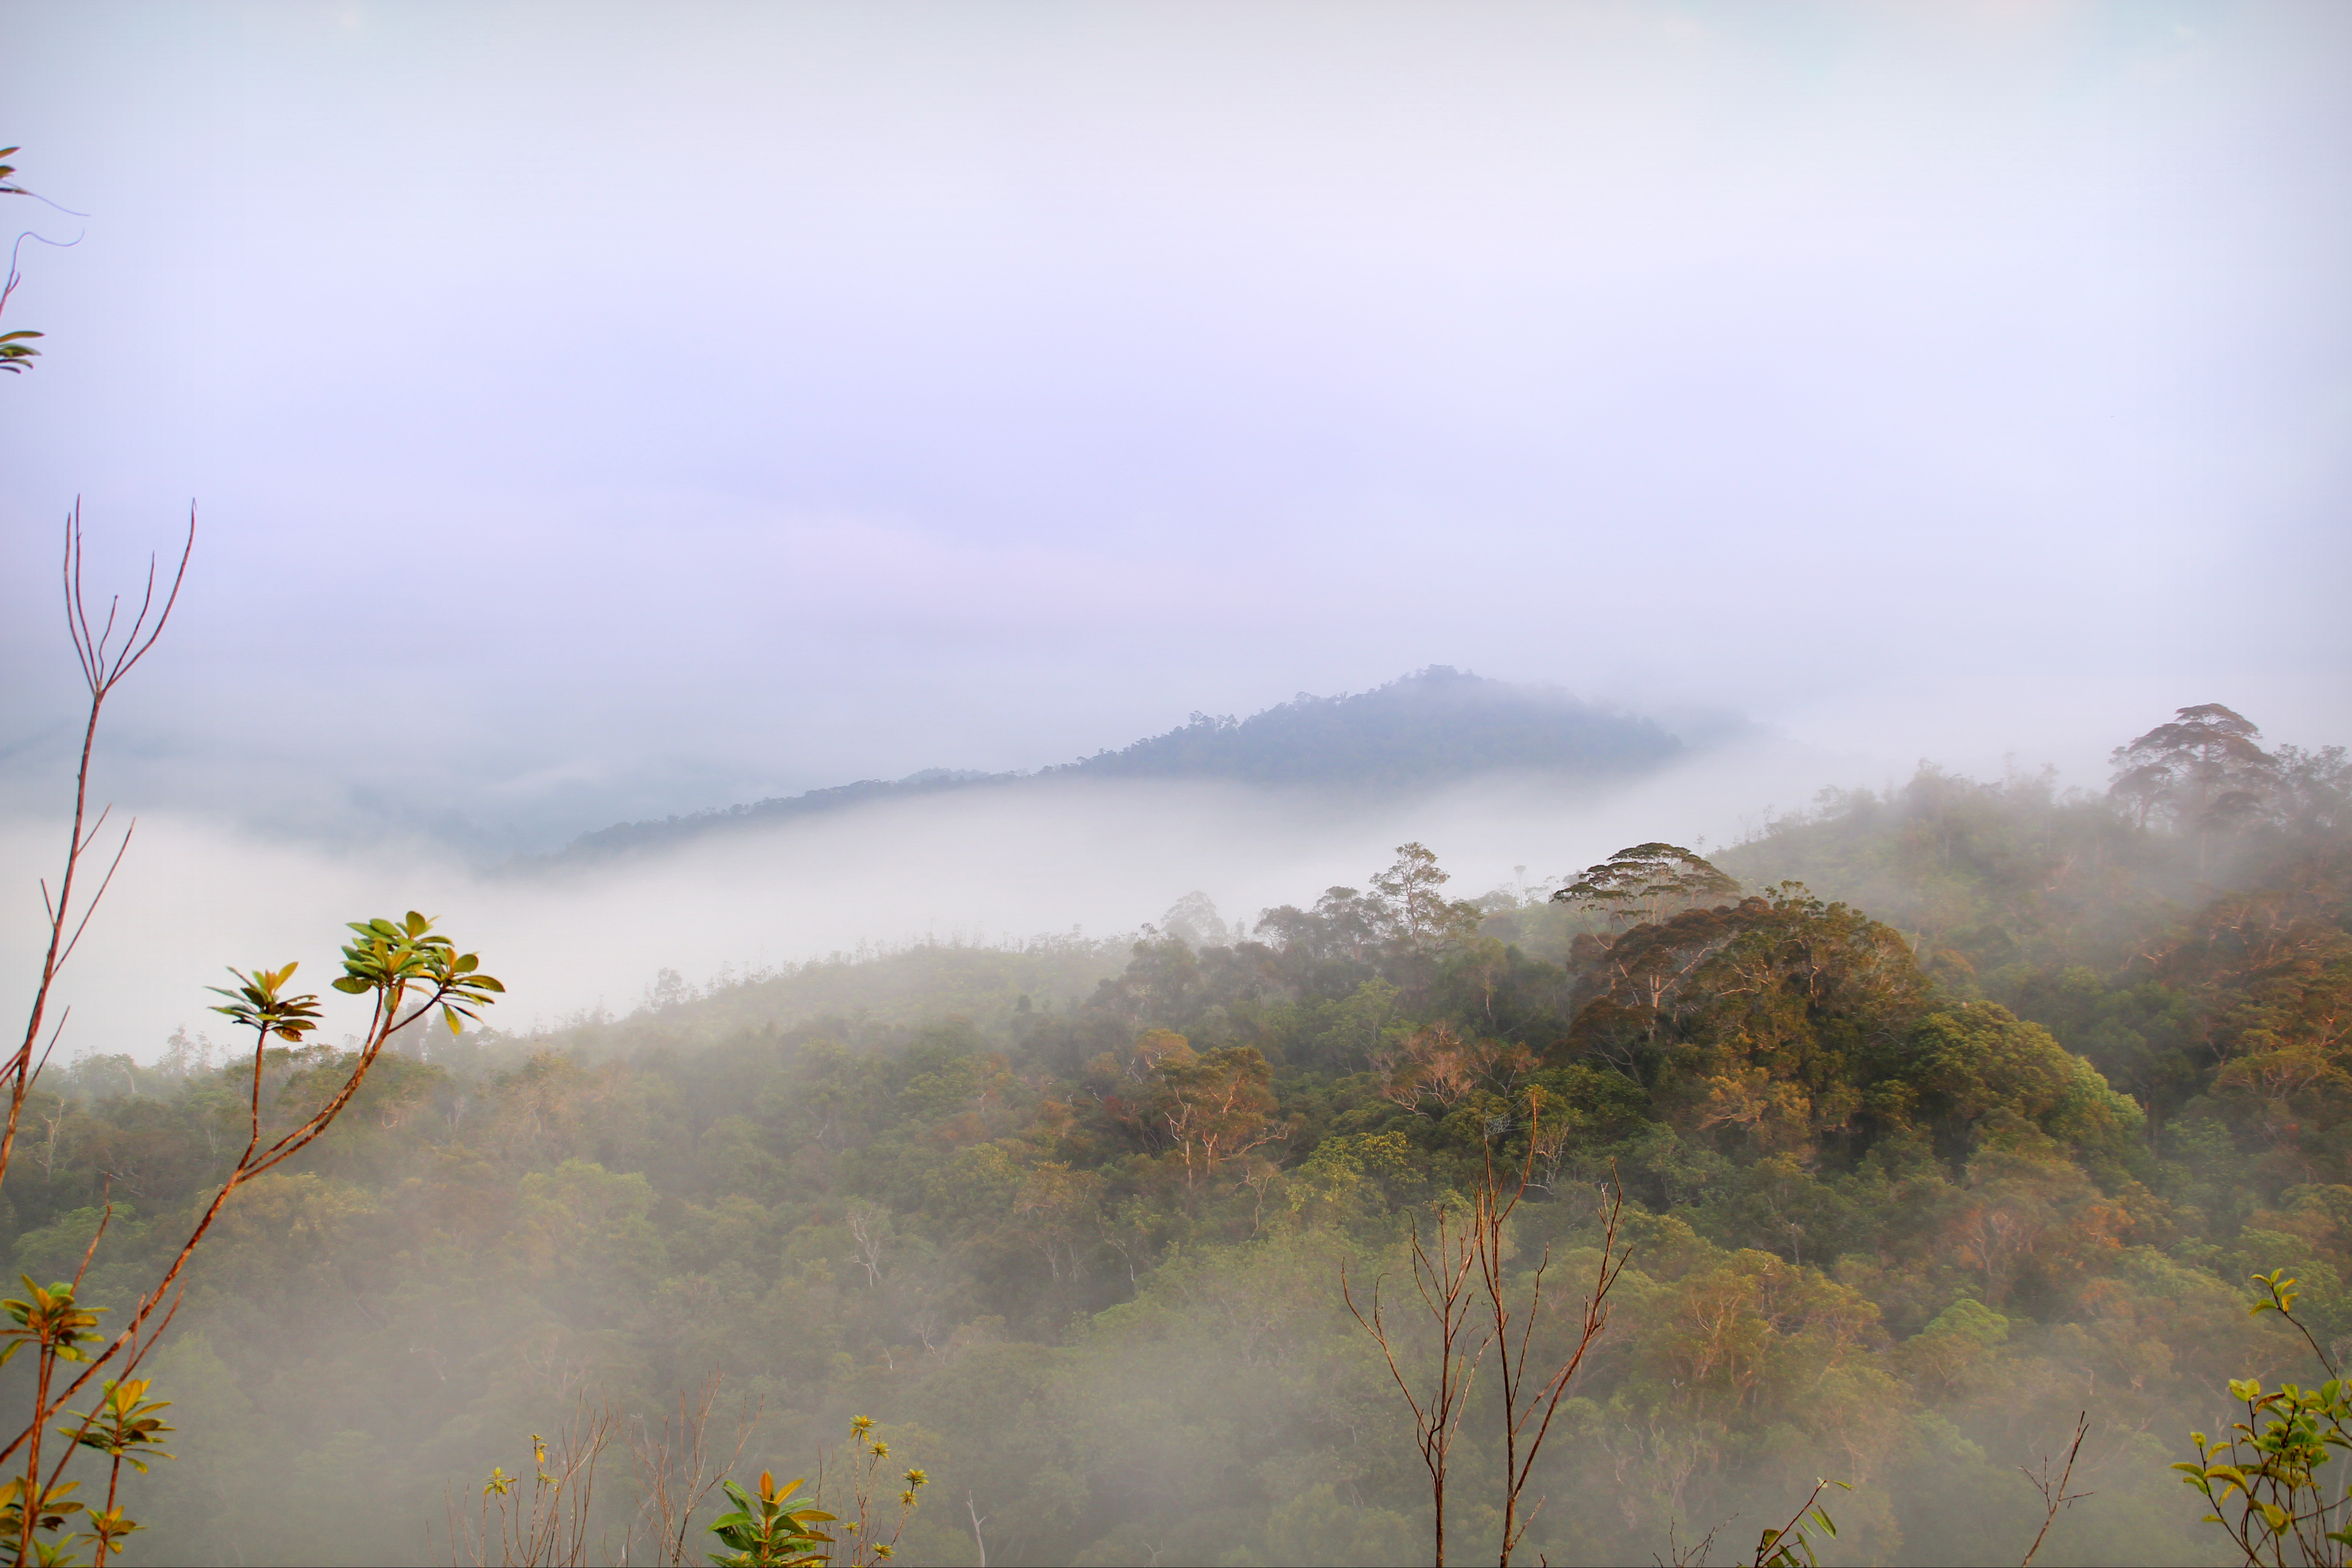
Another good spot is Proposal Hill. Unlike the Prayer Mountain, this is only a fifteen minute to half an hour’s climb up from the foot to the top (someone young university kid did it in 7 minutes). It’s not as high, but the views on the way to the top are equally amazing, if you catch it on the right day.
Valley In The Clouds. Taken from Proposal Hill.
*The right day – is a dry day with a cooler morning temperature. A wet warm morning can cause clouds to rise quickly before the sun is even up, and because it is not as high as the Prayer Mountain, your view could get blocked by the very clouds you went to see. However, on a good day, the views are simply majestic.
Another angle from Proposal Hill
Note: My own success rate at being up there on a good day is 30%. But it’s a spectacular 30%.
Proposal Hill is just 15 minutes walk from Labanglonghouse Lodge.
You’ll never now what you’d get to see at the top of Proposal Hill, but for a 15 minutes hike, it’s definitely worth the gamble.
Breathtaking Proposal Hill – good place to propose.
How to get to Proposal Hill.
You can find the path leading to Proposal Hill about 10 minutes walk from The Bario Market Centre. It is just opposite the Labang Longhouse Lodge.
Squeeze more out of your days in the Kelabit Highlands.
So, when in Bario, wake up very early and prepare yourself some hot coffee in a flask and be up there before the crack of dawn. The amazing morning clouds of the Kelabit Highlands await.
Killjoy:
Of course, if you had a powerful Camera Drone that can go 500 meters up, you could see all this without raising a sweat.
Bario – The Kelabits Highlands is where the Baram River starts. Its rivers and tributaries feed into many rivers downstream and ends up in the Baram Delta – or Kuala Baram, (north of Miri City).
The Kelabit Highlands’ biggest river is the Debpur River. It’s a major source of food and means of transportation. In Kelabit, it’s called the ‘Paq Debpur’. In some parts, it’s rocky whitewater, and in some parts it goes deep and slow, but for Bario, it’s big.
If you’re up in Bario, you can kayak down the Debpur river and tell the folks back home that you’ve paddled the source of the great Baram River.
This article is about how to get to Bario.
FLYING INTO BARIO QUICK TAKES:
Miri-Bario: 45 minutes flight time.
Cost: RM116.54 or about 26EURO/USD29 (one way).
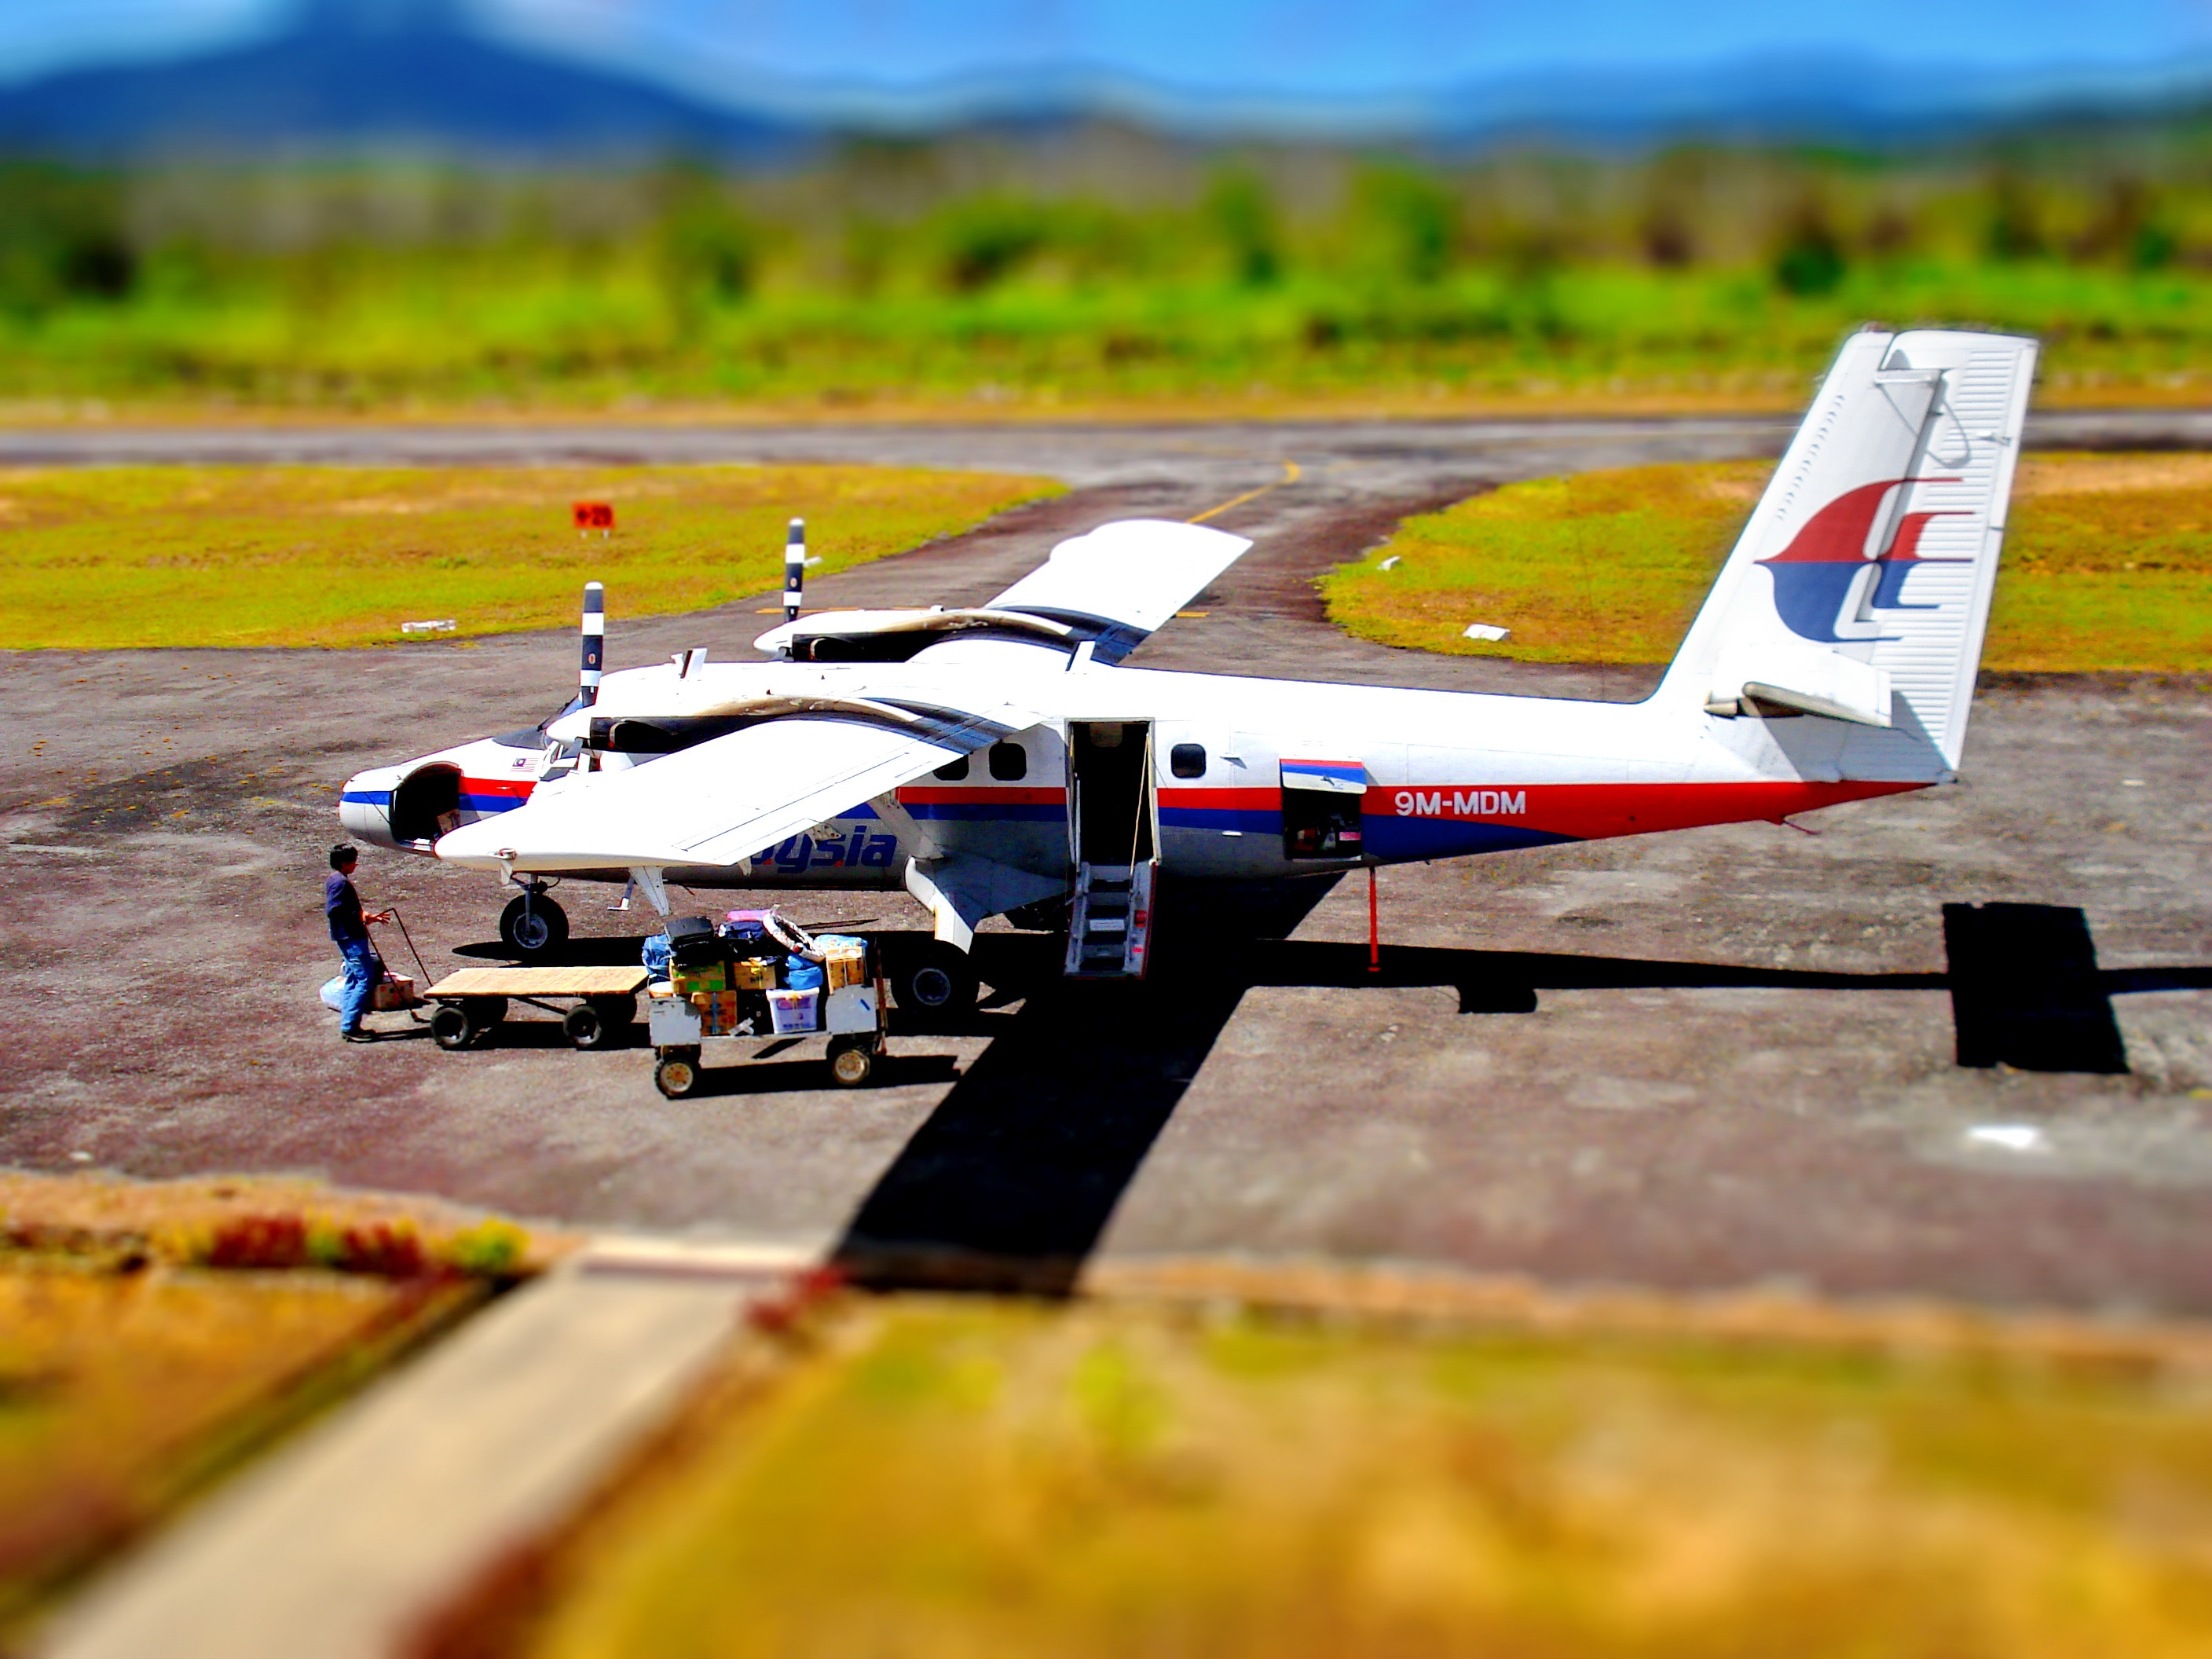
Aircraft: Small 19 Seater DHC-6-400 Twin Otter.
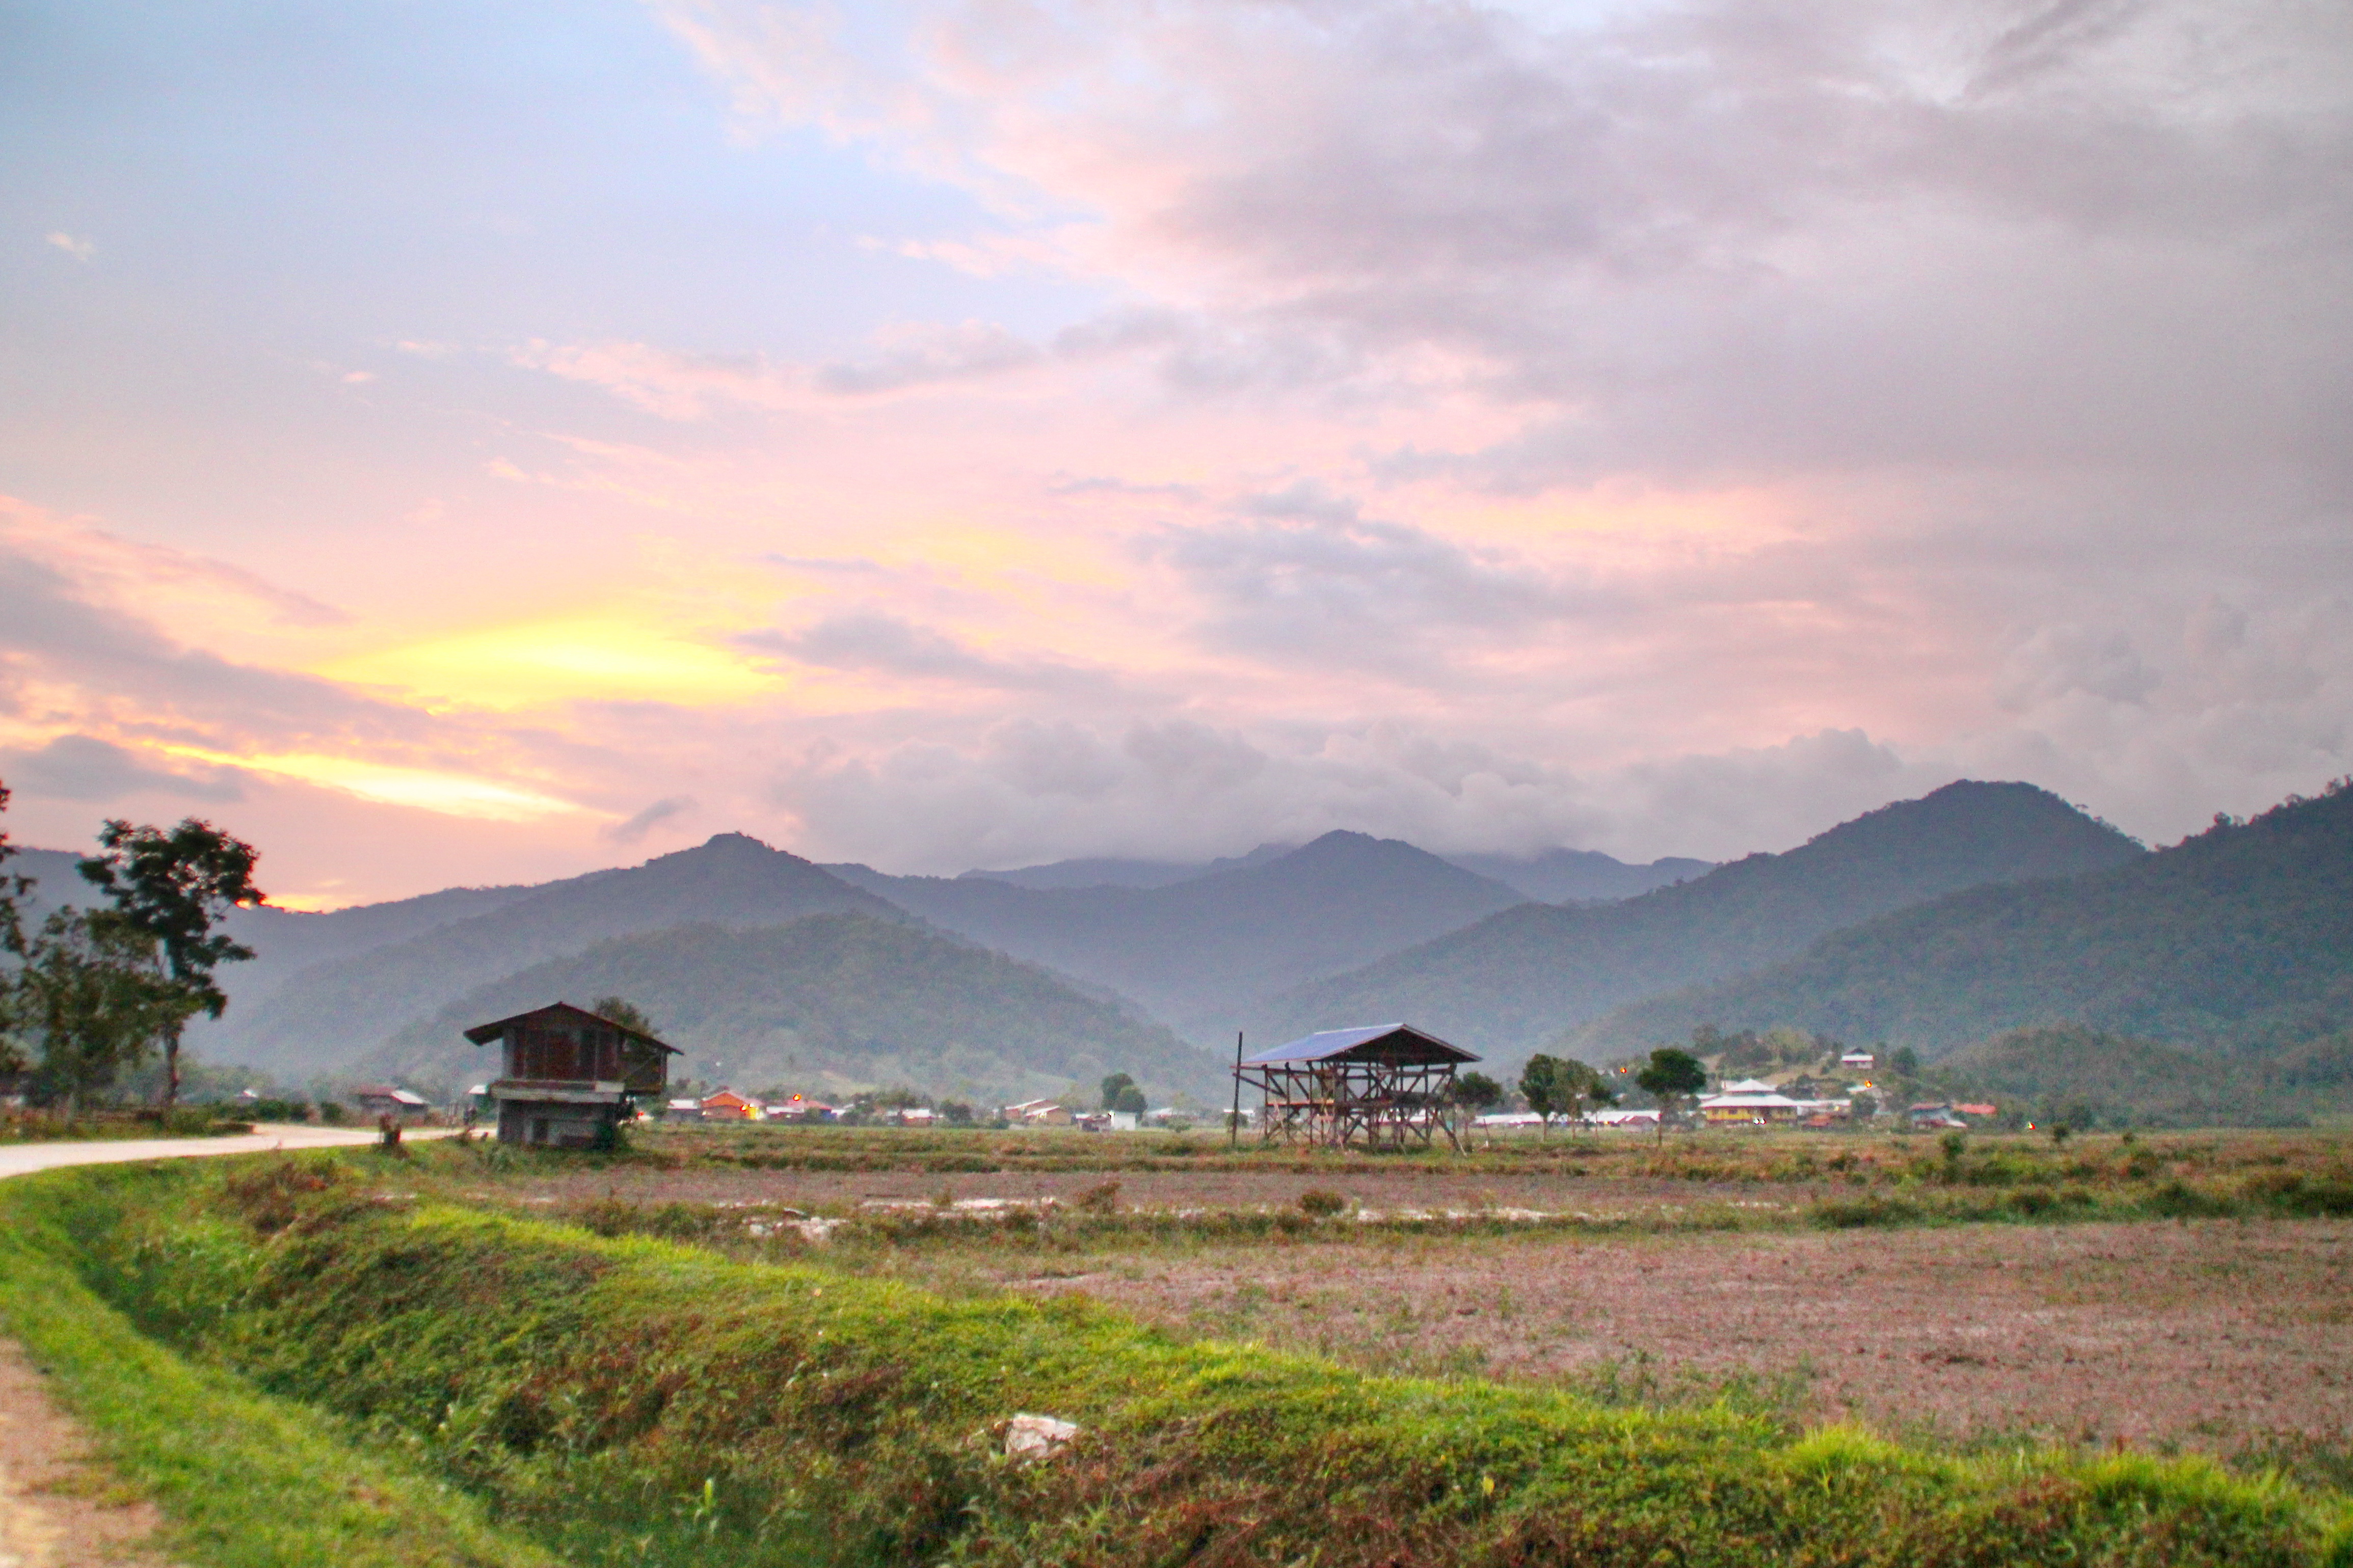
Bario Plateau in the Kelabit Highlands
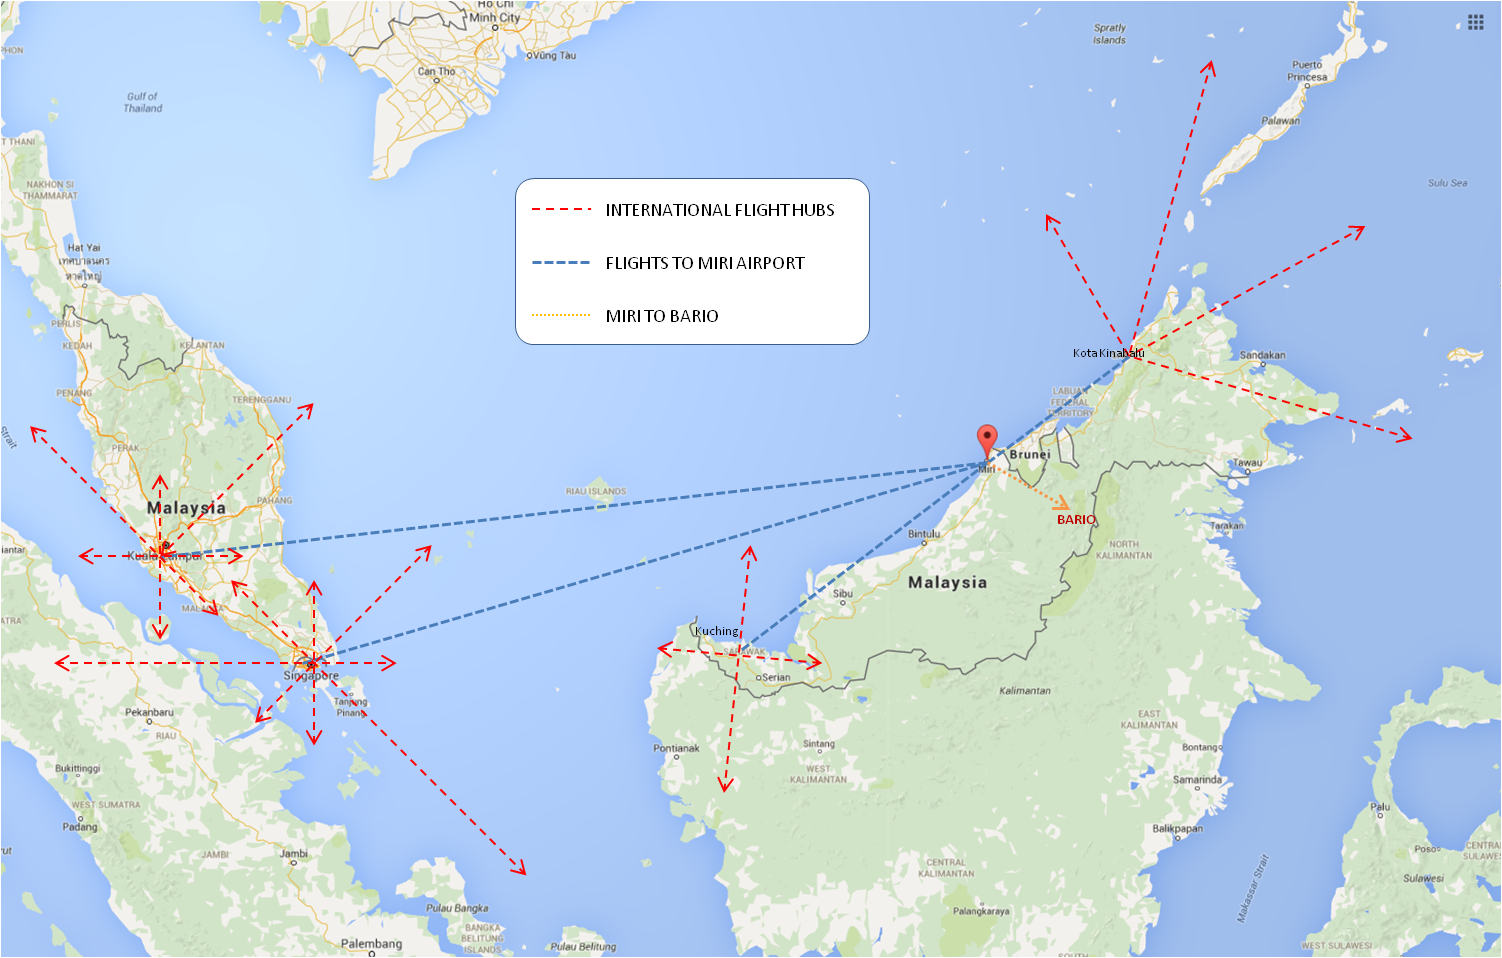
So, Bario is this remote place right in the highland regions of Sarawak Borneo, and given its fabled remoteness, how do you actually get to Bario?
Bario is situated in the deep interiors of Sarawak, right in heart of Borneo Island. for the longest time, Bario was only connected to the world outside through the Miri Airport. Everything was air flown in and out either directly, or via a stop-over at Marudi Airport. Today however, a dirt road has just recently reached Bario, so you now can get to Bario by land – but for most visitors, air travel is the fastest, cheapest and most convenient way of getting in and out of Bario.
MAS DHC-6-300 Twin Otters at the Bario Airport. Circa 2006
HOW TO GET TO BARIO FROM FAR FAR AWAY.
If you’re asking from ouside of Malaysia, the Miri Airport is connected to a few international airports. It is directly connected to the Kuala Lumpur, Singapore, Kuching and Kota Kinabalu International Airports, and it is served by four airlines; MasWings, Air Asia, Malindo Air and Malaysia Airlines.
Flight Legs into Bario via Miri Airport
So, if you’re in Hong Kong, you can fly DragonAir to Kota Kinabalu, and from there fly AirAsia to Miri, and hop on MasWings into Bario.
Or if you’re in Holland, you fly KLM from Amsterdam to Kuala Lumpur or Singapore, then Malaysia Airlines to Miri, and hop on MasWings to get to Bario.
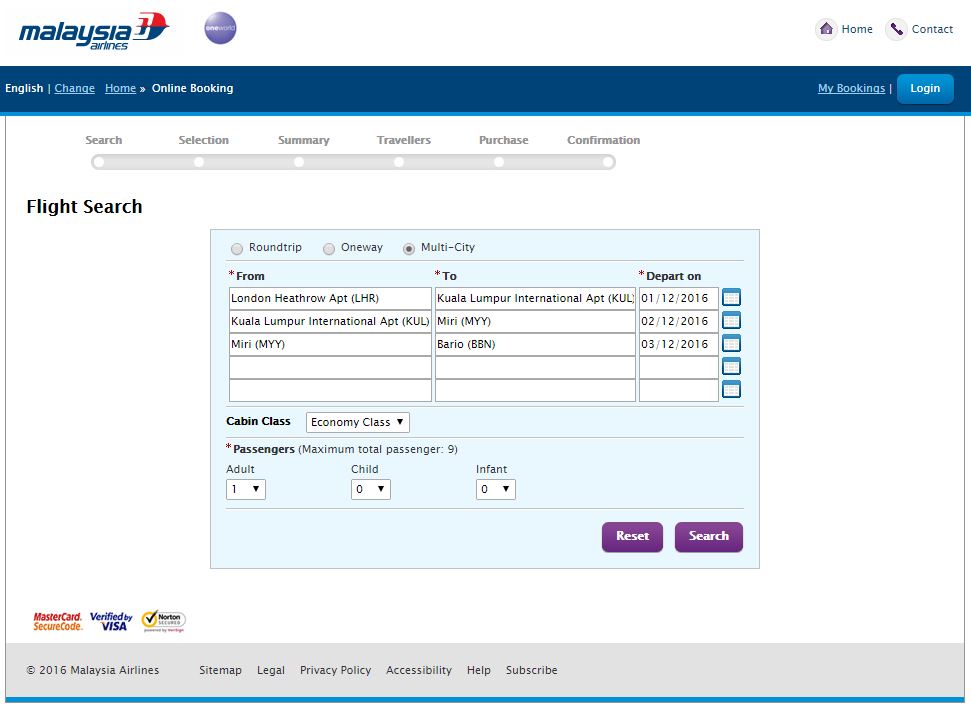
Flight Bookings Quick TIP #1.
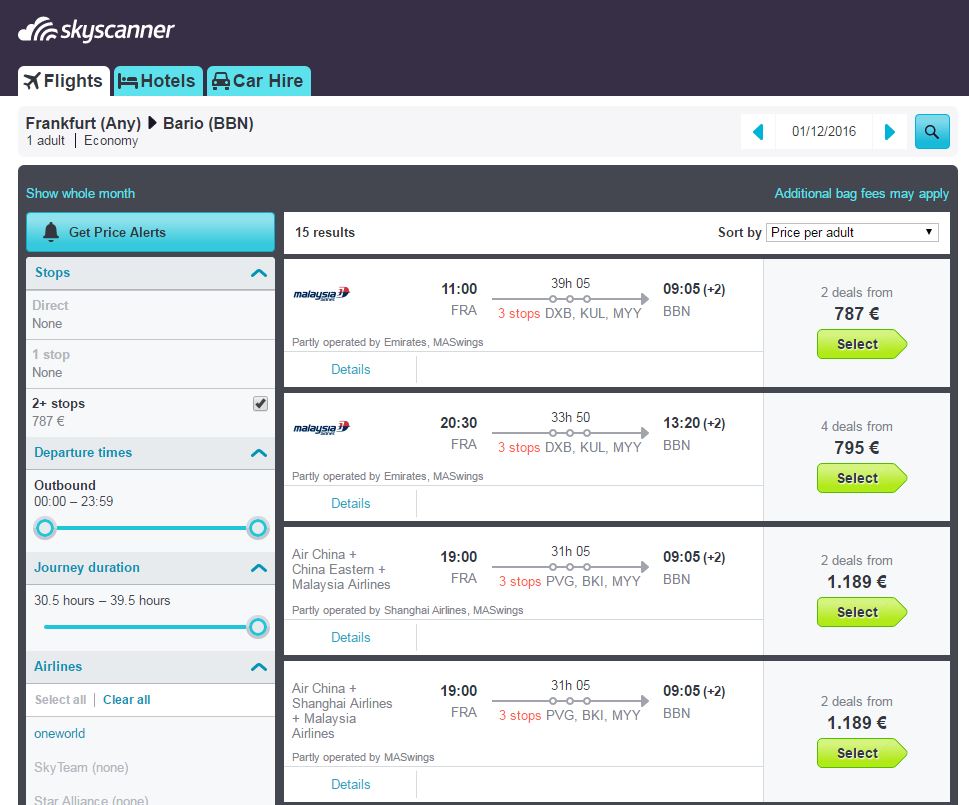
When booking online from overseas, the Malaysia Airlines flight booking portal can connect your Malaysia Airline flights all the way into Bario from some international airports near you. You can also use flight booking sites like Skyscanner to connect you direct, and it comes with ticket prices too.
3 Days to BarioSkyscanner’s point to point flight planner. Just key in two ariports, and it does the connecting automatically.
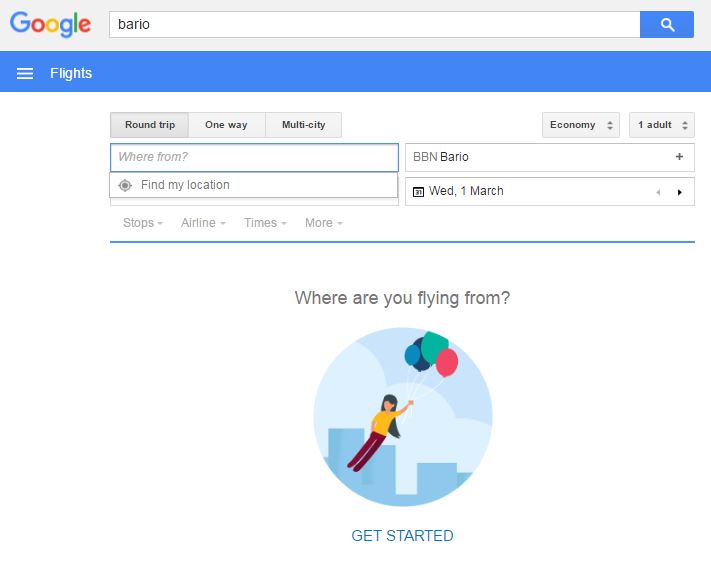
Or just Google! yourself a ticket from wherever you are to Bario. Click Here Presto!
This is seriously cool! Click o the link above and try it.
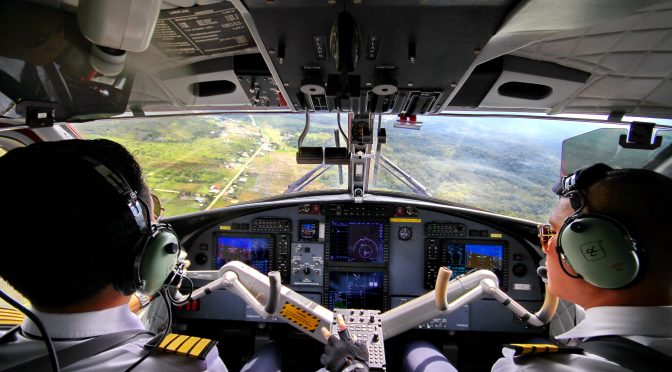
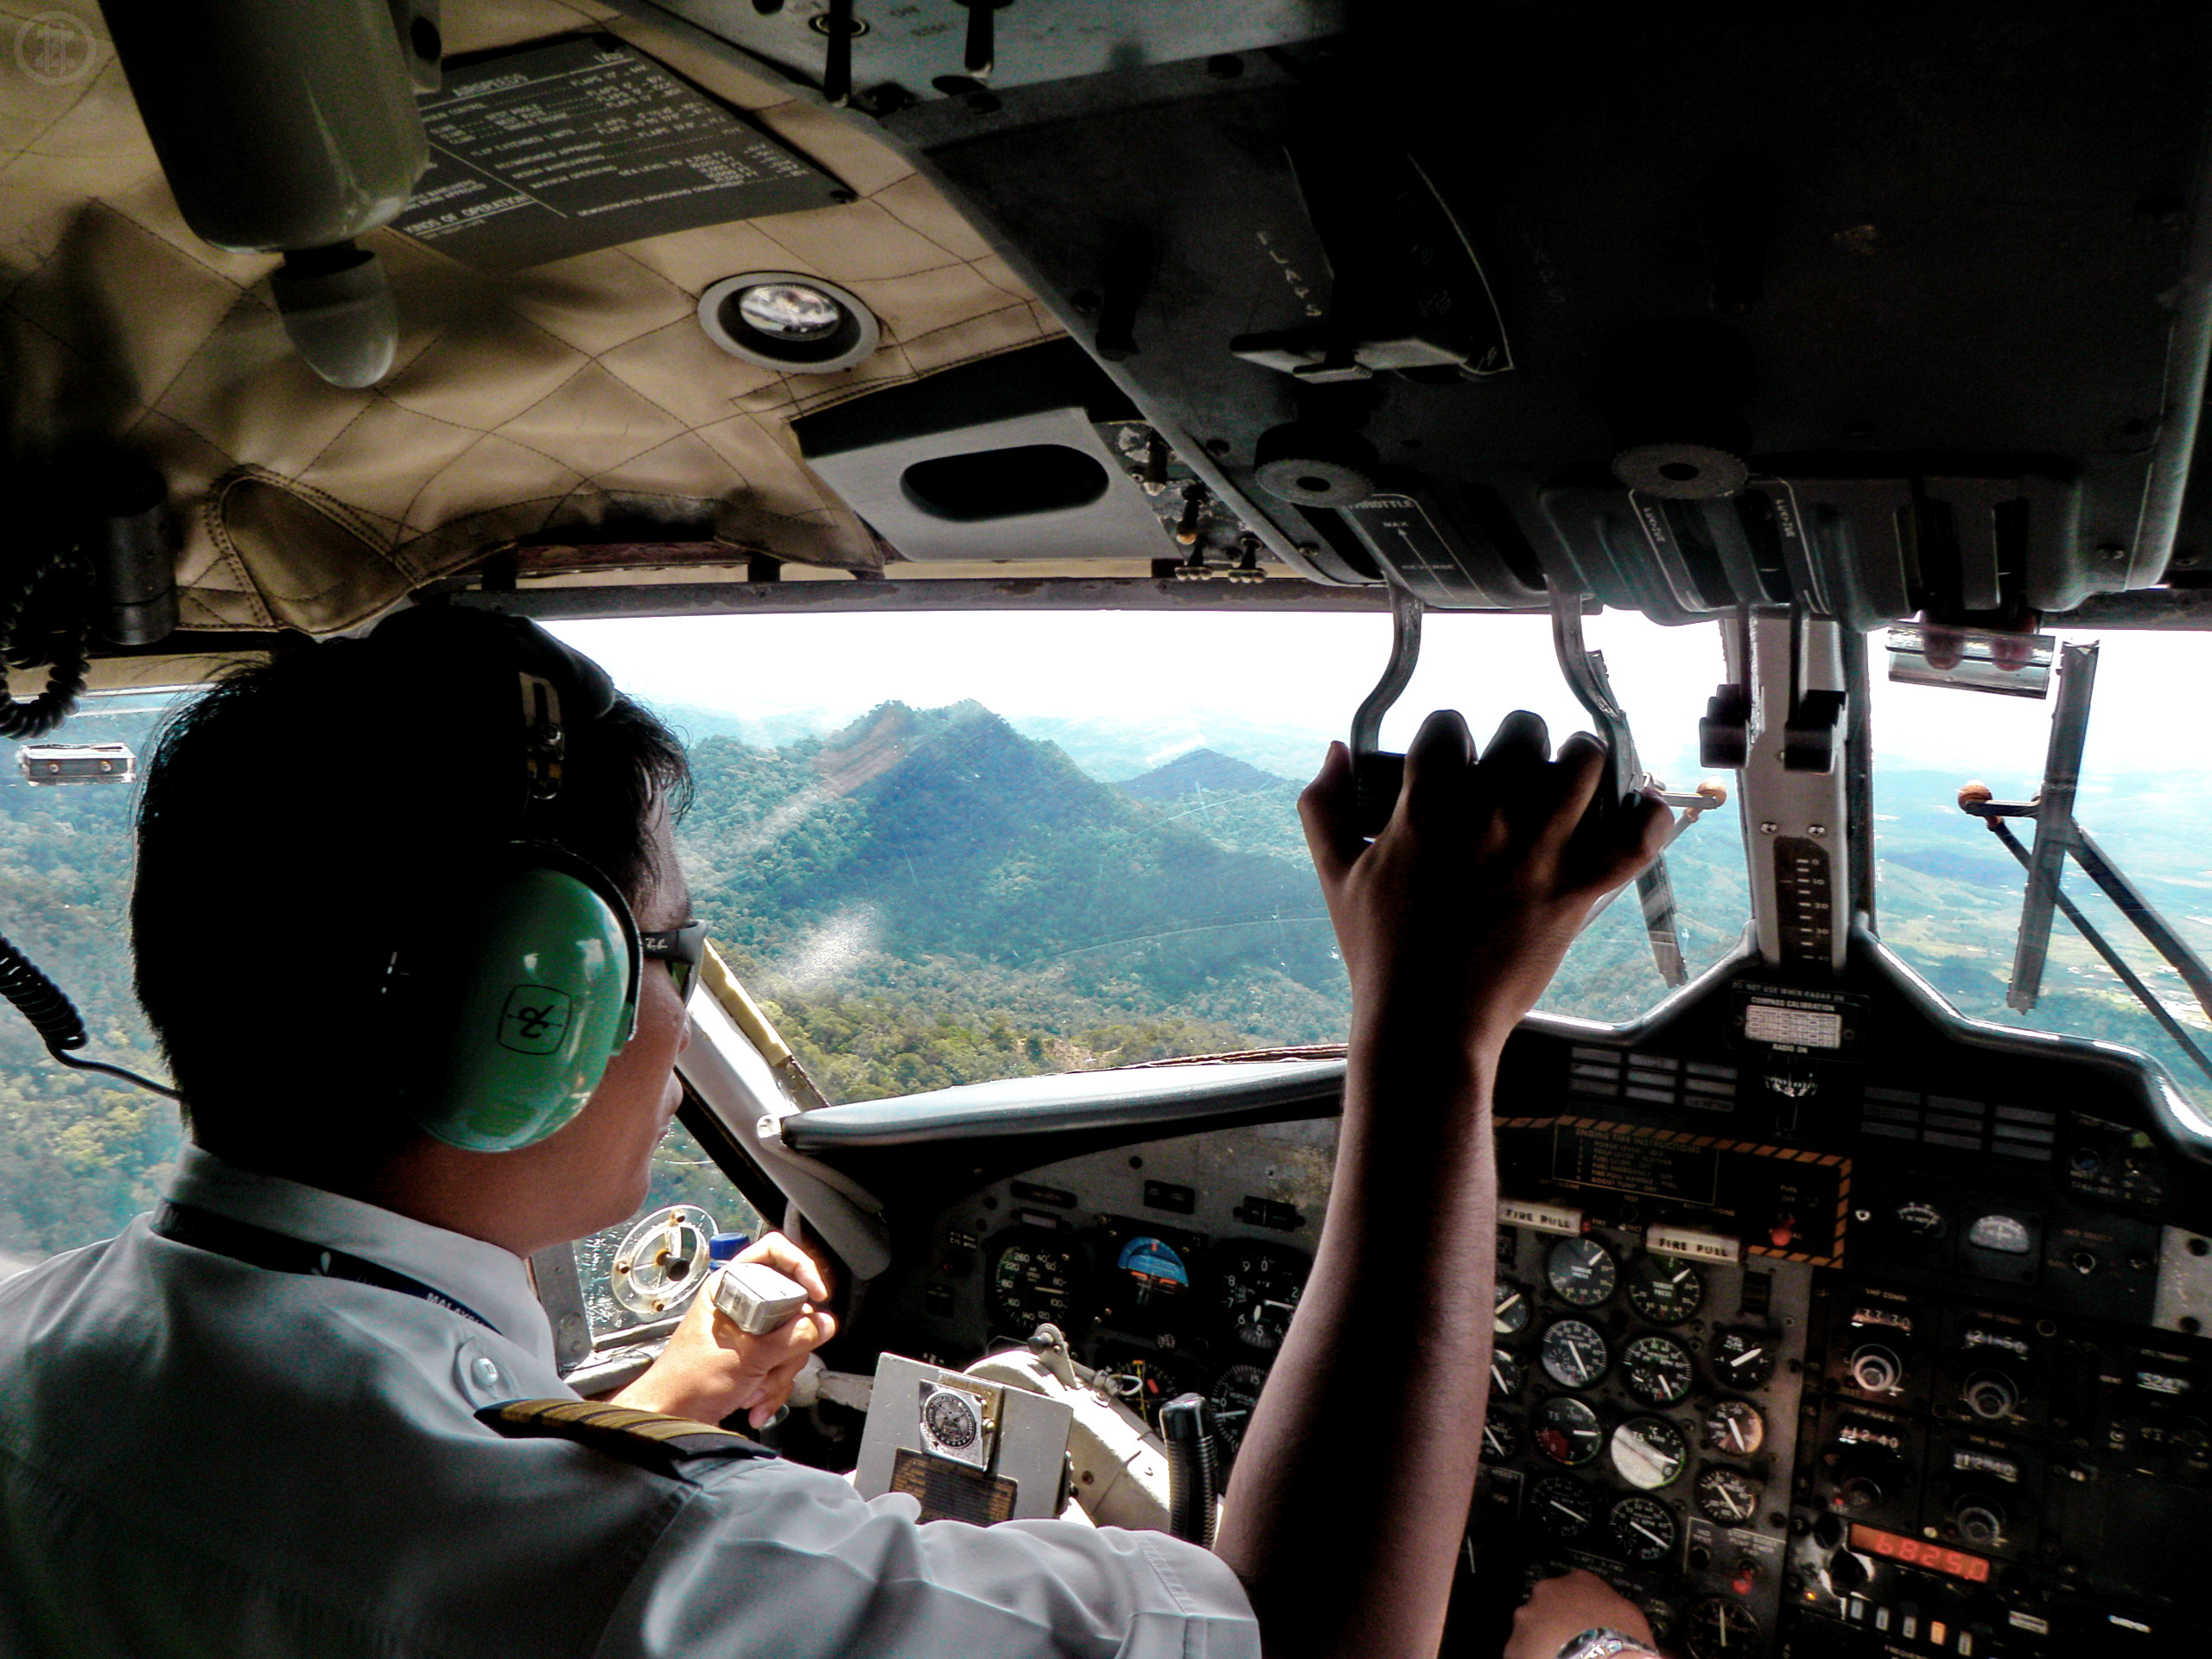
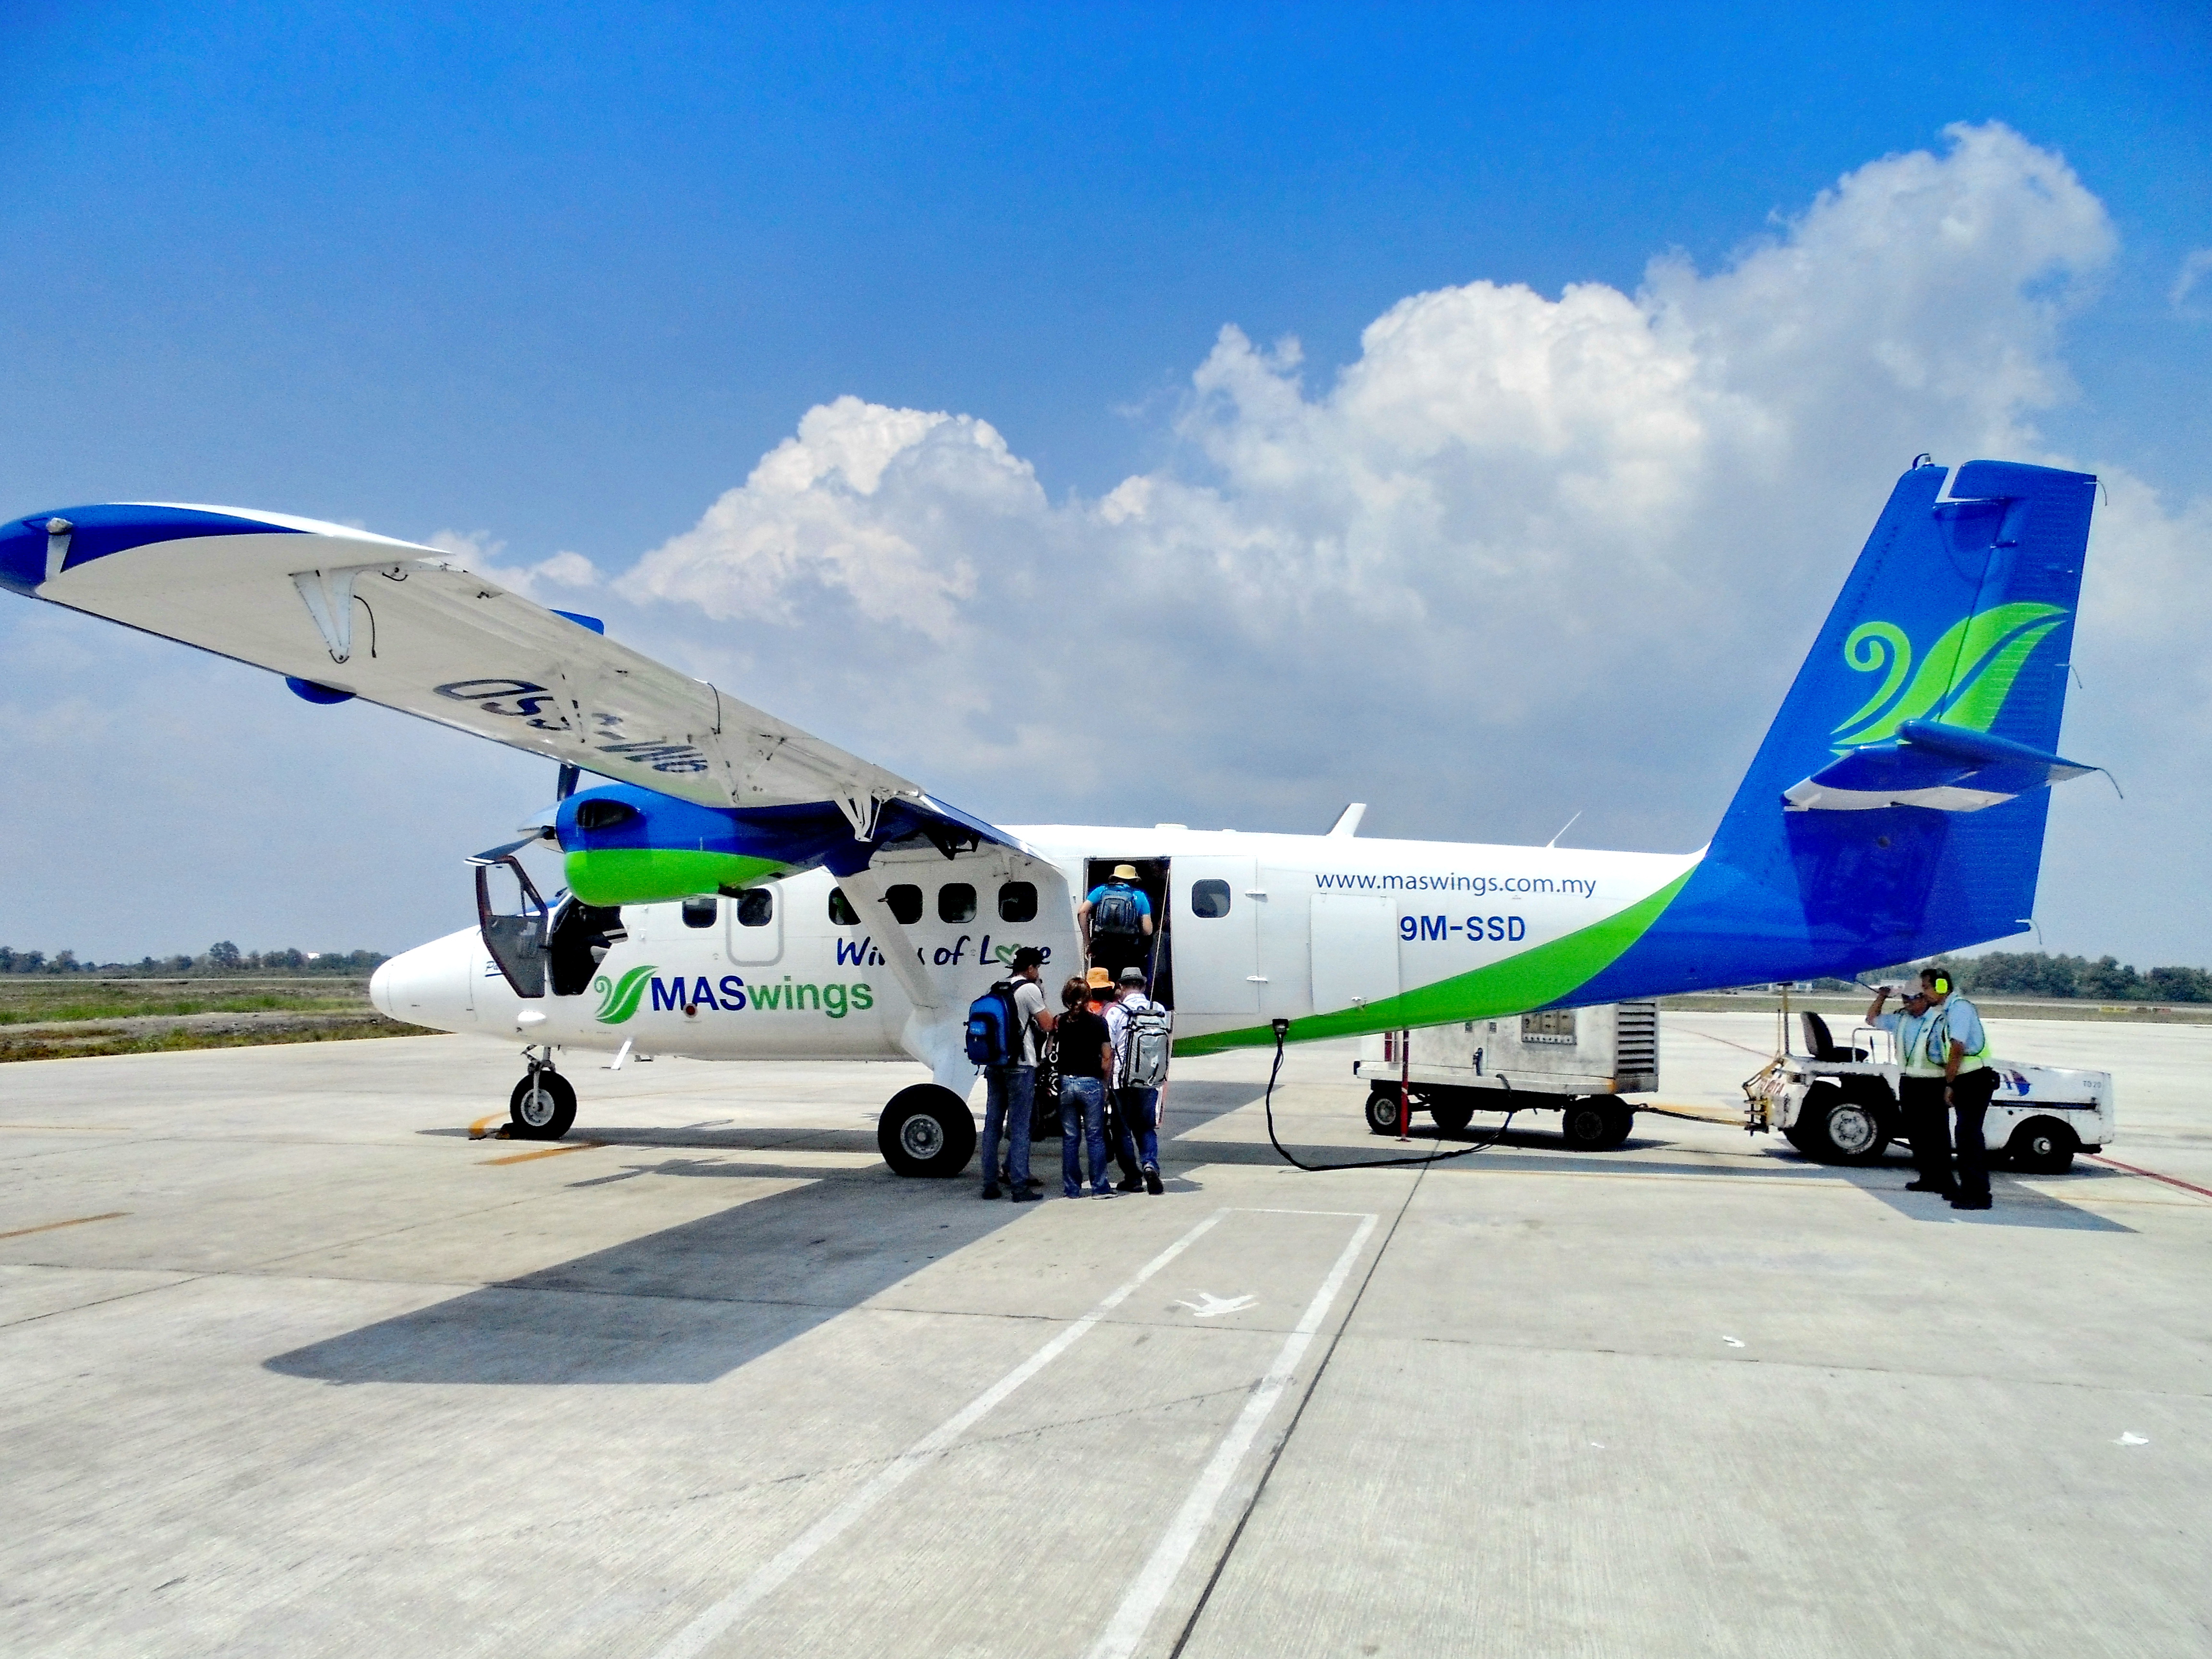
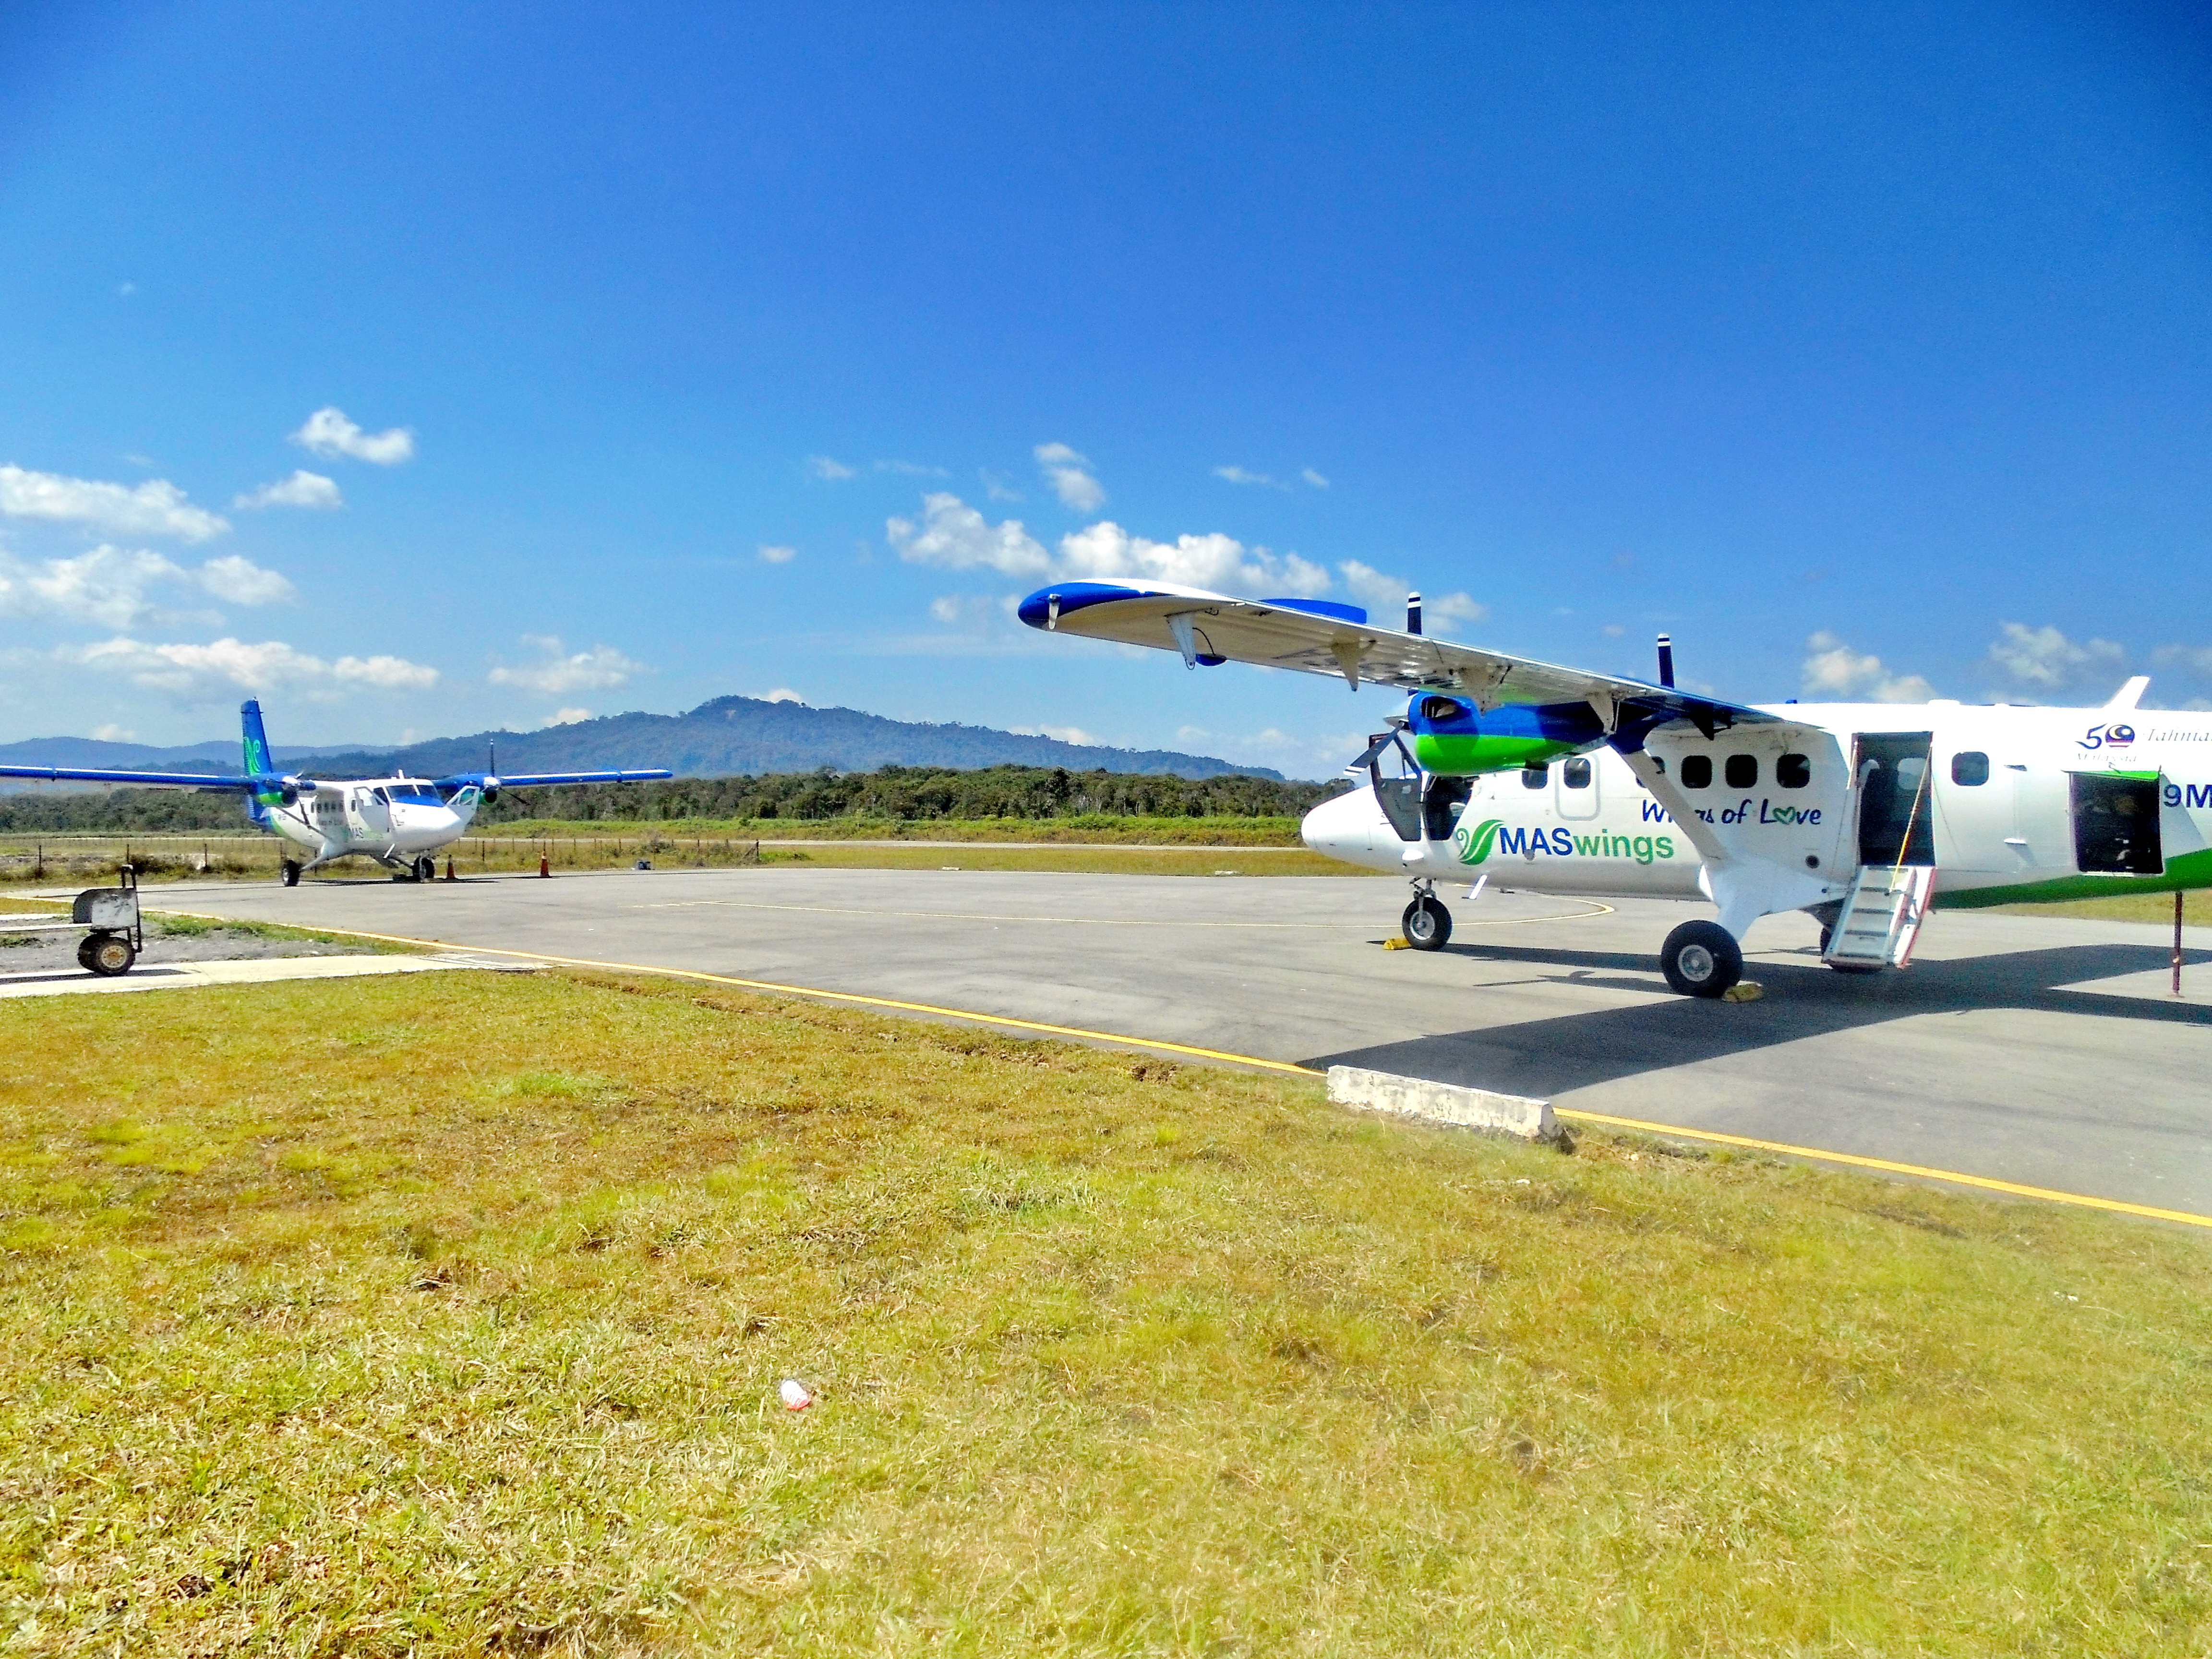
Embarking the MasWing DHC-6-400 Twin Otter to BarioLooking at DHC-6-400 Twin Otter from inside a DHC-6-400 Twin Otter
The flight from Miri Airport into Bario is on a small 19-seater MasWings DHC-6-400 Twin Otter, and the ticket price into Bario is RM116.54 (one way).
For what it is, it’s actually a relatively cheap flight. The MasWings Rural Air Services (RAS) flights are a public service run the Malaysian government’s to ensure that rural and remote areas of Sabah and Sarawak are adequately connected to the outside world. Without the government subsidies, it would cost passengers a lot more to fly into Bario. (estimates – RM400-500 one way – and that breaks even on a full load).
MasWings DHC-6-400 Twin Otter’s flight path into Bario
It is a 178km (96 nautical miles) flight journey that takes 45 minutes; and flying at only between 7000-8000ft, there’s a lot of details to see below. One good way to know what you’re looking at below is to carry a GPS unit with you on the plane. (There might even be an Google map enabled mobile app out there that does this).
THINGS TO SPOT OUT OF THE WINDOW
Heading into Bario, the windows on the left offer quite a good number of things to look at. At one point, you’ll be flying just on the edge of the Sarawak-Brunei boundary, and you can see straight into Brunei territory (It’s the part of the trip where the trees and forest are untouched and very much green).
On the Sarawak side, there are logging tracks and palm oil plantations thousands of acres wide.
Mulu is where the flat lowland ends, and the mountainous range of the highlands begin.
Mulu is where the flatland ends and the mountain terrain begins.
Before you get to Bario, you’ll see the Mulu airstrip, and the UNESCO World Heritage, Mulu National Park – home to Mount Mulu (Sarawak’s 2nd highest peak), and the world famous Mulu Caves.
The Mulu Airport – with Direct flights to Miri, Kota Kinabalu, and Kuching.Mount Mulu, at 7795ft is Malaysia’s 5th highest peak.
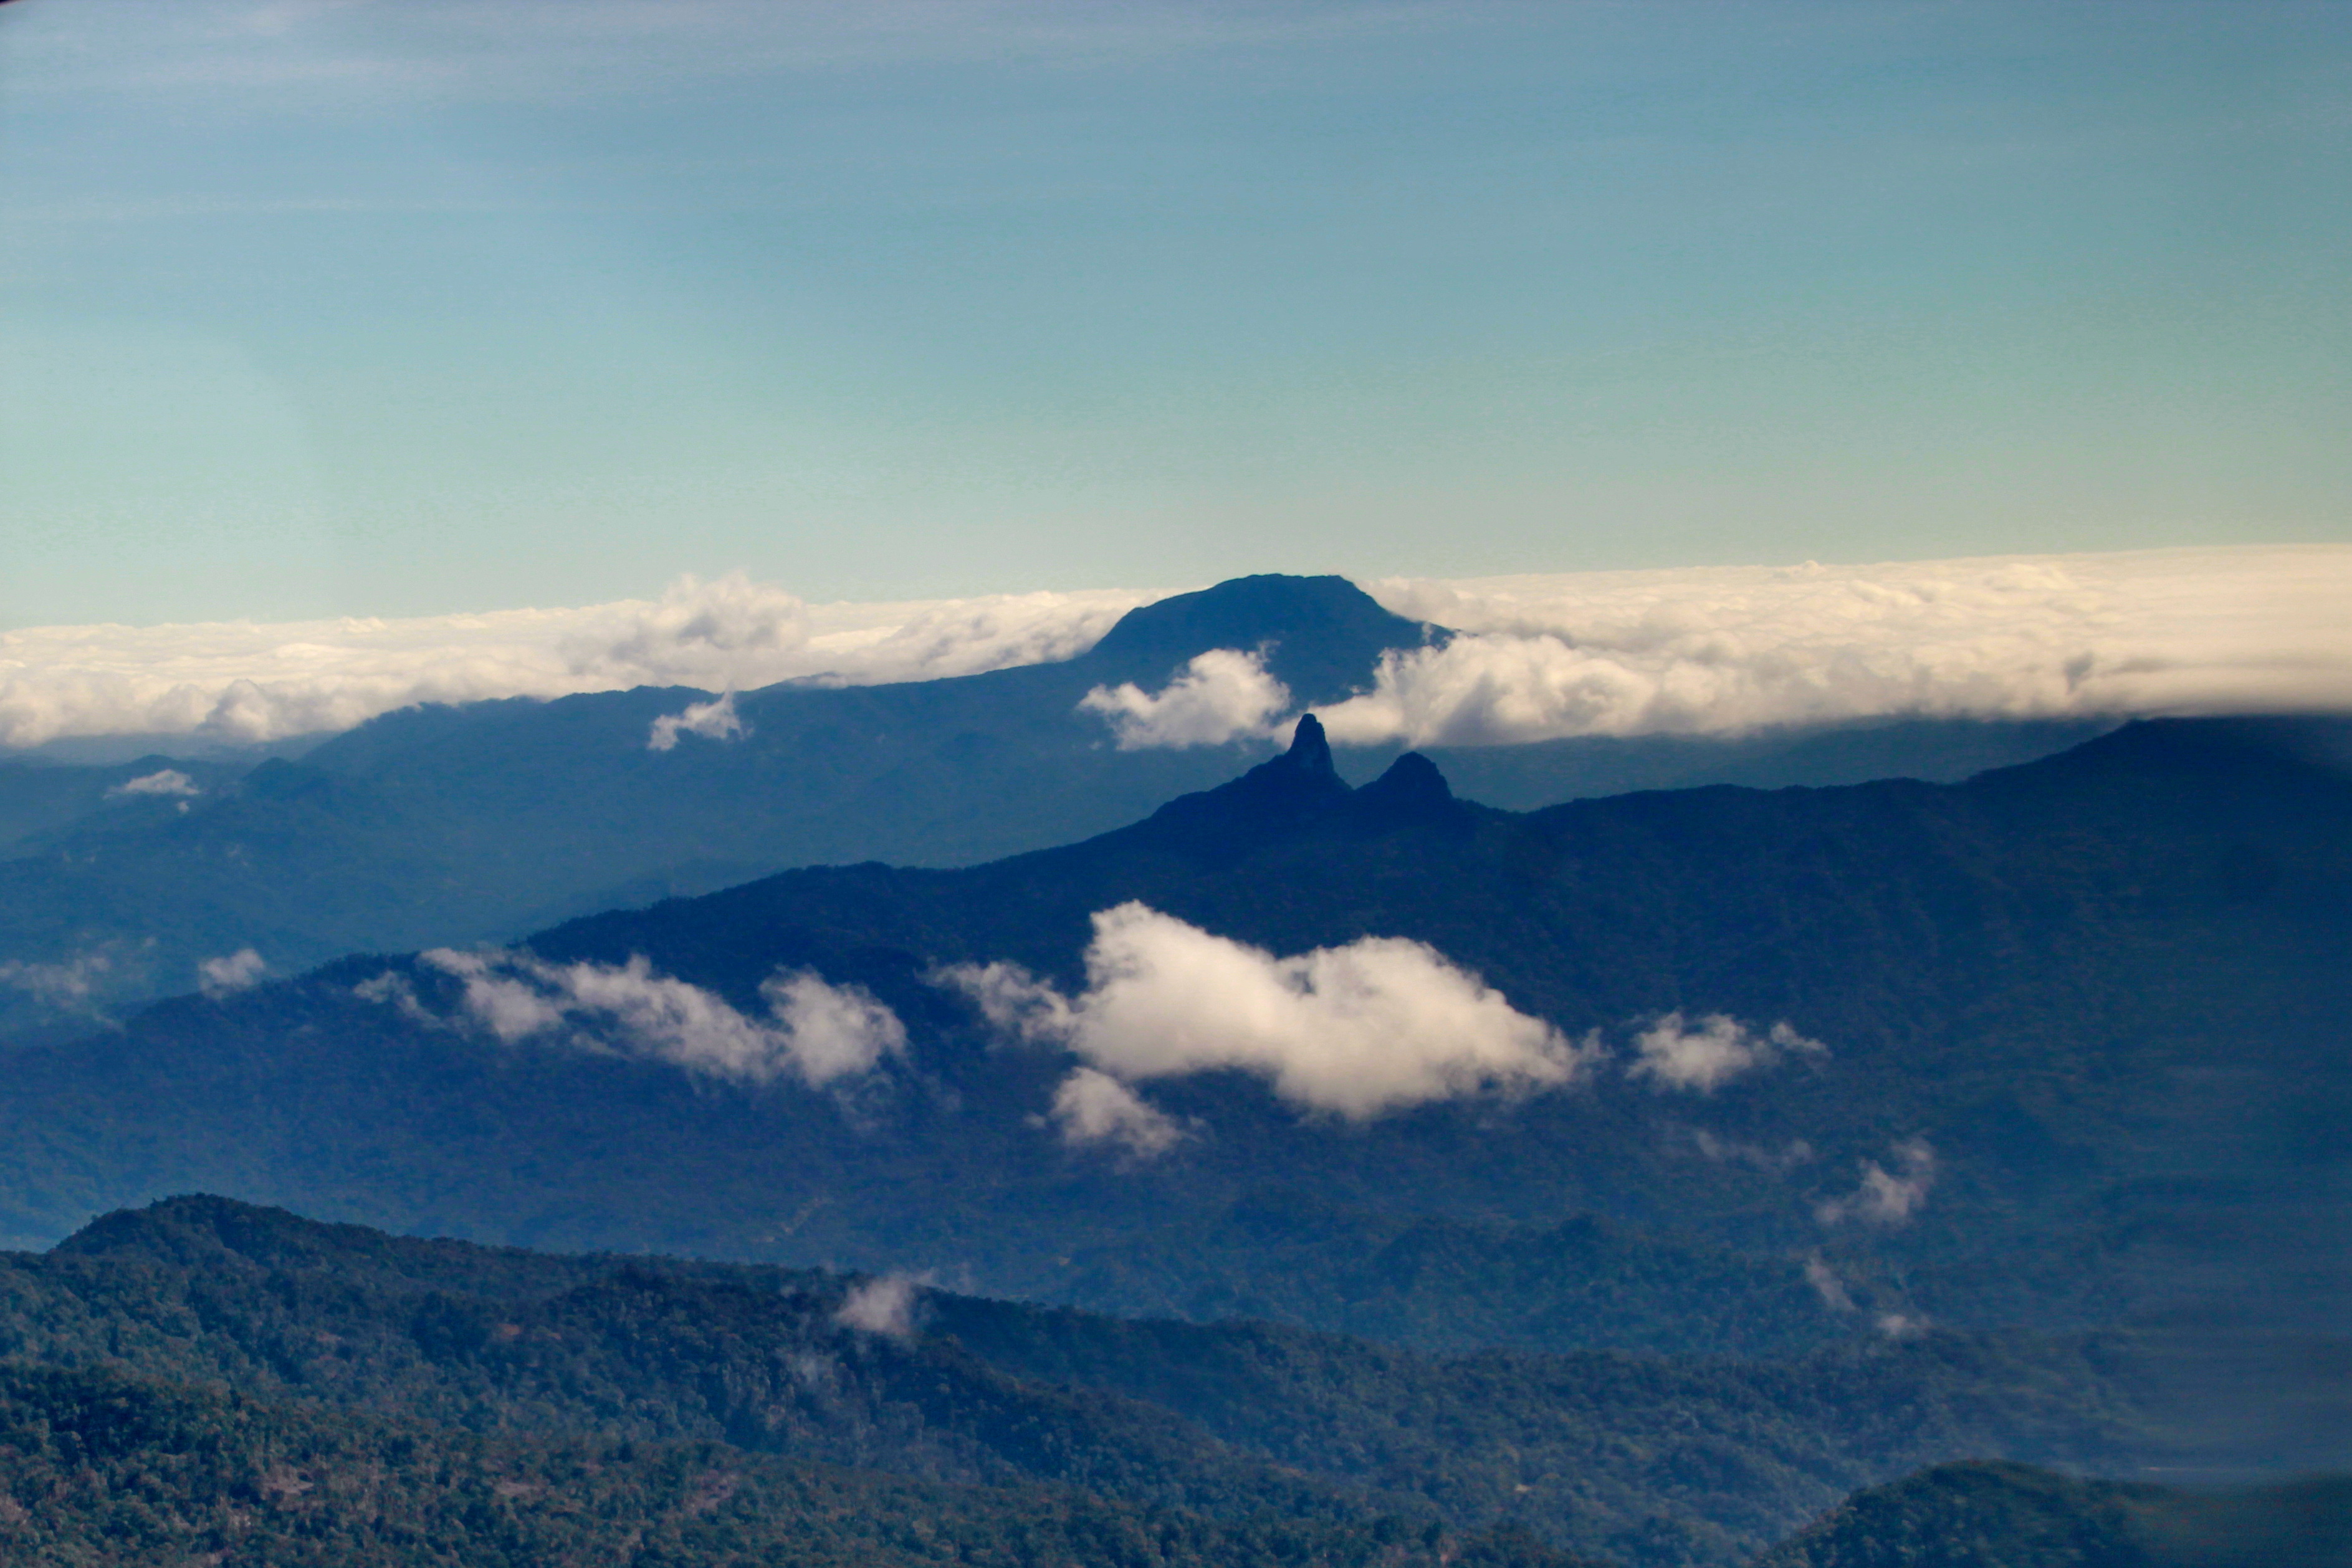
Somehwere in between, you’ll see a rock formation that looks like two fingers poking into the sky. This is Batu Lawi. It is a landmark that says ‘you’re in Kelabit country’. By foot, it’s 3-4 days trek from Bario.
This is Batu Lawi. It is a Kelabit landmark that is etched deeply into the Kelabit identity.
You’ll also see Sarawak’s tallest mountain – Mount Murud.
Batu Lawi and Mount Murud in the background. At 7946ft, Murud is Sarawak’s higest, and Malaysia’s 4th higest peak.
Anabatic Winds and The Roller Coaster Welcome!
When you’re flying in, the early morning flights are usually the smoothest. However, if you catch a late morning flight (10.45am – 11-ish flights) on a bright sunny day, that’s when the ride is usually bumpy at the tail end of the flight. As the terrain get’s higher, the aircraft gets into contact with anabatic winds or updrafts from the many mountain ridges.
The mountain range climb up to aircraft’s altitude. The thermals from the ridges makes for a bumpy ride.
This happens when sun starts to heat the air in the mountains ranges, and this effect causes gusts and winds that blow updrafts along the valleys and ridges. This thermal effect is the cause of the bumpy rides as the aircrafts flies over and through these updrafts. It’s all relatively safe, as the Canadian Twin Otters are powerful and robust planes, but it does give some passengers motion sickness, and for others, the fright of their lives. On a really bumpy day, I like to think of it as a mild-medium roller coaster ride, 7800ft in the sky.
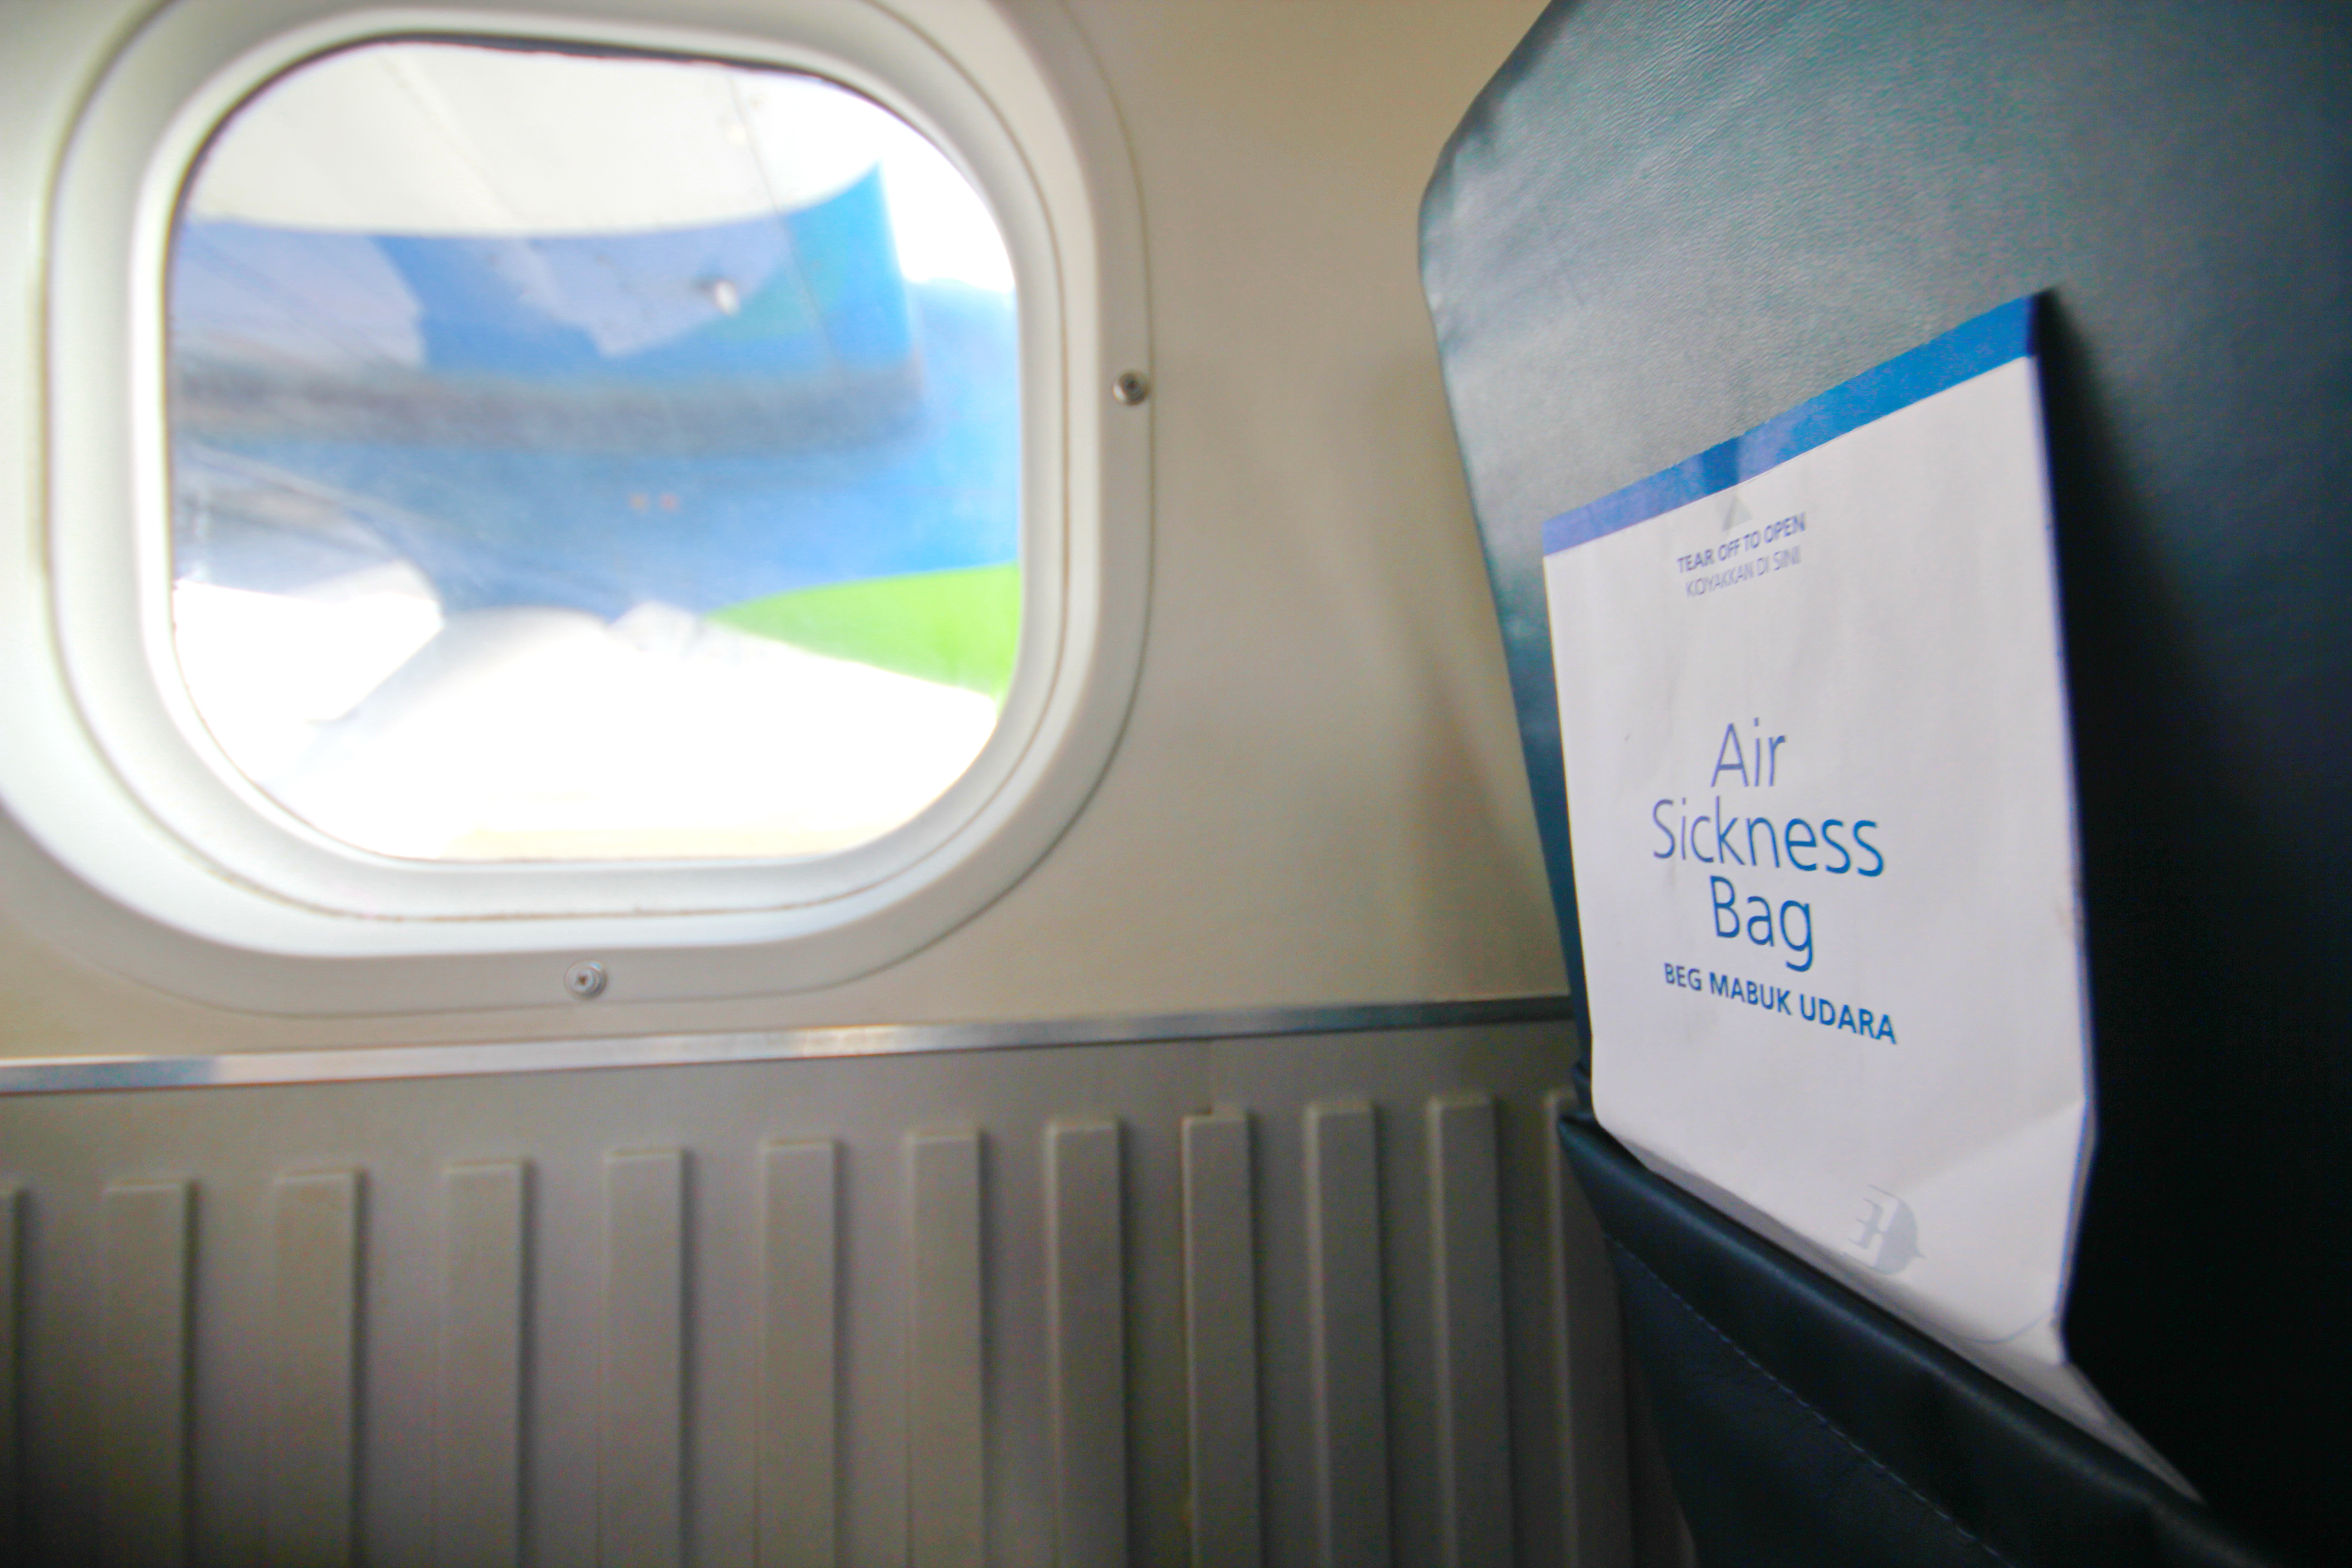
Sick Bags for your breakfast coming out the wrong end.
The good news is, it’s usually a short roller coaster ride, maybe about 5 minutes worth. Once the aircraft flies into the valley, the roller coaster usually eases.
Back in the old days, as soon as you got out of the plane, everyone you meet at the airfield will greet you and shake your hands. They’ll ask you how you are, where you came from, and invite you to drop in for a meal, whoever you are (and this is not an exaggeration). Sadly though, that very confident and warmly hospitable generation is slowly disappearing. You’ll still get the an old Kelabit guy or lady walk up to you and do just that, but that’s probably 2 out of every 10 persons at the airport now. But if you’re in need of any help or advice, everyone will gladly come to your aid. So don’t be afraid to ask for assistance from anyone around. You’re now in Bario, and everyone is a friend.
VERY IMPORTANT INFORMATION FOR VISITORS TO BARIO WHEN BOOKING FLIGHT SEATS ONLINE:
Problem: If you’re travelling through Sarawak on a tight schedule, but you can’t book a seat out of Bario on the day you want to get out, don’t give up yet. It may not mean what you think it says. Because of Bario’s remoteness, available seats out of Bario are not accurately reflected in the online booking system. Solution : You can liaise with your Bario accommodation provider to help you check for, and arrange a seat out of Bario in instances where the online booking system tells you that there are no seats out of Bario. These seats are allocated in the Bario Airport itself, so your contacts up in Bario can better help you get a seat out.
Alternatively, the other way you can get to bario is by 4Wheel Drive vehicles. But that’s for another time.
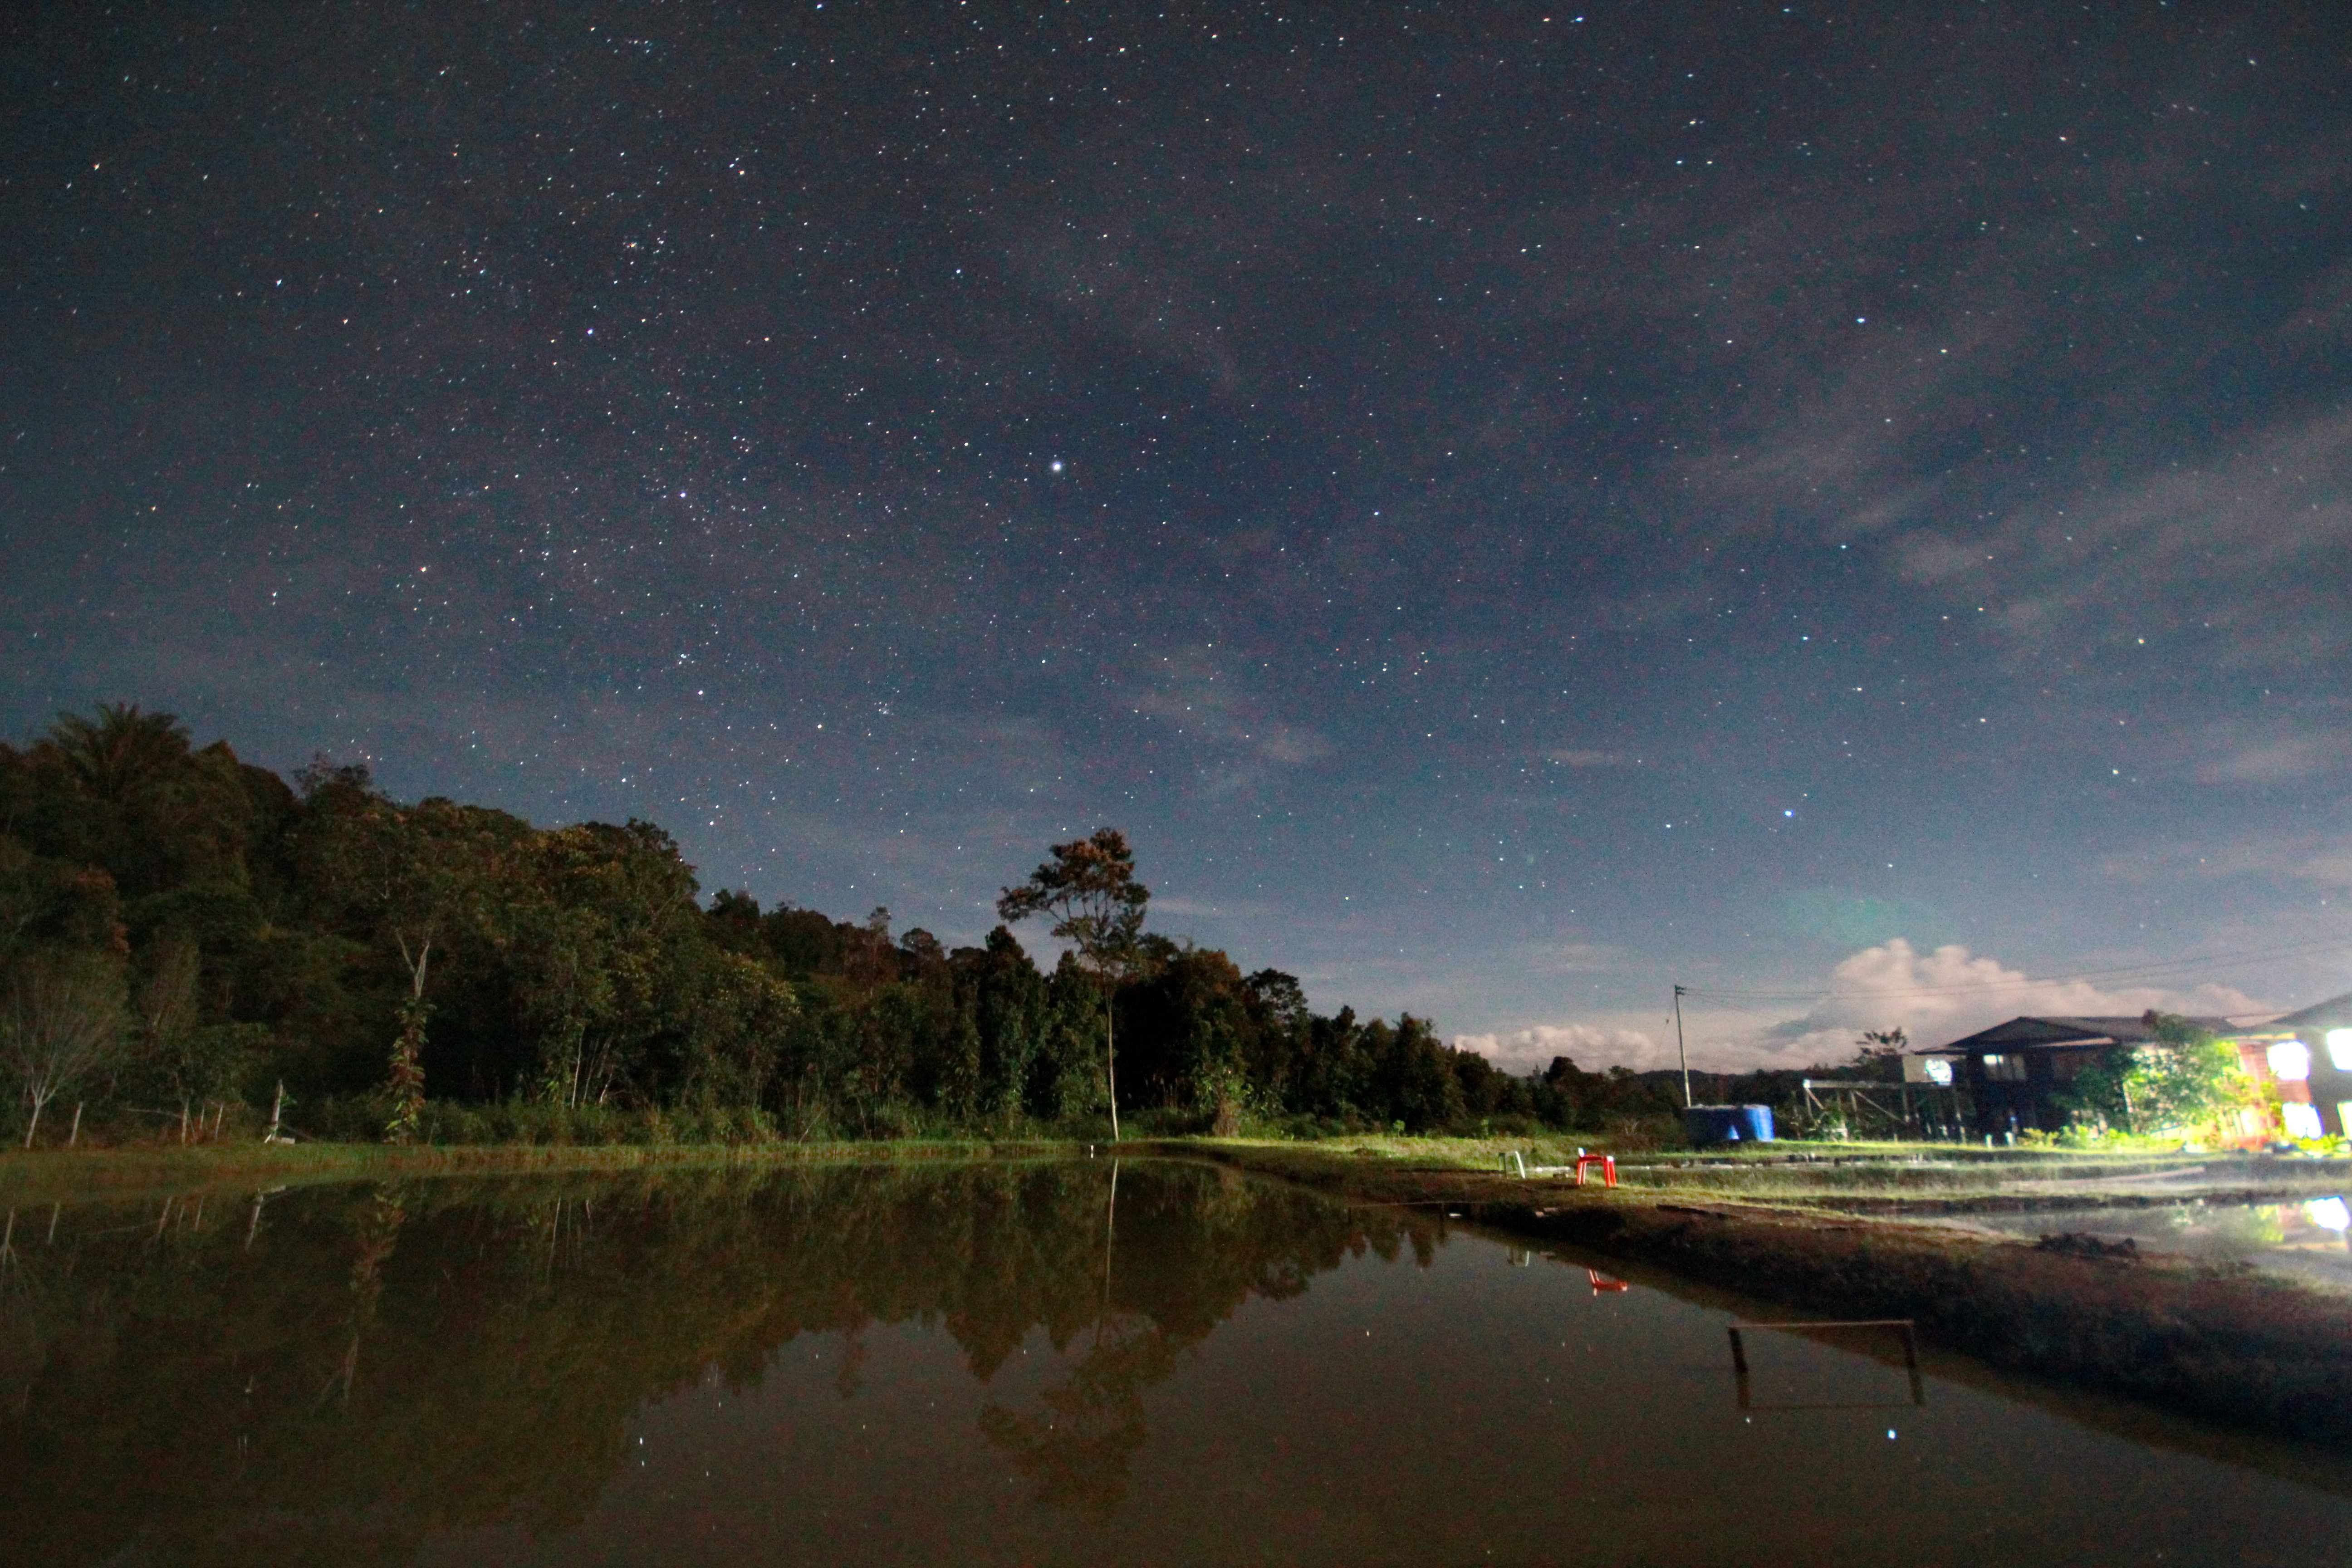
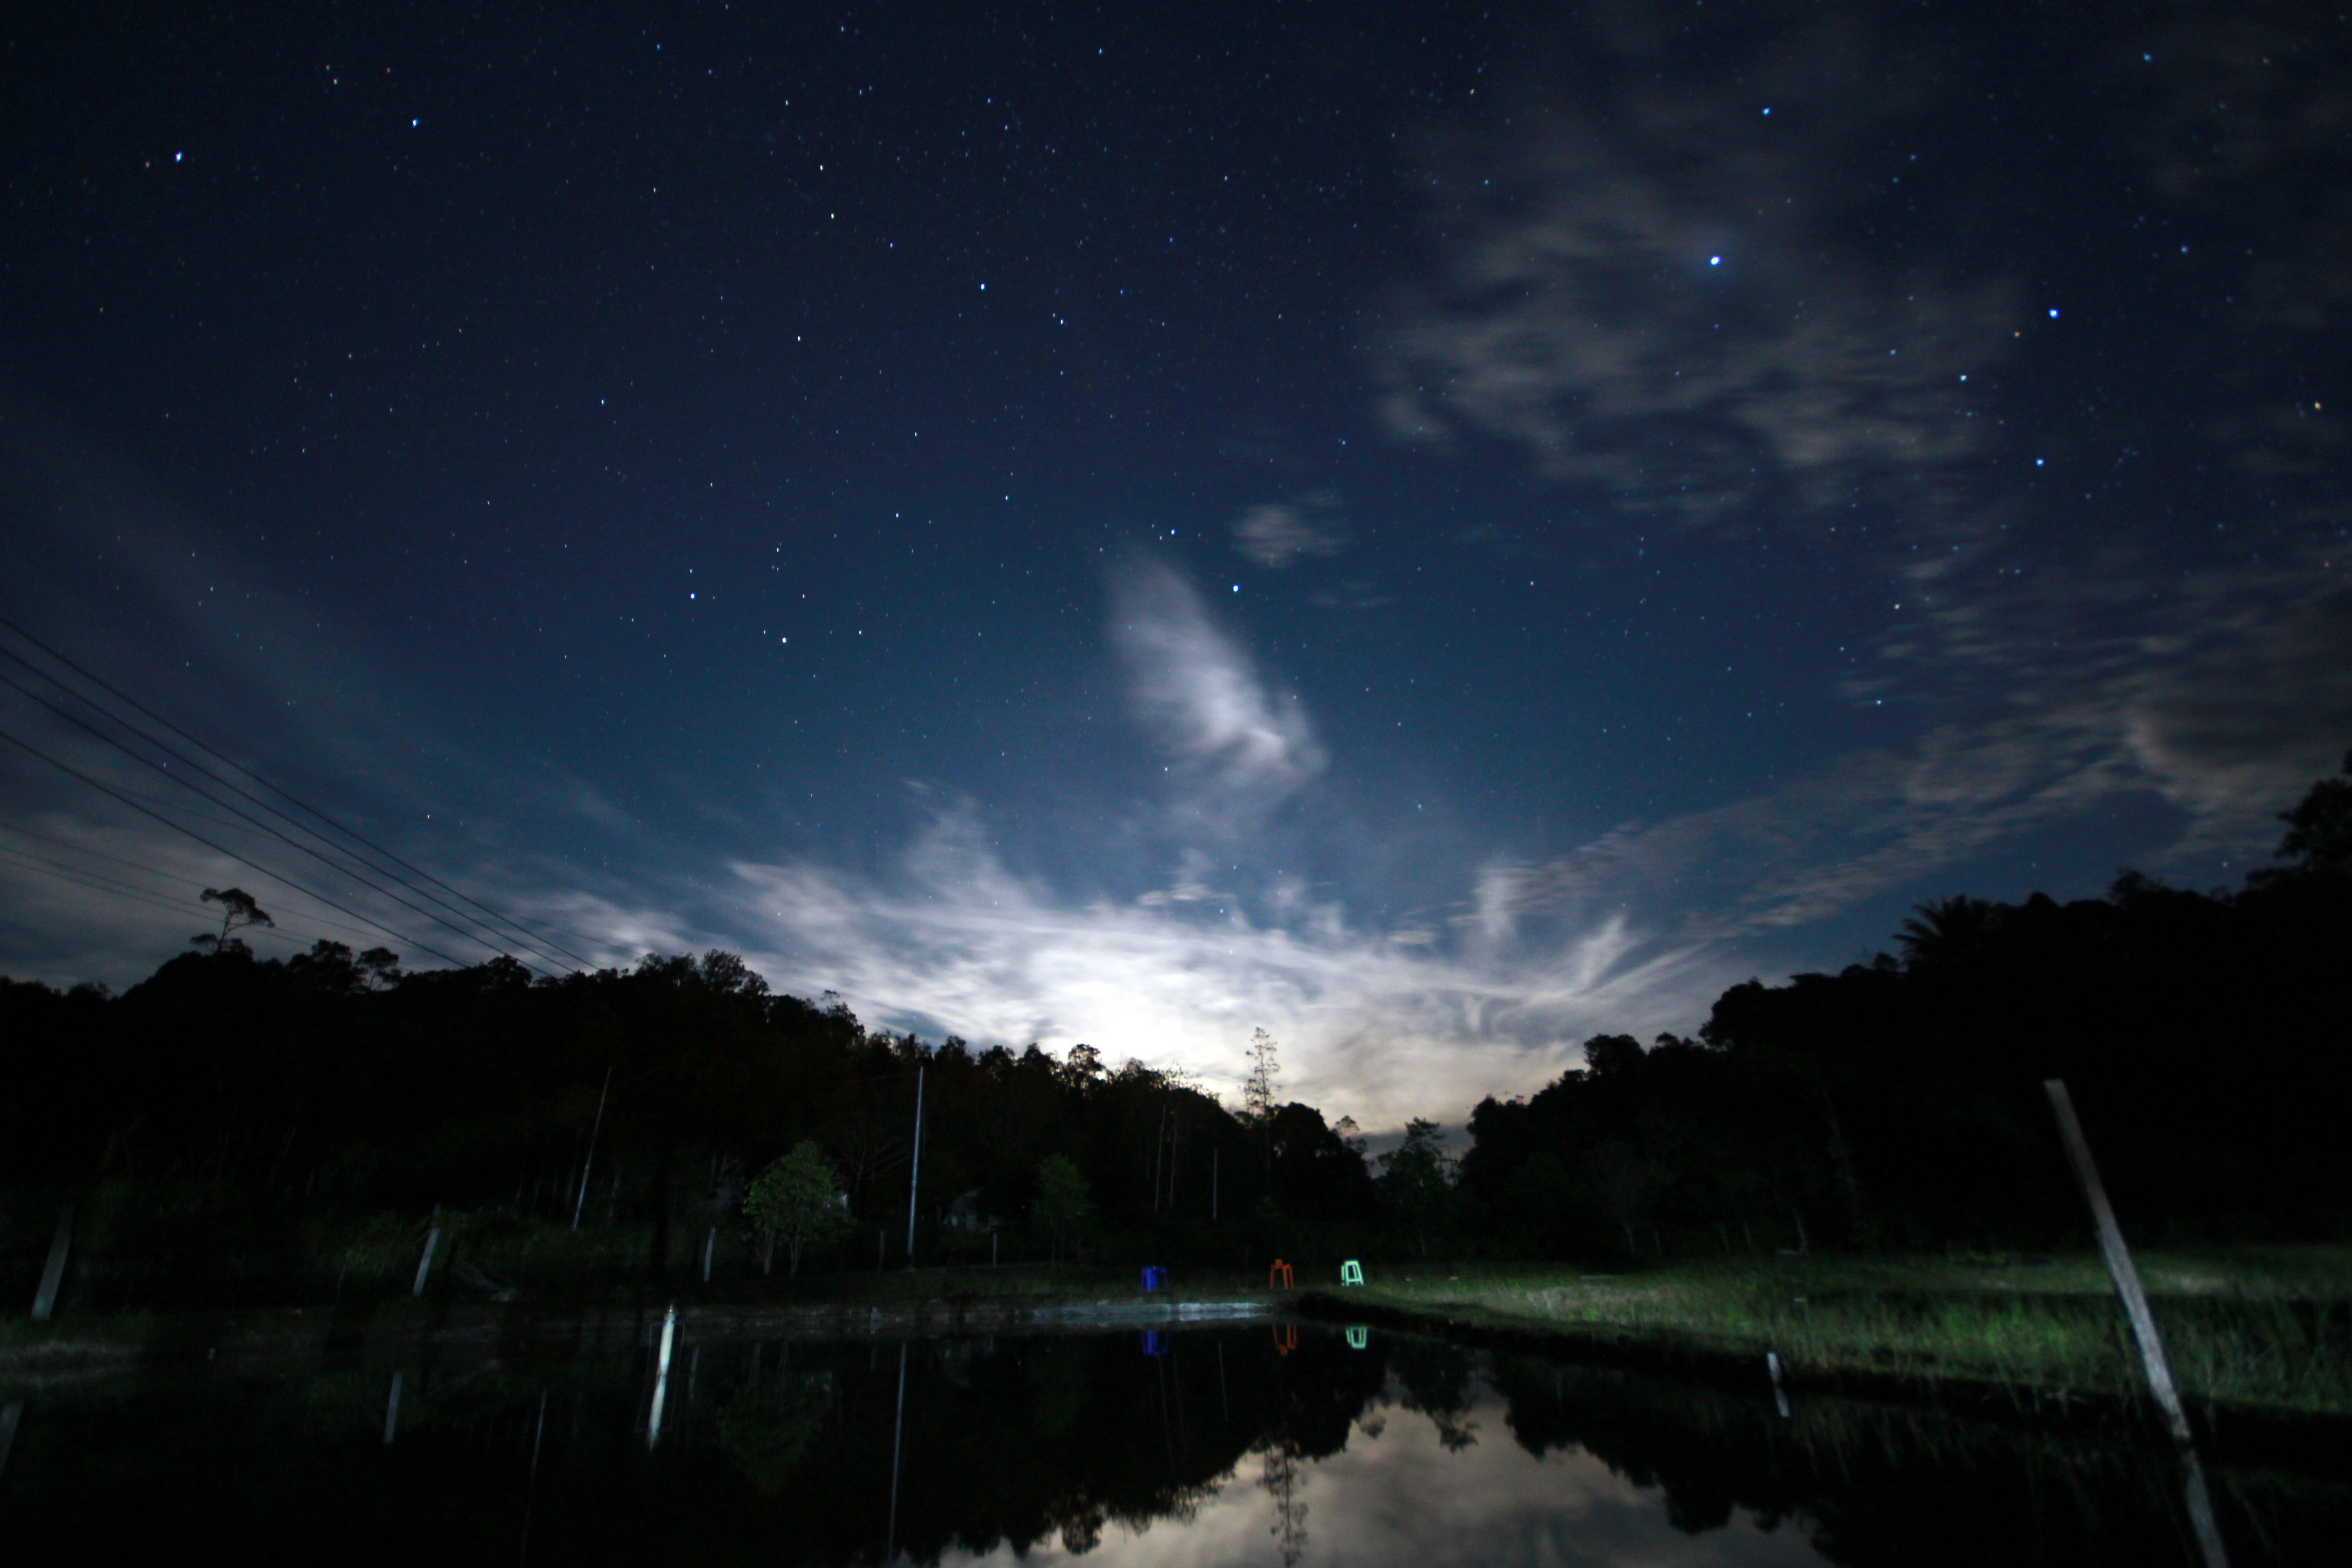
In Bario, when the sun goes down, the stars come out to play.
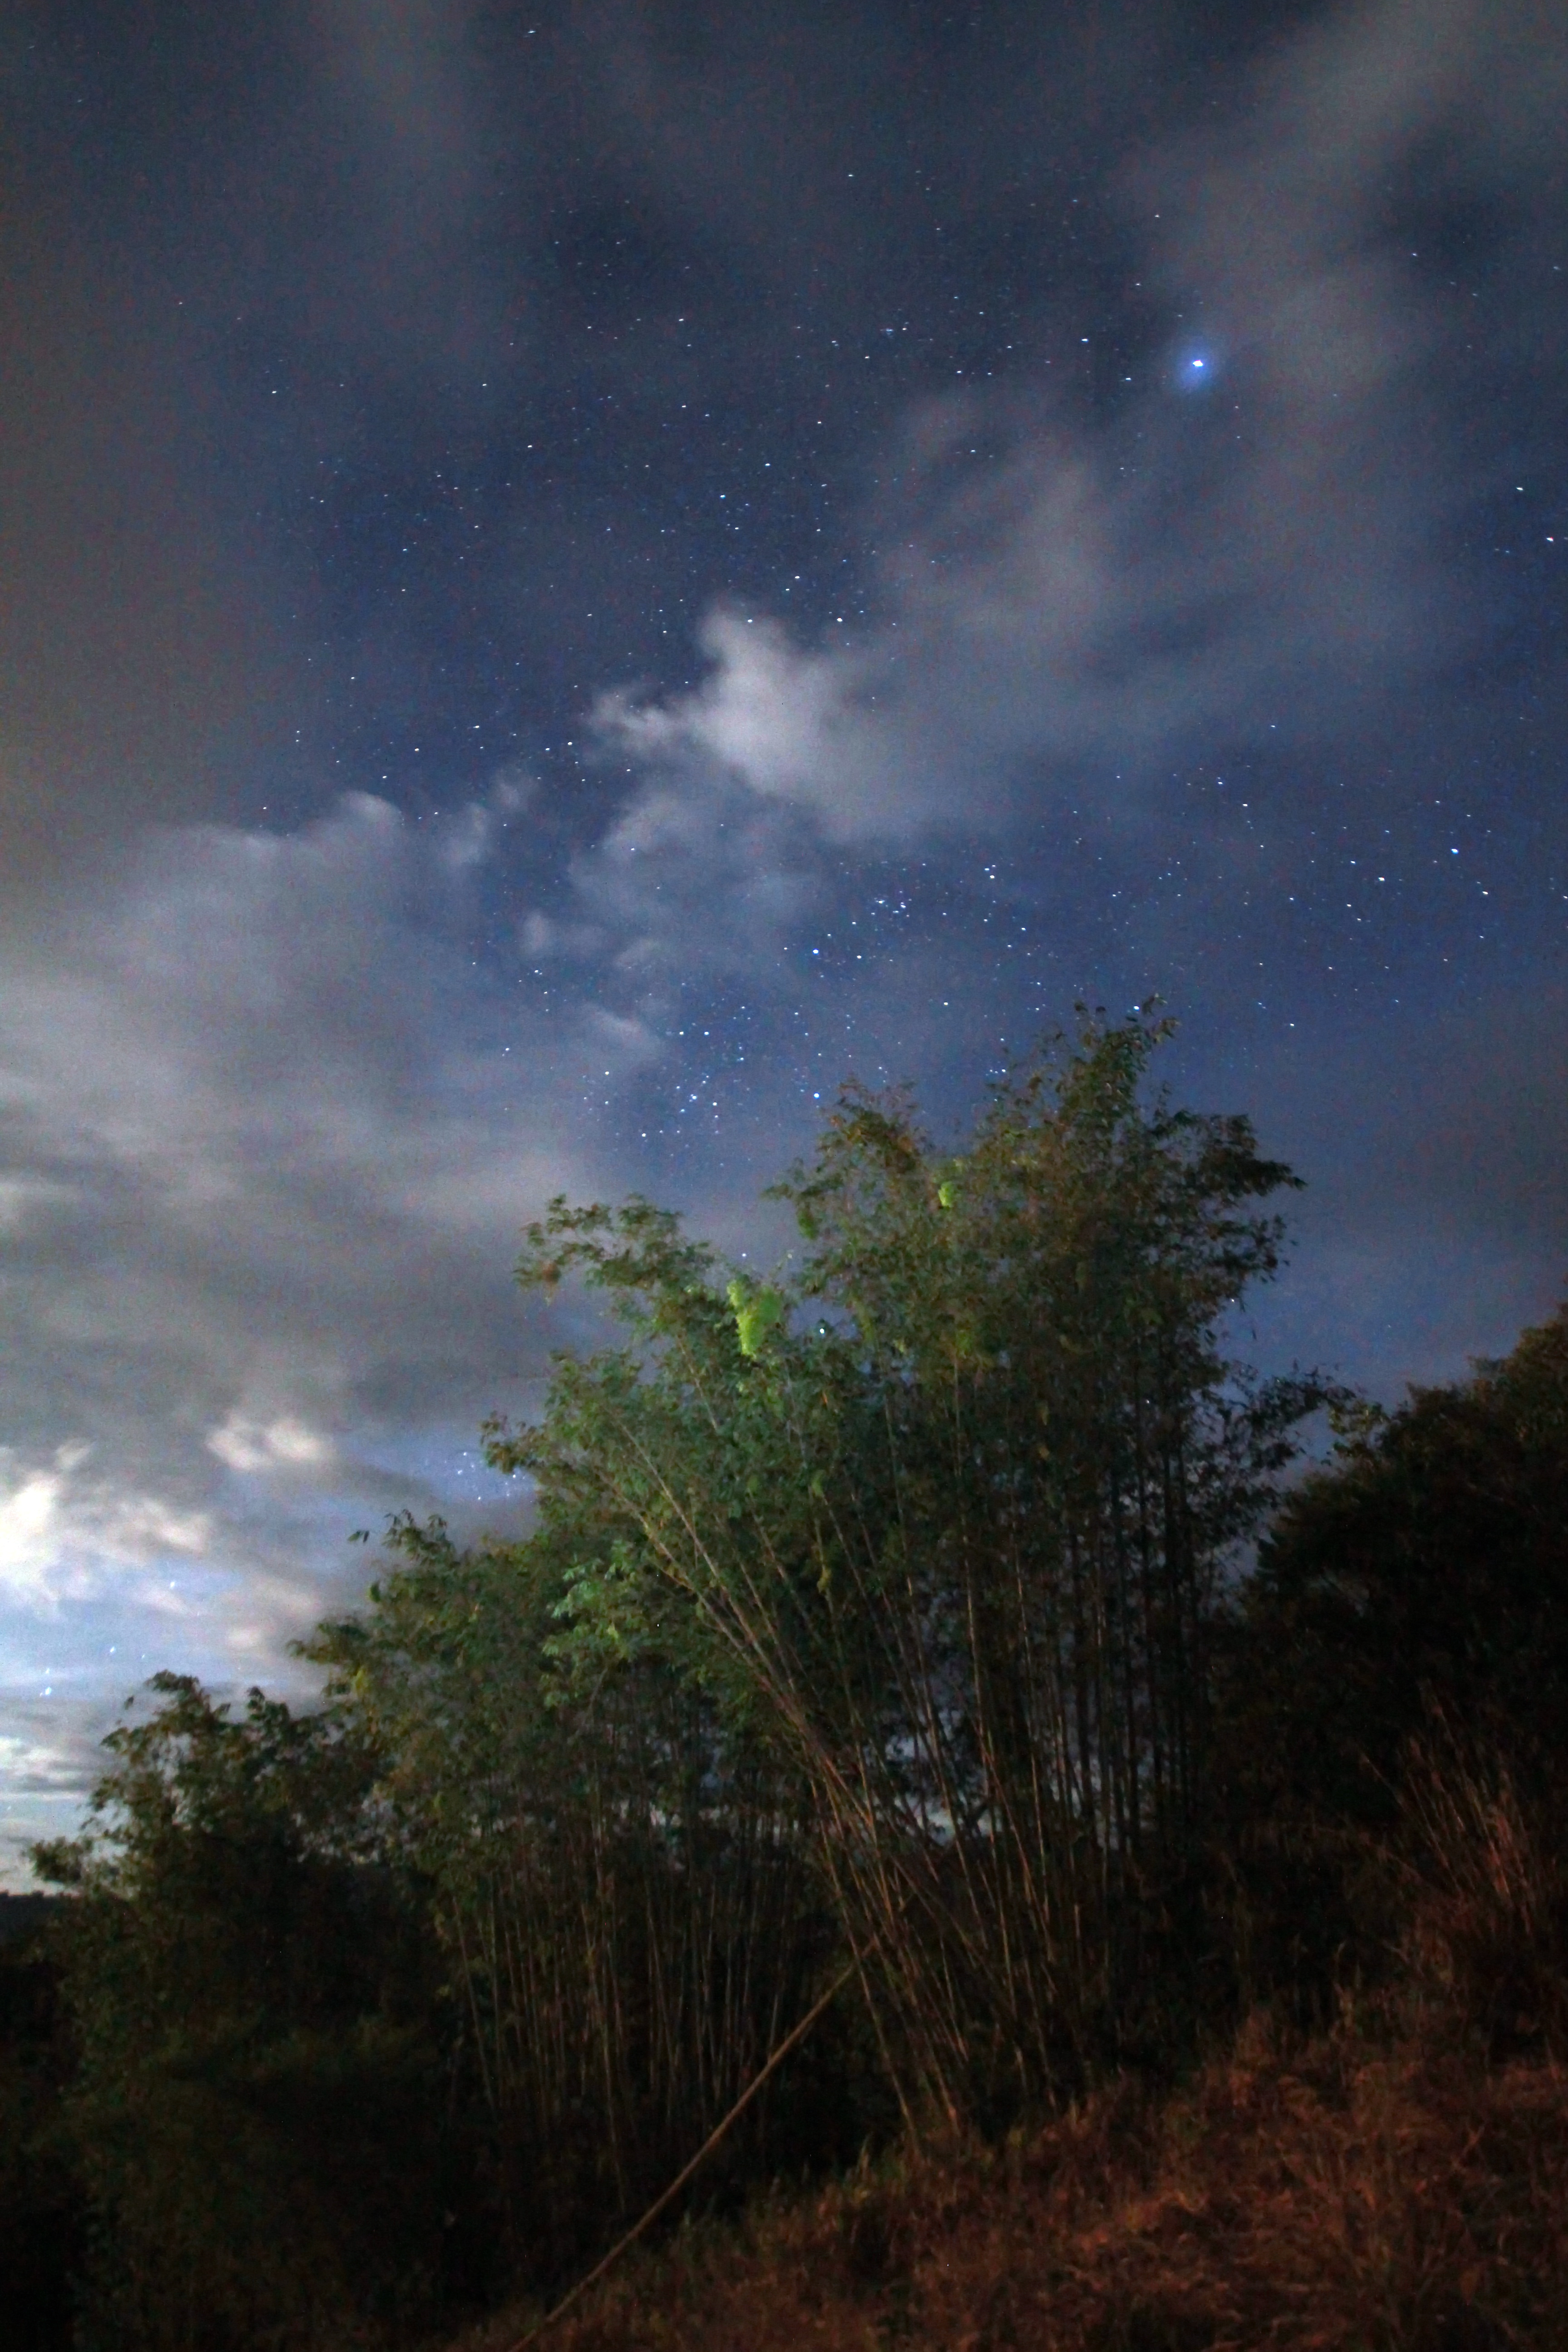
One would think that only professionals photographers could take night shots like these. In some ways, that’s true… a long time ago. But with the new technology found in many amateur ‘entry-level’ cameras today, it’s not that hard for a beginner to take beautiful starry-night photos like these. Of course, there are many levels of camera technology, and a high-end camera can do wonders with more ease than the low-end camera, but with the right skills, you can take great starry-night shots (official term is astrophotography) with an entry-level camera that would make your friends on FB go WOW!
THE STATISTICS SAY: 🙂
If you’ve come to Bario, chances are you’ll be carrying a camera of some sort. There’s also a good half chance of you knowing how to use only half your camera’s full set of features and potential (mostly the Full-Auto mode green box and Auto-Scene mode – sports/low light/landscape functions). And if that’s the case, you’d have missed a great opportunity to shoot Bario’s beautiful starlit nightscape (and when the street lights are fully installed in the future, you may never have the chance again).
START EASY
So, here’s a quick easy instruction on how to ‘start’ with night photogaphy and astro-photography when you are in Bario.
The Moon Grass
Now, entry-level digital cameras today are heaps more advanced in terms of features, control and sensitivity than they were 10 years ago, so what’s more important to a great night shot these days is not so much the quality of the camera but the quality of the eye that composes the shot, and the weather conditions of the night itself.
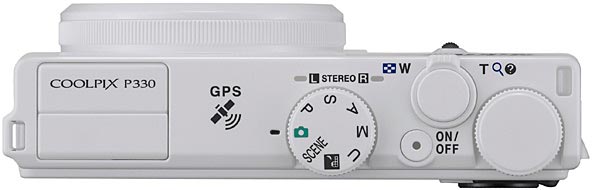
CHECK YOUR EQUIPMENT:
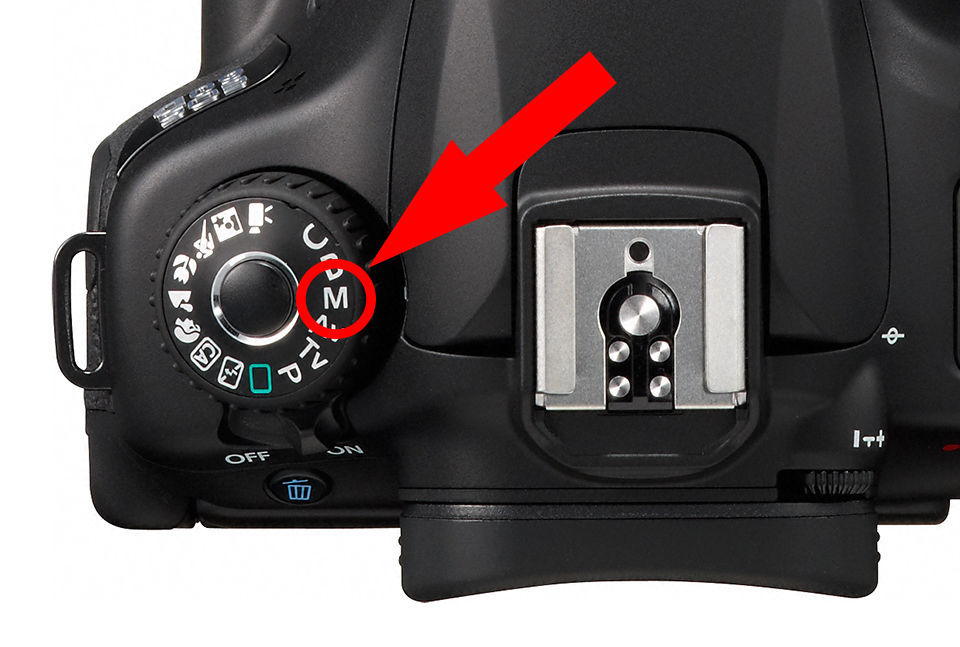
So long as your digital camera has a ‘Manual’ (M) mode (and you can also find them even in some point-and-shoot compact cameras), you already have the basic tool you need to start taking these photos. However, if your compact camera doesn’t have the (M) function on it, then you’re out of luck.
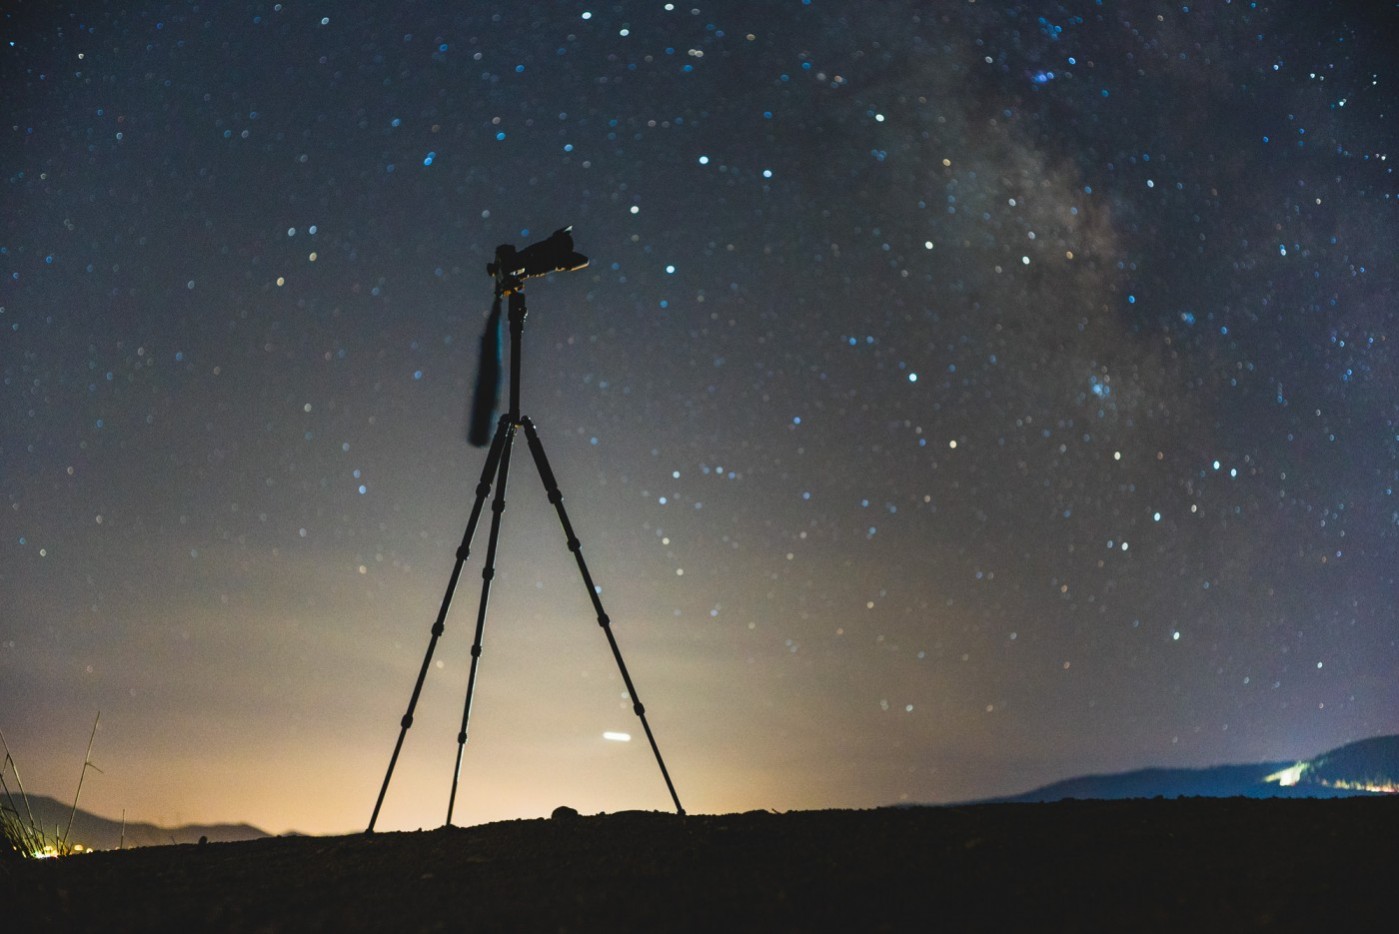
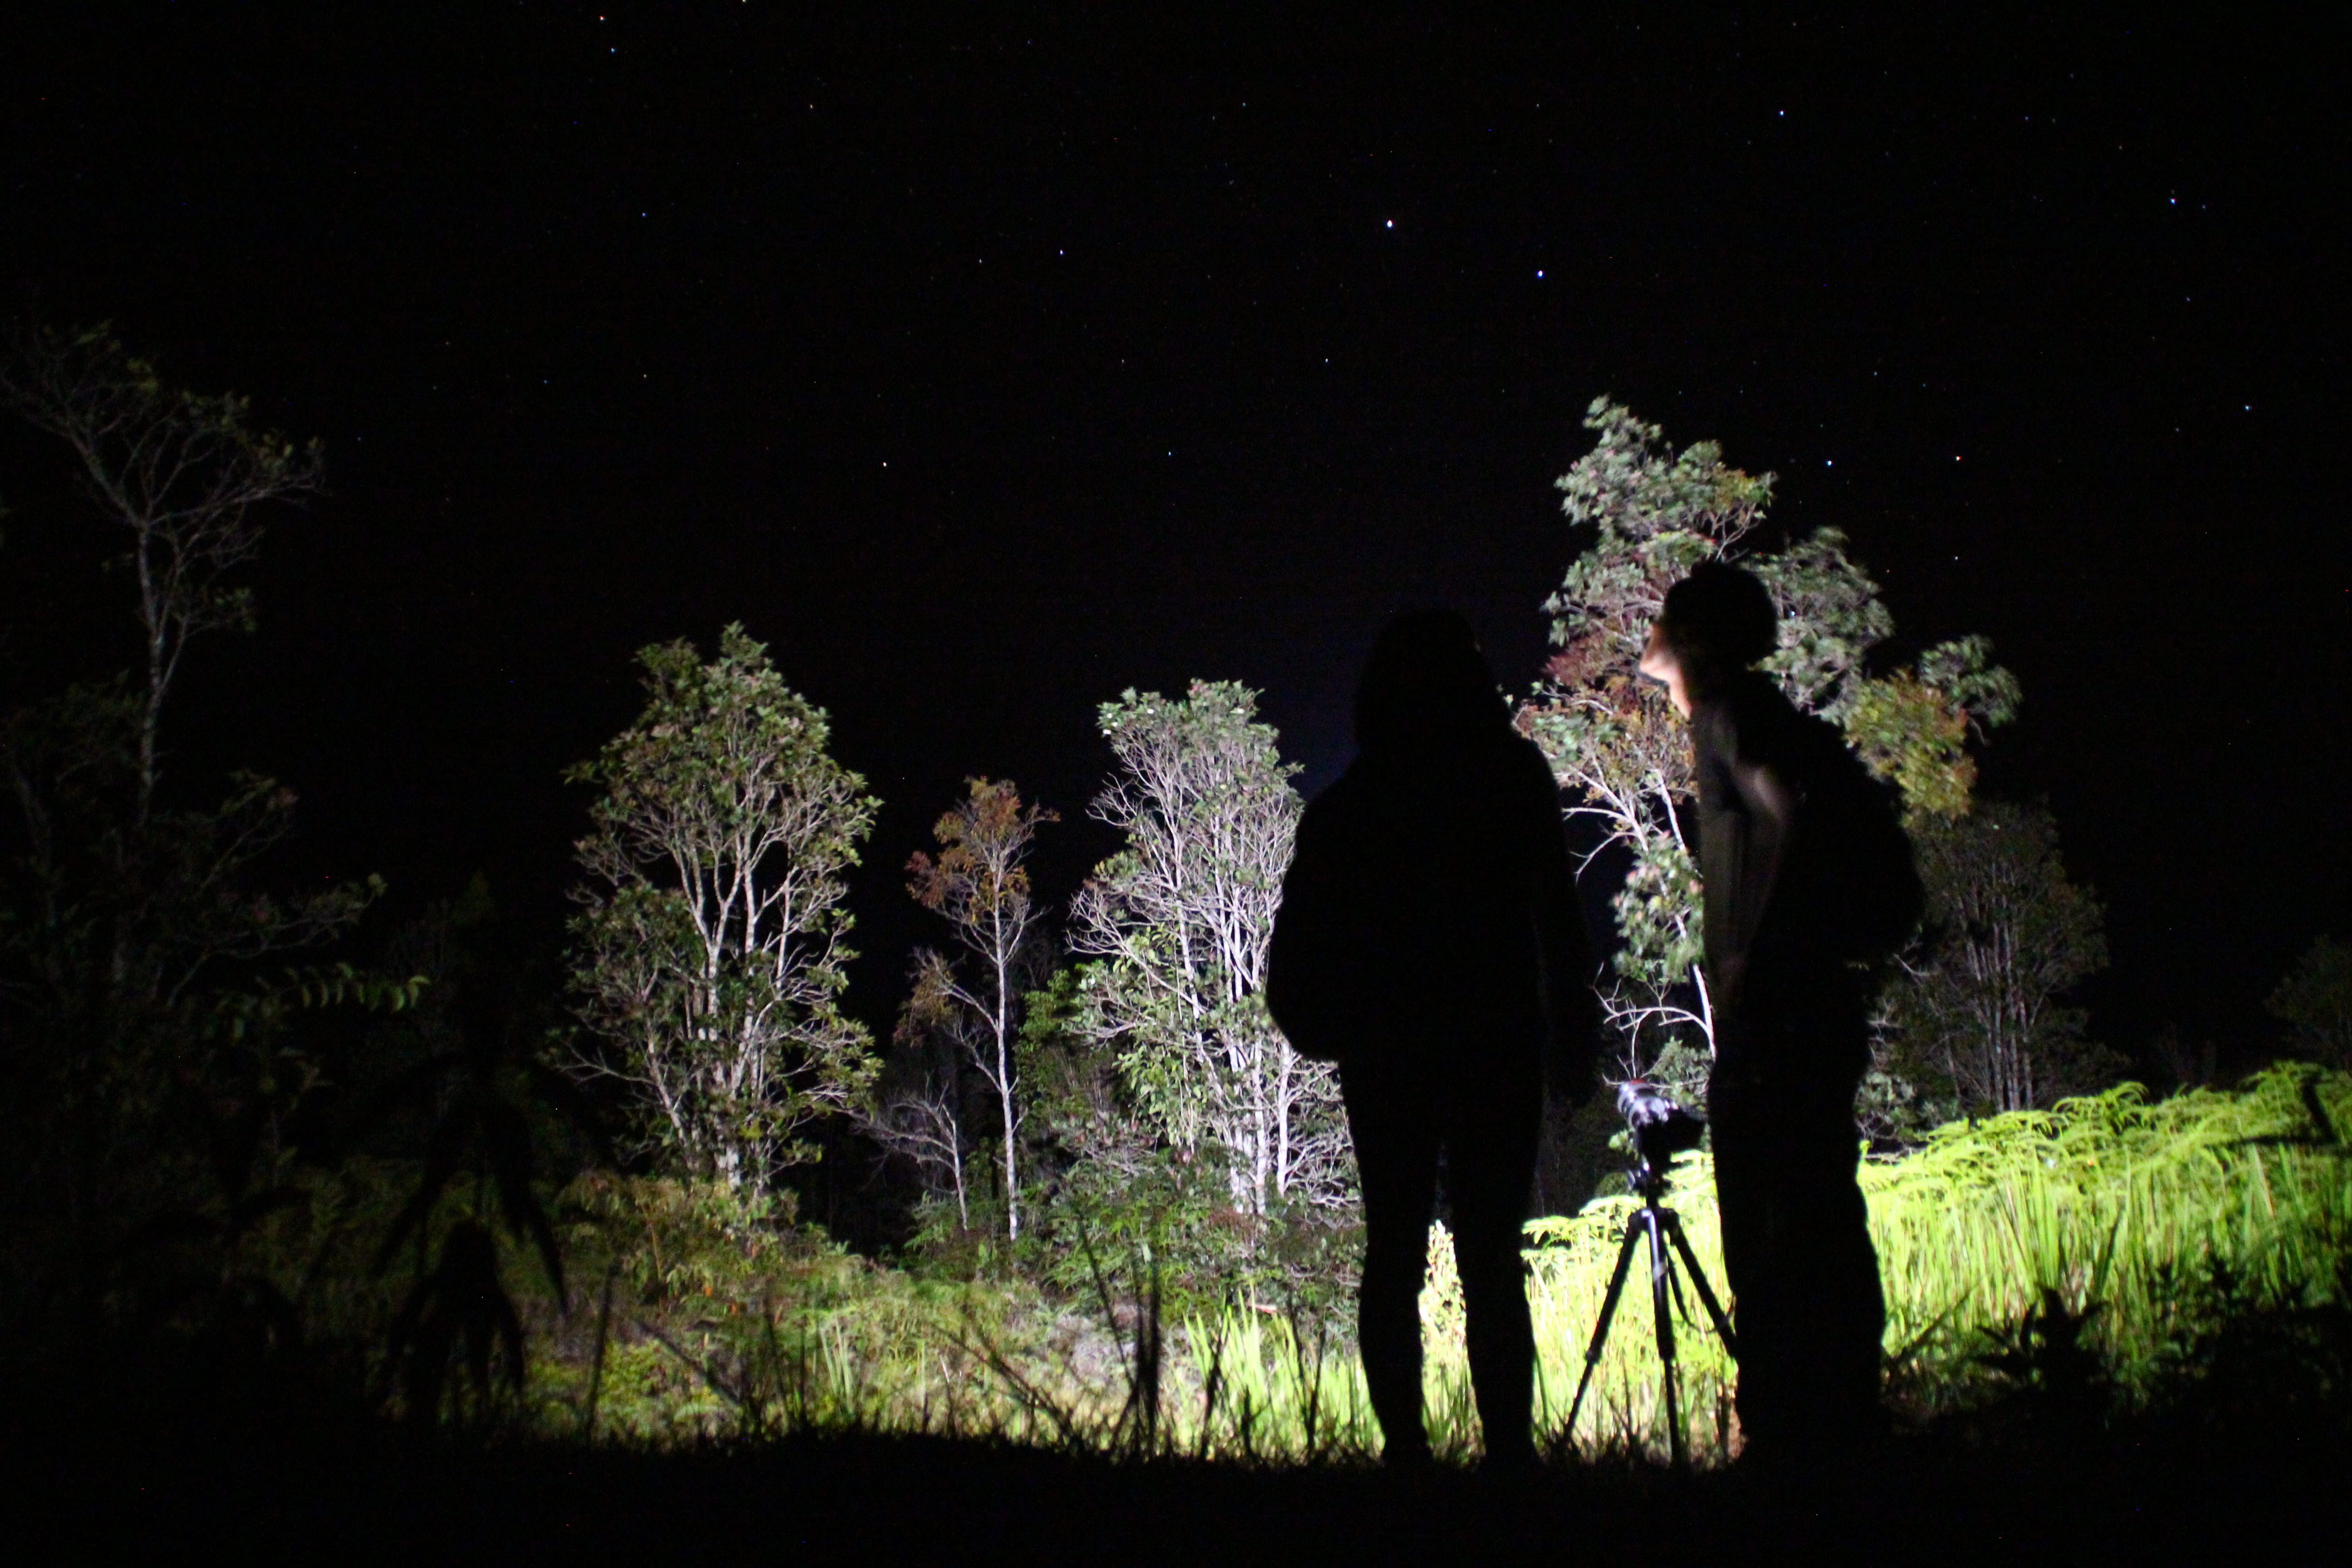
The other very important thing to have is a tripod.
Below: DSLR cameras and any Compact Camera with a ‘Manual’ (M) mode can get the job done.
Nikon compact camera with (M) mode.Canon DSLR CameraCanon Compact Camera with (M) mode.
Once you get into the (M) mode, you can control the shutter speed and aperture size.
The-4-Step-How-To on the Camera:
So, to not make this article very technical, (and just using your regular settings), let’s just start with setting your digital camera to the ‘Manual Mode’ (M).
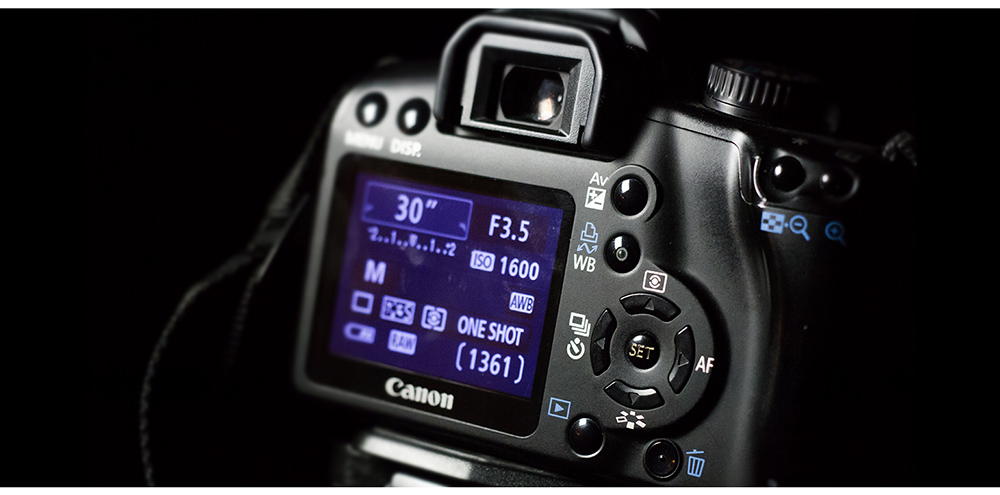
From there, there’s only 4 things you need to set properly first.* 1) Your ISO (set it to between 800 and 1600, or sometimes 3200). 2) Your Shutter Speed – Tv (set it to 30″ – it means 30 seconds exposure). 3) and your aperture size – Av (set it to the biggest – it was f3.5 on my lens). 4) Set your lens focus ring to infinity ( ∞ ).
*Note – This is a starting point. From here onwards, you can toy around with the settings (Shutter Speed + ISO + aperture) after every shot, to get best results.
(M) mode – at 30 second exposure, f3.5 aperture, and ISO1600
Once you’ve adjusted the camera’s settings, it’s time to shoot the scene. Start with something, anything, with the sky as the background. Compose your scene, or just point the camera in a direction you like (because it’s dark, and you can’t really see anything way in the distance).
Note:The camera has to be really still for the 30 seconds. So, having a very sturdy tripod is important.
A tripod is an essential component of astrophotography. Don’t forget to bring one up.
The first shot: The Finger Trigger
Start with using your finger to press and release the shutter. (you don’t have to leave your finger on the shutter button). Wait 30 seconds and have a look at the result.
If you’re not so steady with the hands, you’ll notice that there will be some motion blur in the picture from the movement of your finger on the shutter. Some people can do it well, others not so well. If you’re one of those who can’t keep a slow and steady shutter finger, then here’s a trick.
The second shot: The Timer Shutter A very simple solution – Turn on your timer shutter release (all cameras have a timer shutter release setting – the one we use for group photos). Press the shutter button, let the timer start the countdown, and wait 40 seconds. (10 seconds for timer release, and 30 seconds for shutter exposure). Check the shot.
Horizon Rising
After you’ve taken a picture, repeat the process. With digital cameras, we are no longer limited to the 24 or 36 frames on a Kodak/Fuji celluloid film roll. You also get instant result on the photo you took through the LCD panel. So, if you aren’t happy with your picture, retake the shot – with a different aperture size, and shutter speed or ISO speed setting. So you can keep snapping until you get the shot you like.
Different cameras will respond differently to the settings mentioned, so try the different settings and see the results. If you still don’t like it, use another setting and see what comes out. The more photos you take, the better your odds are of getting better shots.
The Bario night scene on a full moon night.
Photography is more of an art than science, so feel free to experiment and come to your own picture perfect sense. Soon you’ll develop your own preference for a style to your astrophotography. For example, I have developed a preference for shooting the night sky when there’s a bright full moon up in the sky (mid month).
So, start with these simple steps first. Don’t expect to get it right on the first go, and you’re bound to take lots of bad shots along the way. But hopefully, there’s enough information here to help you bravely get started on it. If you find that you enjoy taking night photographs with the stars, you can then consider acquiring one more important piece for the perfect shot – a wireless remote shutter button. 🙂
I use something like this. Was RM100 in 2011, but you can get cheaper ones now.
VERY IMPORTANT TO HAVE:
Now, there’s one very crucial tool to have with you at all times, and without it, you’d be absolutely unable to do all those things above. Headlamps. You’ll need the light, and you’ll need to leave your hands free, because they’ll be doing a lot of work. Headlamps will also help you ‘paint the foreground with light’ (but that’ll be topic for another post).
Experiment and play around with your composition. Here, a hand held light source was used to ‘paint the foreground’. This was also shot ‘Trigger Finger’.
BARIO CONDITIONS: LOCAL KNOWLEDGE.
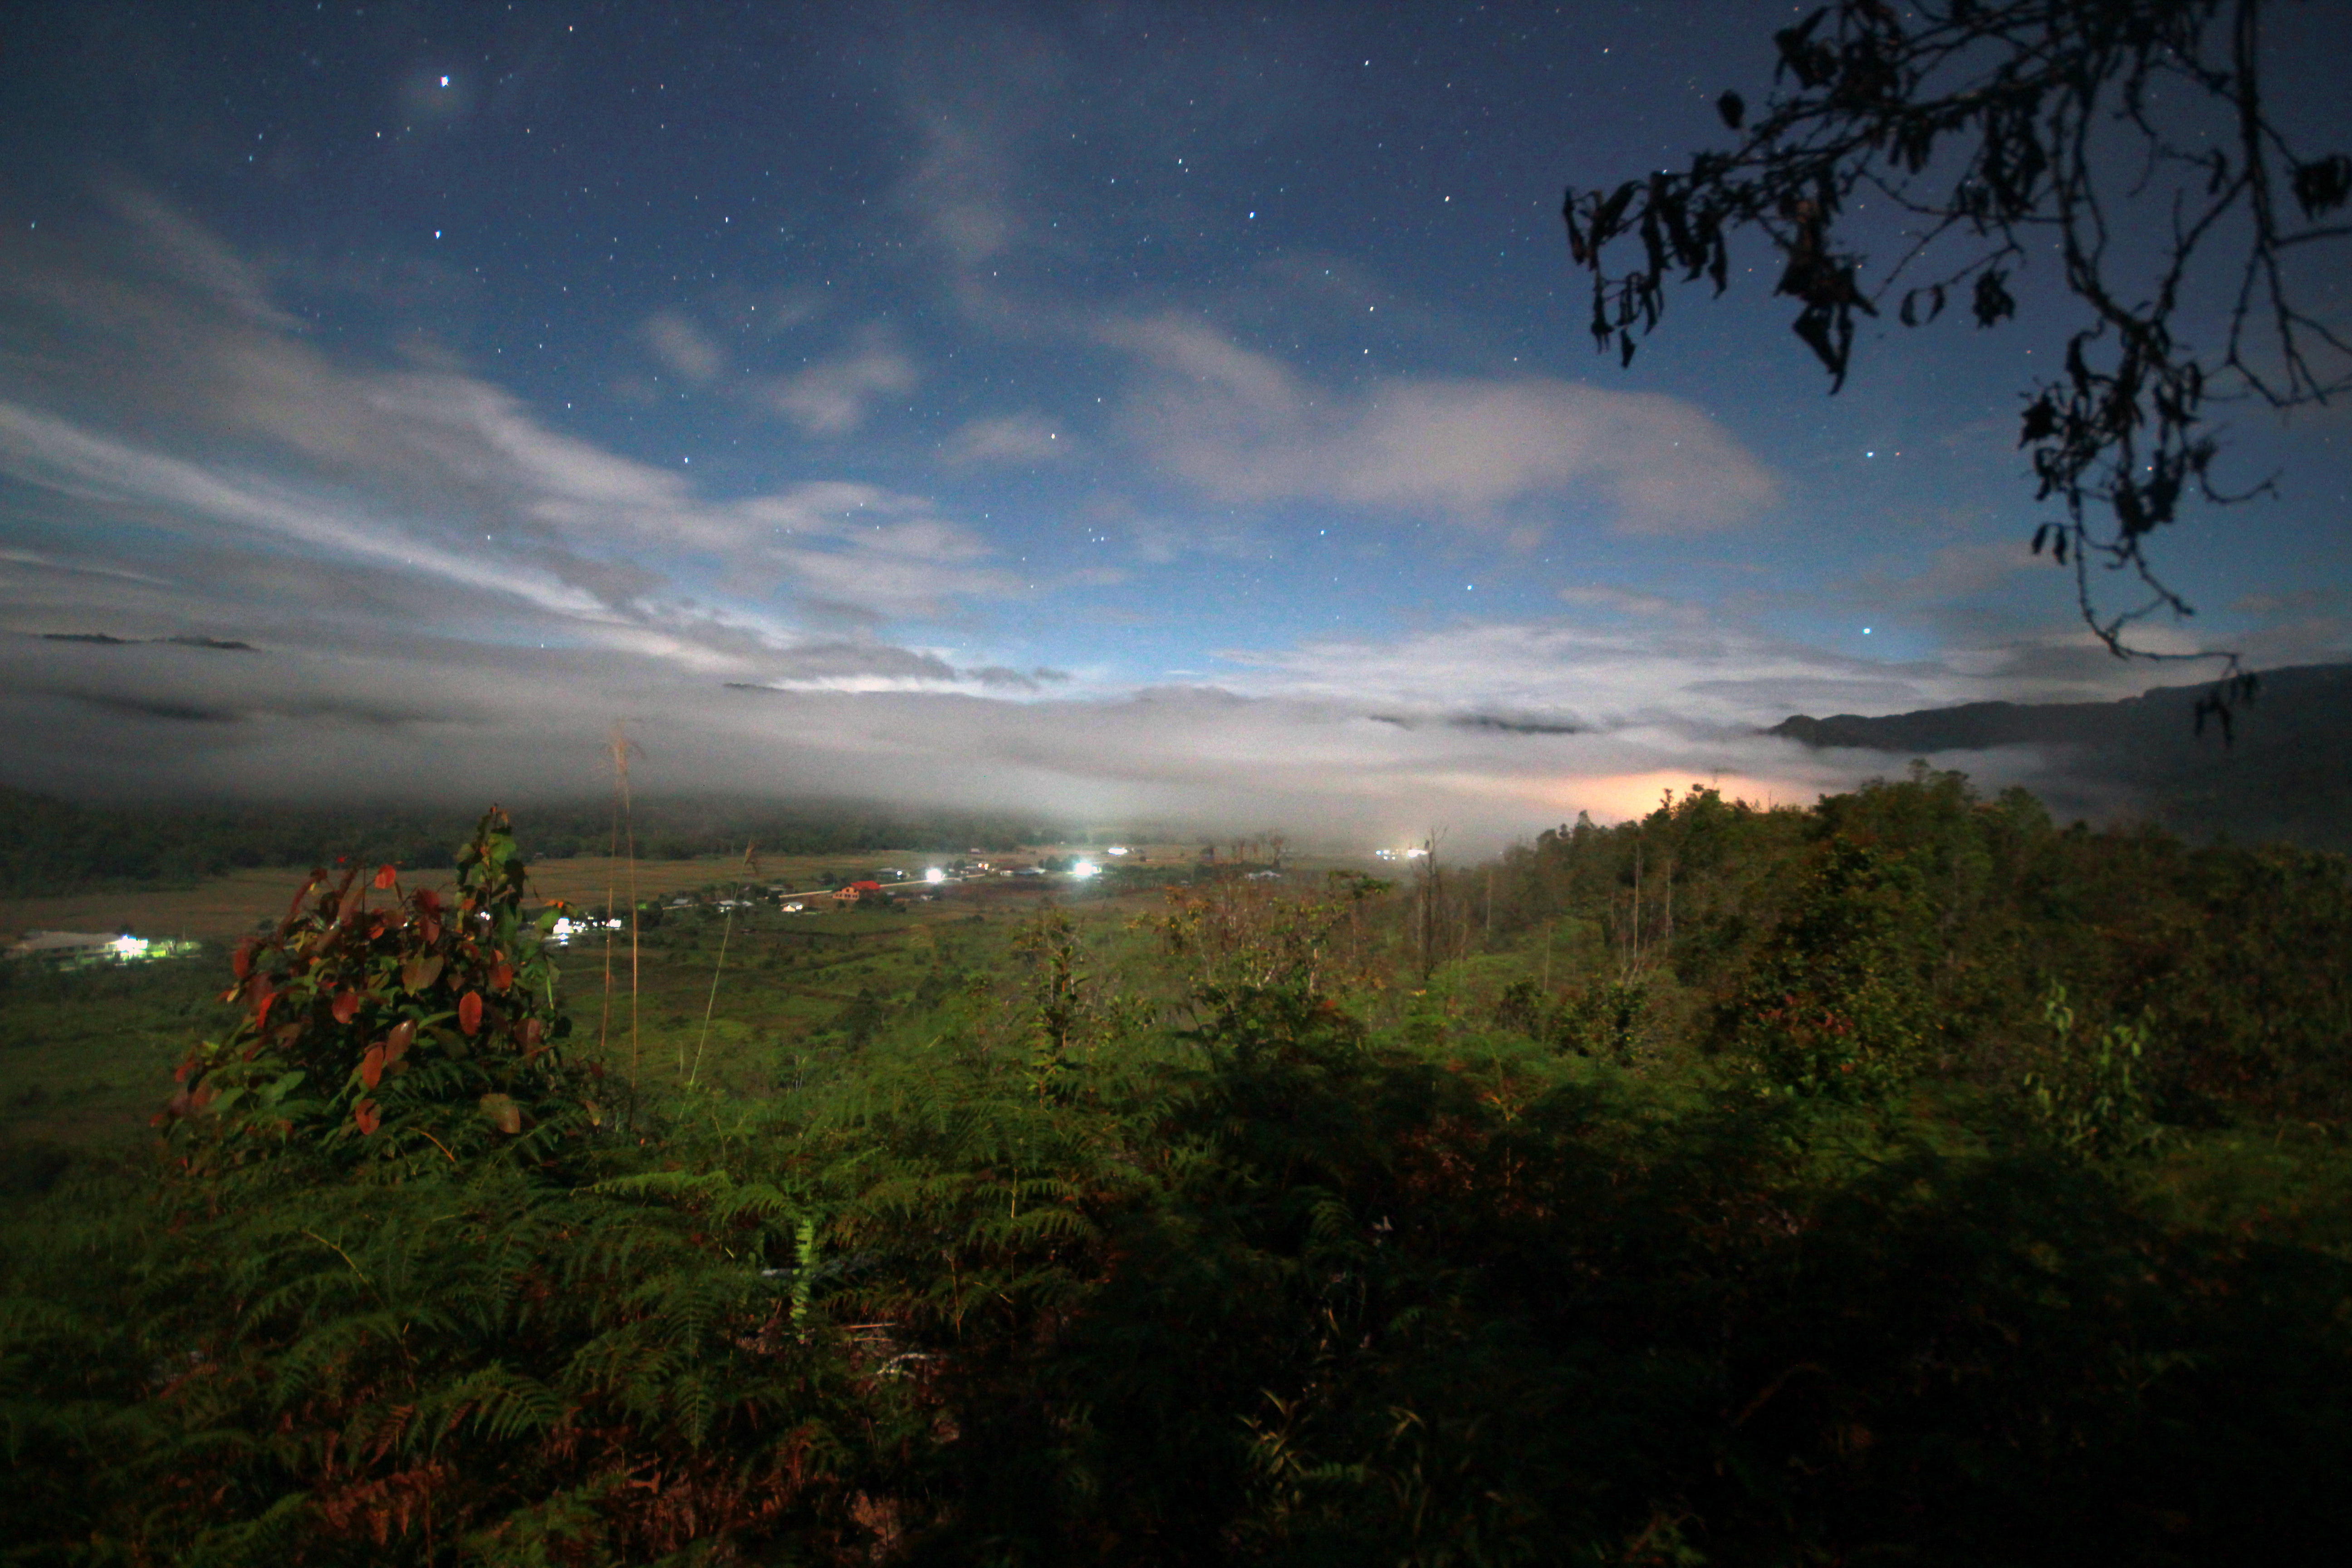
In Bario, depending on what kind of night shot you want to take, here are a few key things to take note of. On a good day, early evening (8mp after dinner) is a good time to be out shooting if you want clear skies. If you go out too late, the mists starts blowing in at about 12am-1am, and you might not be able to get a good shot as the mist blocks your view of the stars and your lens gets misted. So, go out early, and you’ll give yourself plenty of time experiment with your camera.
However, the mist can spectacularly add to a photo if you know how to shoot it. Late in the night, go up the higher hills for a spectacular shot. As the mist fills up the valley below, you’ll see a layer of cloud below, and stars above it. Suggestions are Prayer Mountain, Proposal Hill (aka Panorama Hill), and Korea Hill. These spots have good views over the valley.
Good luck!
*If you’re going up to Bario with a camera, look us up at the Lodge. We’re not quite the pro, but we’ll gladly help you make more use out of your camera on your evenings in Bario.
The viewing point on Proposal Hill (as seen from Labang Longhouse Lodge).